Ashes of the Damned drops you into a Bermuda triangle-like region torn apart by uncontrolled Aether energy and twisted undead creatures. Twisted streets are filled with collapsed, scorched buildings. Smoke fills the air. Echoes of evacuation sirens linger under the roar of the undead. This map blends tight indoor sequences with wide forested outskirts, open lakeside clearings, farmland paths, and a central hub known as Ashwood.
The main quest is defined by steady progression: investigate, escape, choose your path, restore power, and bring advanced systems back online so the region can stabilize. This Black Ops 7 Zombies Ashes of the Damned main quest guide walks through every confirmed step in order, following the exact mission flow players encounter in-game.
Before we continue to the guide, a quick heads-up - on Playhub, you can buy Call of Duty accounts with any of the series’ entries and cosmetics you want unlocked.
Ashes of the Damned Main Quest Walkthrough
STEP 1: Spawn in Janus Towers Plaza
Your Ashes of the Damned main quest walkthrough begins in Janus Towers Plaza, a commercial square lit by burning debris and broken signage. Zombies push down from second-floor walkways, climb over shattered railings, and move through open storefronts. Use the early rounds to prepare for upcoming challenges - collect Essence and salvage.
Do the following steps:
-
Buy a wall weapon of choice
-
Clear zombies while circling the plaza’s outer path
-
Gather salvage from lobbies and ruined kiosks
-
Open the door into the interior hallway leading toward the Server Room
You will see your first mission prompt appear: Investigate the Server Room.
STEP 2: Investigate the Server Room
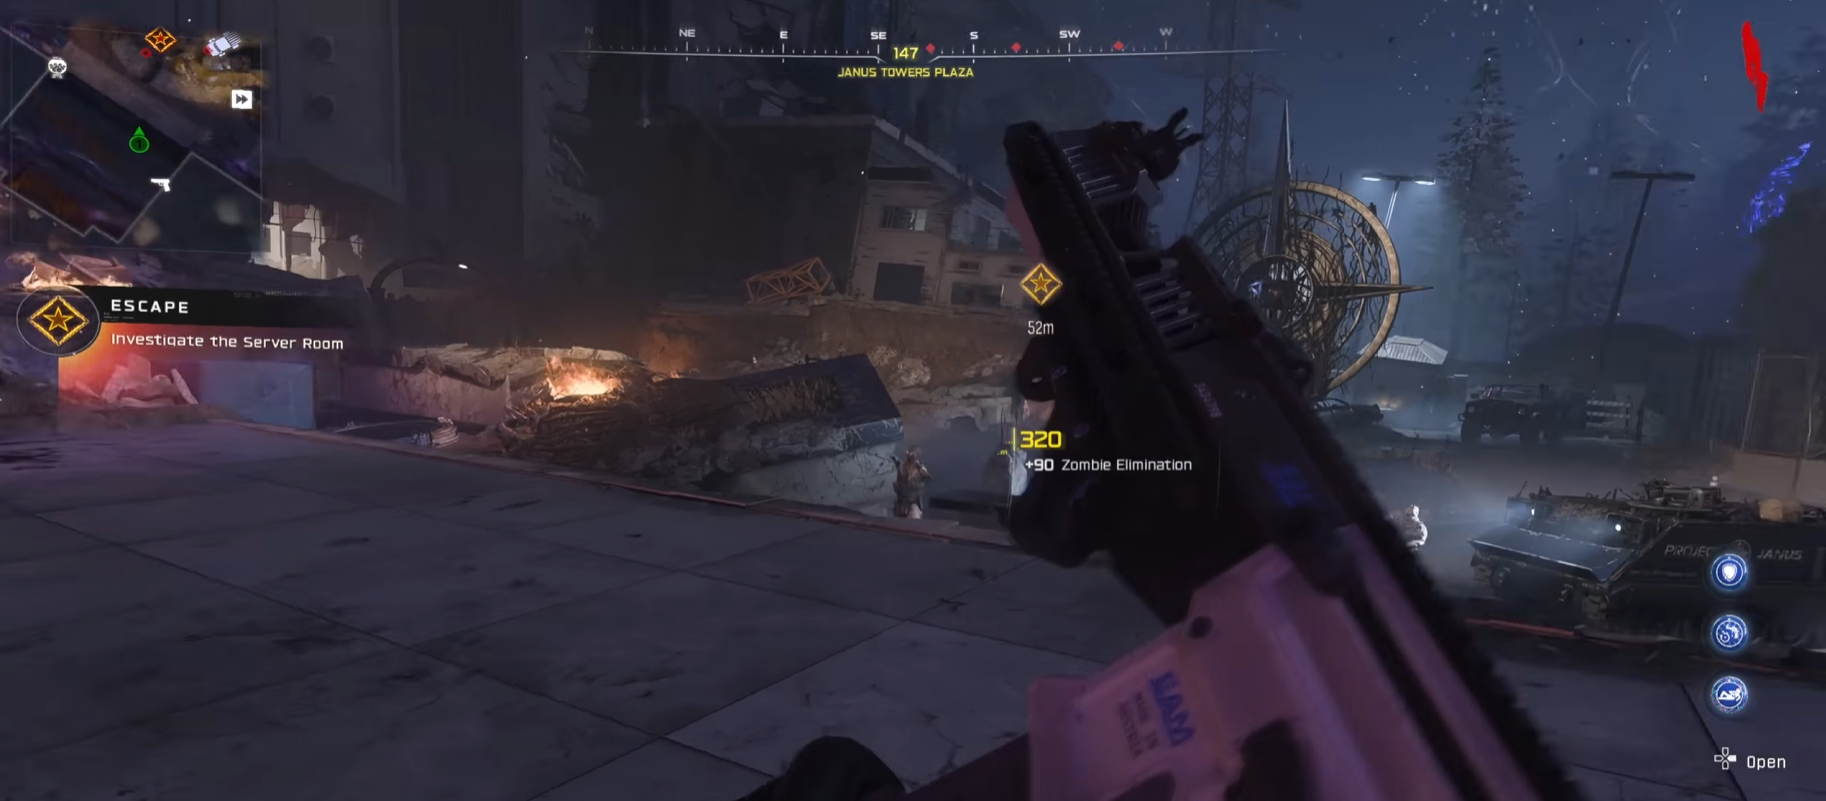
Enter the hallway and follow the markers to reach the Server Room door. Spend Essence to unlock it. Inside, sparks fly off damaged machinery, and the room hums with distorted energy. Move to the back corner and interact with the floor grate. Kick it open - inside, you’ll see the exposed crawl compartment from which T.E.D.D.’s head appears. Grab it as soon as the prompt appears. This item is essential for your Ashes of the Damned walkthrough. It powers the vehicle you need to escape Janus Towers Plaza.
STEP 3: Install T.E.D.D.’s Head on Ol’ Tessie
Exit the Server Room and head to the plaza’s front entrance. You’ll find Ol’ Tessie, a beaten utility truck parked beside the doorway. Interact with the truck to install T.E.D.D.’s head.
The truck powers up instantly. Dialogue triggers, lights flicker on, and the vehicle becomes your mobile route to the outskirts. Zombies will begin to surge into the plaza as the truck prepares to move. Move into the truck’s vicinity. The objective shifts to Escape Janus Plaza. You need to crash Ol’ Tessie through debris and drive along a fixed route out of the district, opening the map's borders.
STEP 4: Choose Your Path – Vandorn Farm or Blackwater Lake
Outside the city center, the route divides into two distinct zones. You must complete one of these two paths to advance - the right route leading to Vandorn Farm and the left route taking us to the Blackwater Lake. Both zones share a similar structure:
-
Reach the region’s pump station
-
Destroy the spores under a time limit
-
Unlock a building nearby
-
Go upstairs
-
Flip the regional power switch
The two paths differ in layout, combat pacing, and zombie pressure, so you’ll have to carefully choose exactly how to complete Ashes of the Damned. Below are both routes in full detail.
Vandorn Farm Route
STEP 4-1: Travel to Vandorn Farm
Choosing the route on the right sends you along a dirt road lined with broken fencing and scorched farm equipment. Once you arrive, exit the truck and prepare for a large open-field fight. The farm is filled with narrow animal pens, old barns, and overgrown crops where zombies emerge aggressively from blind angles.
There, you can encounter your first Black Ops 7 Zombies Easter Egg. In the Vandorn Farm, you can find the Sprayer item either in the Barn upstairs, in the Cellar against the wall, or on the Farmhouse near the main door. Afterwards, you can find Aether Flaura stems around the map, which you can spray to start its growth and launch a defense timer. Defend it from the zombie horde to receive 500 essence and a random piece of equipment.
STEP 4-2: Clear the Fungal Infestation at the Pump
Your first farm objective is located next to the large pump structure beside the barn. The pump is covered in Aether-infused spores. Interact with the pump to begin the timed event.
• You have 30 seconds to destroy all spores on the pump
• Additional spores appear on the sides and upper frame
• Zombies spawn during the timer
Prioritize the spores immediately. Failure resets the event. Once the spores are destroyed, the pump unlocks.
STEP 4-3: Enter the Barn and Reach the Upstairs Switch
Spend Essence to unlock the barn door. Inside, zombies burst from hay piles, rafters, and collapsed beams. Climb the ladder or staircase to reach the upper platform. The regional power switch sits against the far wall. Flip the switch. The objective is completed, and power surges through the region.
STEP 4-4: Return to Ol’ Tessie
Return outside and regroup with Ol’ Tessie. She will now be able to proceed back toward the central hub zone of Ashwood.
Blackwater Lake Route
STEP 4-1: Travel to Blackwater Lake
Choosing the left route sends Ol’ Tessie down a wooded path thick with fog. You’ll crash through wooden barricades before arriving at a quiet cabin dock leading into Blackwater Lake. Visibility is lower here, and zombie spawns rise sharply from the waterline and the surrounding trees.
STEP 4-2: Clear the Fungal Infestation at the Pump

The pump sits beside the wooden cabin, wrapped in glowing fungal growth. Interact with the pump to start the timer:
-
You have 30 seconds to destroy all the spores
-
Some spores sit on the awkward angles near the pipes
-
You should expect zombie pressure from both sides of the lake path
Once all spores are destroyed, the pump stabilizes.
STEP 4-3: Unlock the Cabin and Reach the Upstairs Switch
Spend Essence to open the front door of the lakeside cabin. Inside, zombies appear through broken windows and climb the stairwell. Go upstairs. The regional power switch sits against the interior wall. Flip the switch to energize Blackwater Lake.
STEP 4-4: Return to Ol’ Tessie
Head back to the truck. With the switch flipped, Ol' Tessie can return to the main road and drive toward Ashwood, the next major hub.
STEP 5: Travel to Ashwood
Regardless of the zone you completed, Ol’ Tessie now transports you through a transitional route into Ashwood, a central settlement filled with burned homes, boarded storefronts, and makeshift barricades. This area anchors the next sequence of objectives. As soon as you arrive, expect heavy zombie activity. Your mission updates to Reach the Bridge.
STEP 6: Reach the Bridge
Follow the objective marker to the bridge entrance. The area is partially collapsed, with debris covering the pathway. You must open several blocked paths with Essence. The bridge is an elevated checkpoint notorious for sudden zombie surges. Use the wider walkway to maintain spacing. Once you reach the far end, your next objective appears: Find a Way Across - Use the Zipline.
STEP 7: Take the Zipline
A zipline is mounted across the collapsed portion of the bridge. Interact with it to cross over into the deeper Ashwood district. Zombies will spawn behind you during this moment, so take the zipline as soon as it becomes available. Landing on the far side puts you closer to the next infestation site, allowing us to proceed to the next part of our BO7 Zombies main quest guide..
STEP 8: Clear the Ashwood Infestation
You’ll reach another pump-like structure infected with clusters of Aether spores. This infestation must be cleared to continue power restoration. Start the interaction:
-
Destroy all spores within the time limit
-
Maintain awareness of rooftop and alley spawns
-
Move quickly between the pump faces
Completing this step unlocks the interior routes of Ashwood.
STEP 9: Flip the Ashwood Power Switch
The next objective directs you toward a boarded-up structure in the district. Spend Essence to enter. Inside, fight through tight corridors to reach the staircase. Go upstairs. The final Ashwood regional power switch sits against a wall lined with broken wiring. Flip the switch. The entire Ashwood zone powers up, and Ol’ Tessie becomes available for the next major installation step.
STEP 10: Install the Pack-a-Punch Machine
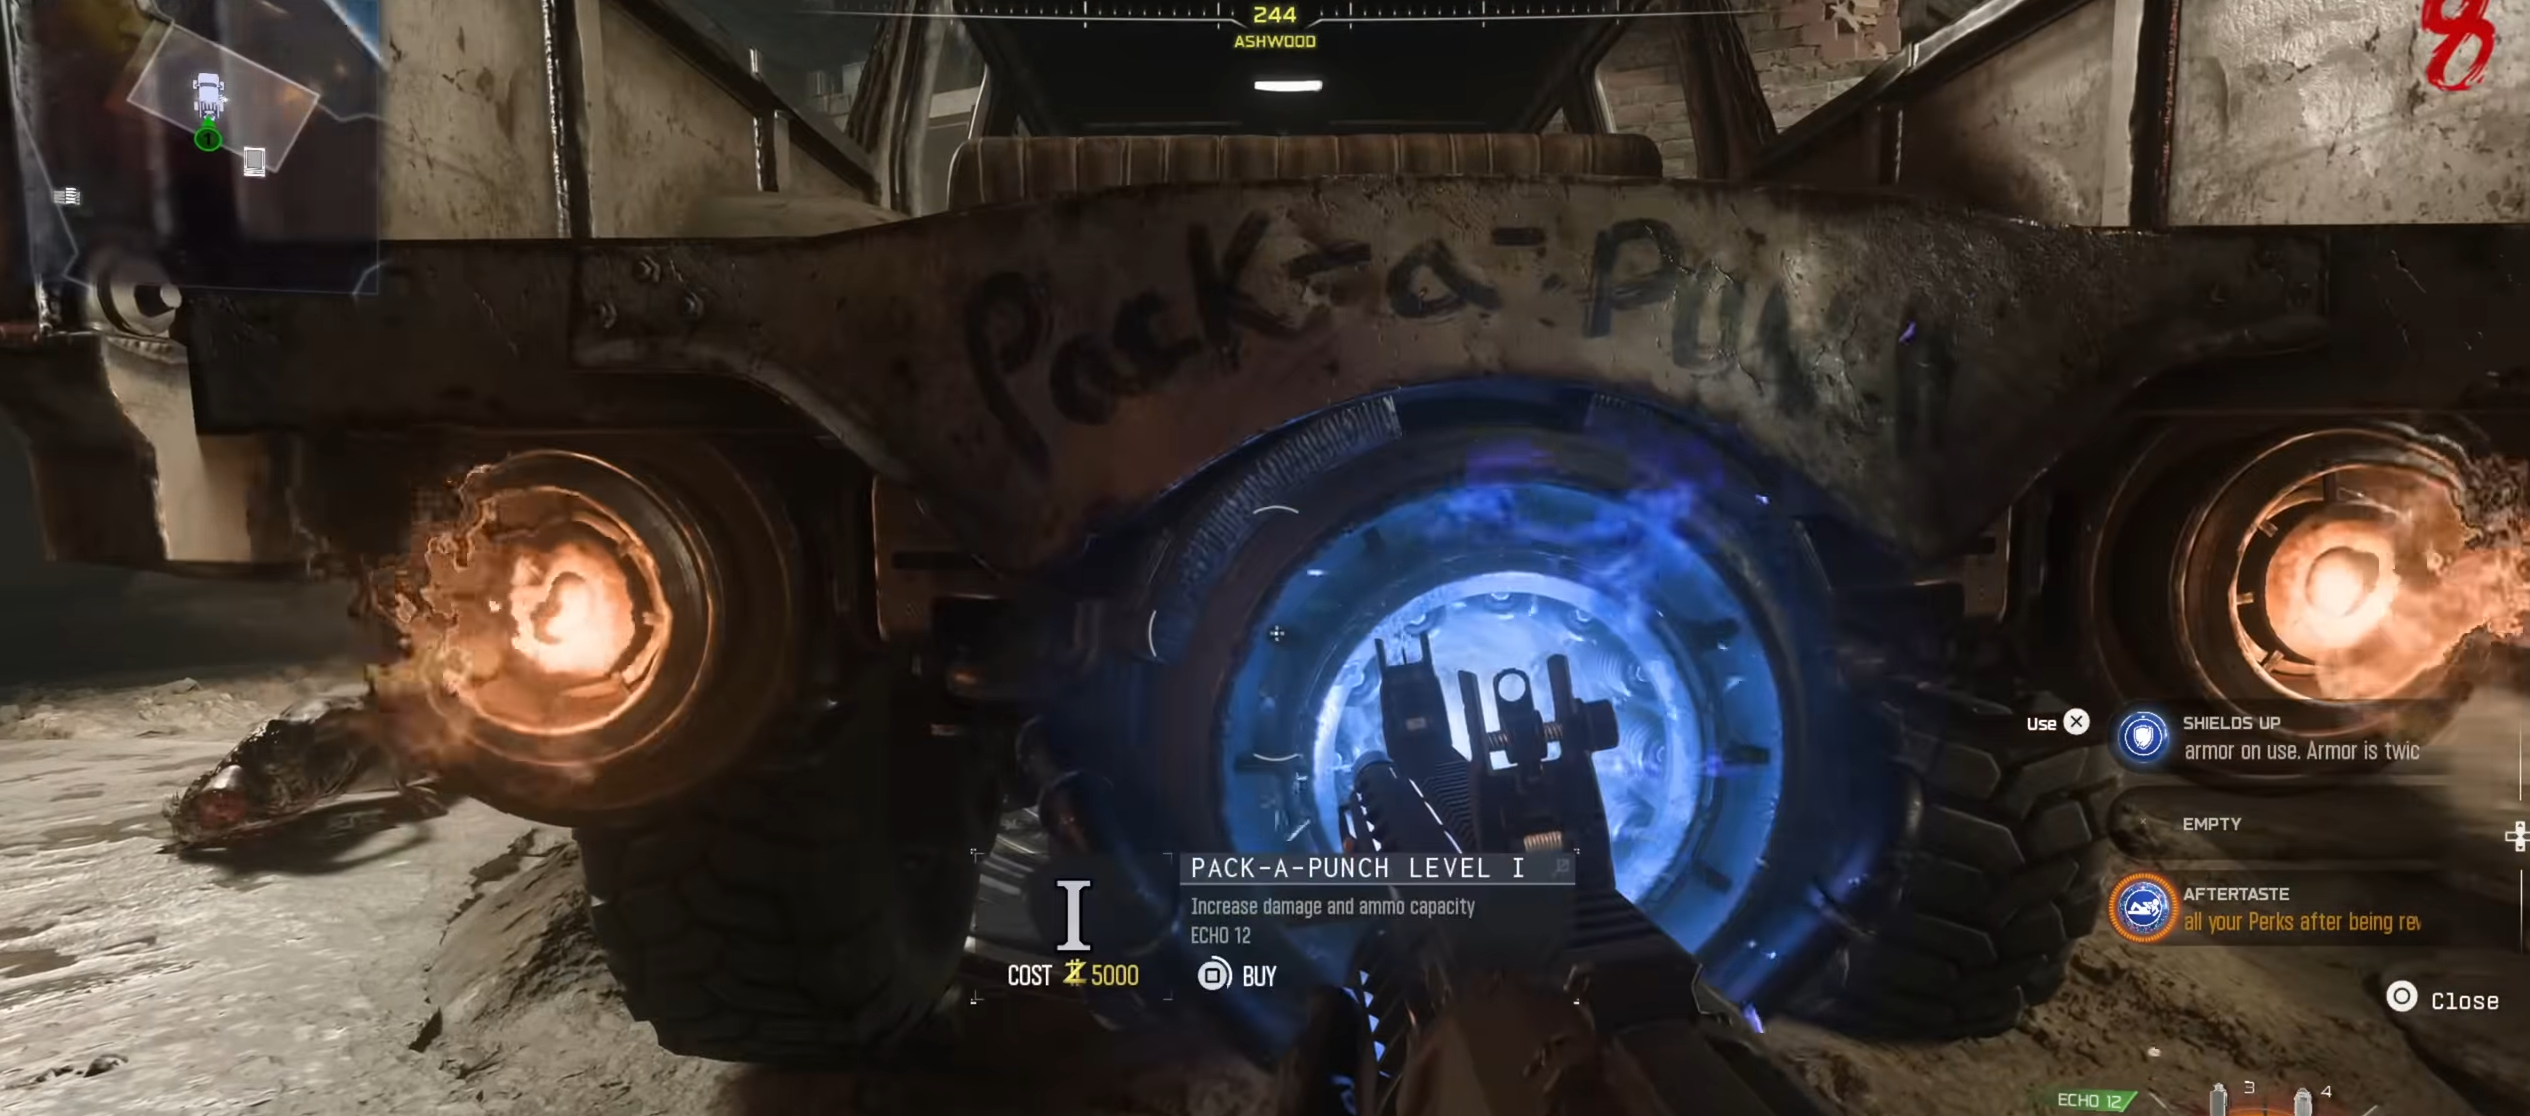
Your last confirmed main-quest objective is to power up one of the map’s most essential systems: Pack-a-Punch. Drive or follow Ol’ Tessie into the garage area. A mounting platform sits inside. Interact to install the Pack-a-Punch system onto the truck’s housing. Once the installation completes, Pack-a-Punch becomes fully active inside the garage area. You now have access to full weapon upgrading for the remainder of the run.
Now let’s condense everything into a quick, handy sheet for reference during your Black Ops 7 Zombies Ashes of the Damned playthrough:
|
Step |
Objective |
Completion |
|---|---|---|
|
1 |
Janus Plaza Start |
Gather Essence, buy a weapon, and move to the Server Room. |
|
2 |
Server Room |
Unlock the door, break the grate, grab T.E.D.D.’s Head. |
|
3 |
Power Ol’ Tessie |
Install T.E.D.D.’s Head on the truck. |
|
4 |
Escape Plaza |
Ride Ol’ Tessie out of Janus Towers. |
|
5 |
Route Choice |
Pick Vandorn Farm (right) or Blackwater Lake (left). |
|
6A |
Vandorn Farm Pump |
Destroy spores under the timer. |
|
7A |
Vandorn Farm Switch |
Unlock the barn, go upstairs, flip the switch. |
|
6B |
Blackwater Pump |
Destroy spores under the timer. |
|
7B |
Blackwater Switch |
Unlock the cabin, go upstairs, flip the switch. |
|
8 |
Reach Ashwood |
Ride Ol’ Tessie into the central hub. |
|
9 |
Bridge |
Clear blockages, fight across. |
|
10 |
Zipline |
Cross into the deeper Ashwood. |
|
11 |
Ashwood Infestation |
Destroy spores under the timer. |
|
12 |
Ashwood Switch |
Enter the building, upstairs, flip the switch. |
|
13 |
Pack-a-Punch |
Drive Ol’ Tessie into the garage and install PaP. |
As always, Zombies tasks are pretty easy with clear and easily obtainable rewards. Using our guide, you’ll get every power-up you need to win in no time.
Since the easter egg completion has not yet been solved by the community, our Black Ops 7 Zombies Easter Egg guide will be updated as new details are revealed.
Conclusion
This full walkthrough covers the confirmed progression from Janus Towers Plaza all the way through Vandorn Farm or Blackwater Lake, into Ashwood, across the bridge, through the zipline, past the infestation zones, and into the final Ashwood power switch and Pack-a-Punch installation. When the puzzle is done, we’ll expand the article with the BO7 Ashes of the Damned Wonder Weapon guide.
Ashes of the Damned blends intense movement, tight encounters, environmental hazards, and region-based tasks into a fast, heavy Zombies experience. Completing these steps unlocks the map’s full functionality and gives you the tools you need to continue deeper into the run with properly upgraded gear, full mobility, and restored infrastructure.
