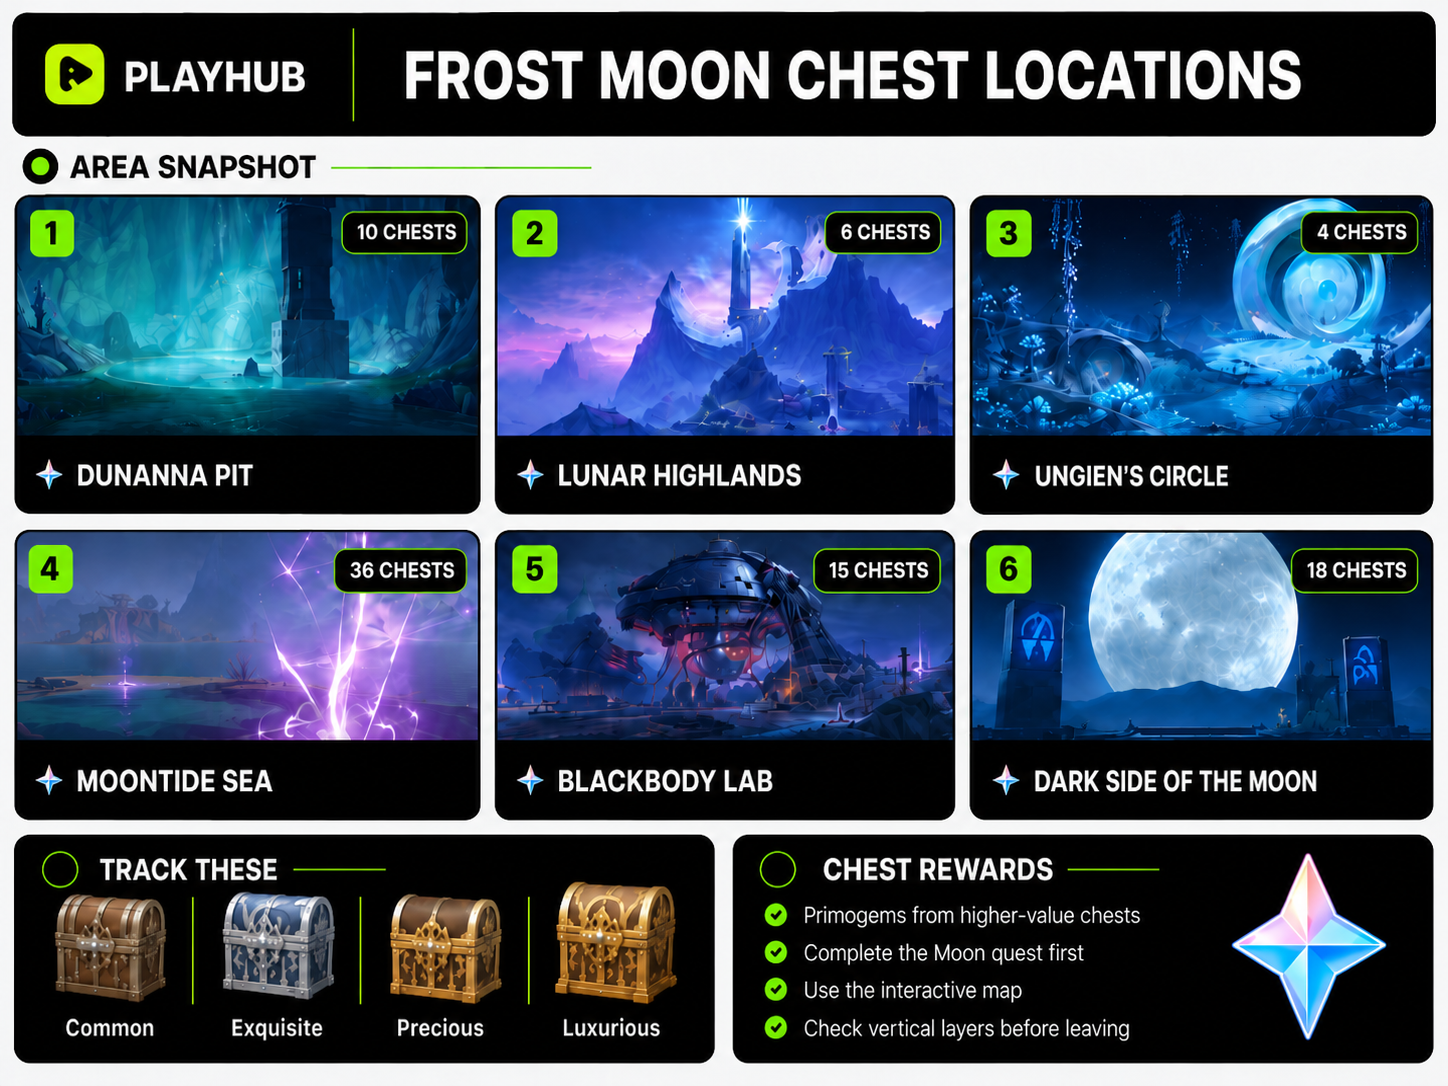
Frost Moon Chest Locations in Genshin Impact TL;DR
-
Dunanna Pit has the shortest chest route and a good place to start after the Moon quest.
-
Lunar Highlands is one of the main Frost Moon chest zones, with vertical routes, gravity movement, and clumped chest clusters.
-
Moontide Sea has the largest confirmed route here, including Save Kuuhenki steps, puzzle chains, a robot backtrack, and a Shrine of Depth.
-
Curtain-Form Blackbody Containment Lab is a southern Moontide Sea subarea with its own chest route.
-
Dark Side of the Moon has grouped and story-related rewards, so clear it after progressing the main quest.
Genshin’s roster is huge, and waiting for rerun banners to assemble your dream team could take you years. Instead, you can buy Genshin Impact accounts straight away on Playhub. You can get accs with pre-built characters, characters with max constellations, and more.
Frost Moon Chest Locations Map
I’m splitting Frost Moon into its actual named map areas and subareas. Beware, though, once you go through the entire list, you won’t have 100% exploration since Lunocolouses are also a part of that progression.
If you’re looking for 100% in all areas of the new zone, I think that the best way to clear Frost Moon is to work in chunks. I’d start with the smaller cave-ish areas, then move into the bigger open zones. Keep the article open, mark every chest you collect, and just get every chest you see. Before starting, make sure you have the Luna Treasure Compass - unlocked at Nod-Krai Reputation Level 3, it makes exploration so much easier.
Dunanna Pit Chest Locations
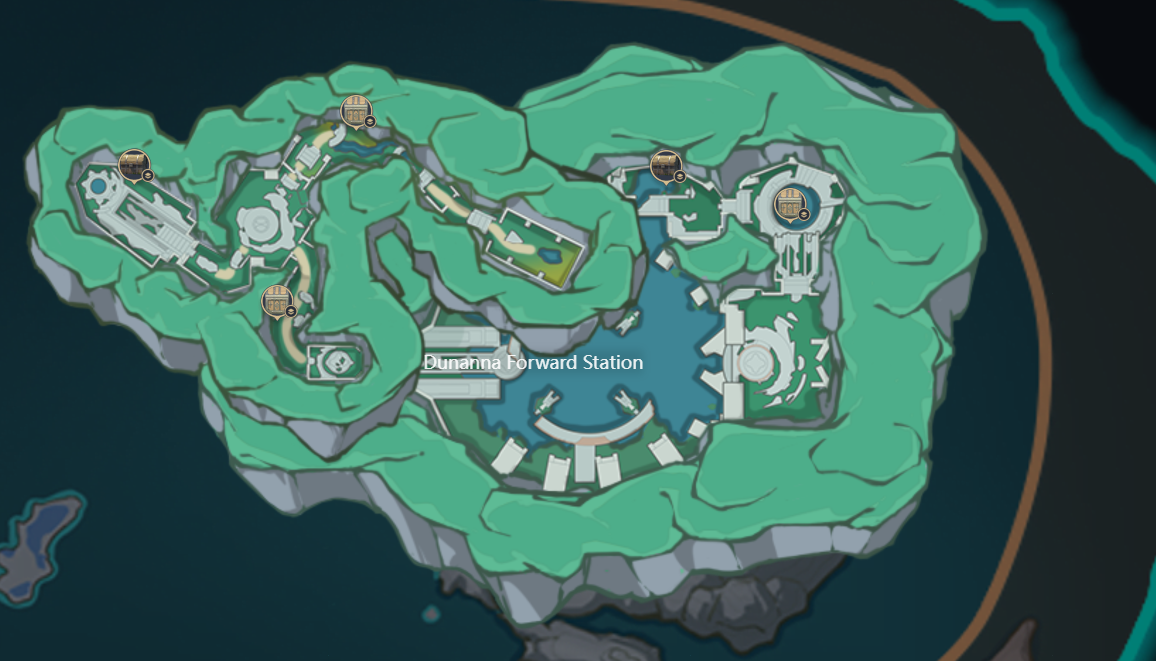
Dunanna Pit feels like the warm-up starting zone for the rest of Frost Moon. It is smaller, chests are easier to spot, and less visually cluttered than Moontide Sea. As for any other zone, really, I recommend clearing Dunanna Pit after finishing the main Moon quest chain. This rule stayed throughout the game’s patch history - you always open up some zones and mechanics by completing the questline.
|
# |
Chest Type |
How to Get |
|---|---|---|
|
1 |
Exquisite Chest |
Complete the Frost Moon quest first, then follow the opening Dunanna Pit route to the first chest marker. |
|
2 |
Exquisite Chest |
Continue along the early route after the first Lunoculus and viewpoint section - it’ll be right there. |
|
3 |
Precious Chest |
Found in a grouped reward section with a Common Chest - locked behind a simple puzzle near the questline route. |
|
4 |
Common Chest |
Found next to the Precious Chest in the same grouped reward. |
|
5 |
Common Chest |
Found near the route section that also contains a Lunoculus. Check the nearby side path. |
|
6 |
Exquisite Chest |
Follow the main Dunanna Pit route and you’ll see a chest marker. |
|
7 |
Common Chest |
Found near another Lunoculus section. Check the lower or side layer before leaving. |
|
8 |
Exquisite Chest |
Found in the late Dunanna Pit route before the final Luxurious Chest path. |
|
9 |
Precious Chest |
Found together with the late Exquisite Chest and Lunoculus section. |
|
10 |
Luxurious Chest |
Final major Dunanna Pit reward. Finish the previous route steps first. |
Once the table route is done, do one last pass around the edges and lower paths before moving on. Dunanna Pit is compact, but compact Genshin areas are usually where one chest hides behind a rock, a slope, or a camera angle that feels legally questionable.
Lunar Highlands Chest Locations
Lunar Highlands is where Frost Moon starts feeling like a classic open-world exploration zone. Here, you’re dealing with height changes, gravity-style movement, raised paths, and chest markers that can sit above or below where you would expect them to be.
|
# |
Chest Type |
How to Get |
|---|---|---|
|
1 |
Common Chest |
Check the marked Lunar Highlands chest pin and clear the nearby open-world objective. |
|
2 |
Common Chest |
Follow the Lunar Highlands route and check the next marked chest location near the main path. |
|
3 |
Exquisite Chest |
Clear the nearby puzzle, enemy lock, or time trial attached to the marker. |
|
4 |
Exquisite Chest |
Check the elevated route or gravity path near the marked chest location. |
|
5 |
Precious Chest |
Clear the stronger local objective or multi-step puzzle tied to the chest marker. |
|
6 |
Luxurious Chest |
Save for after nearby mechanics or quest progress if the chest is locked. |
The design is pretty slick in the new areas - even when the chest itself is not directly tied to any objectives, the game often uses the same pathing to pull you towards another. So you naturally move from chest to chest and get that completion % up.
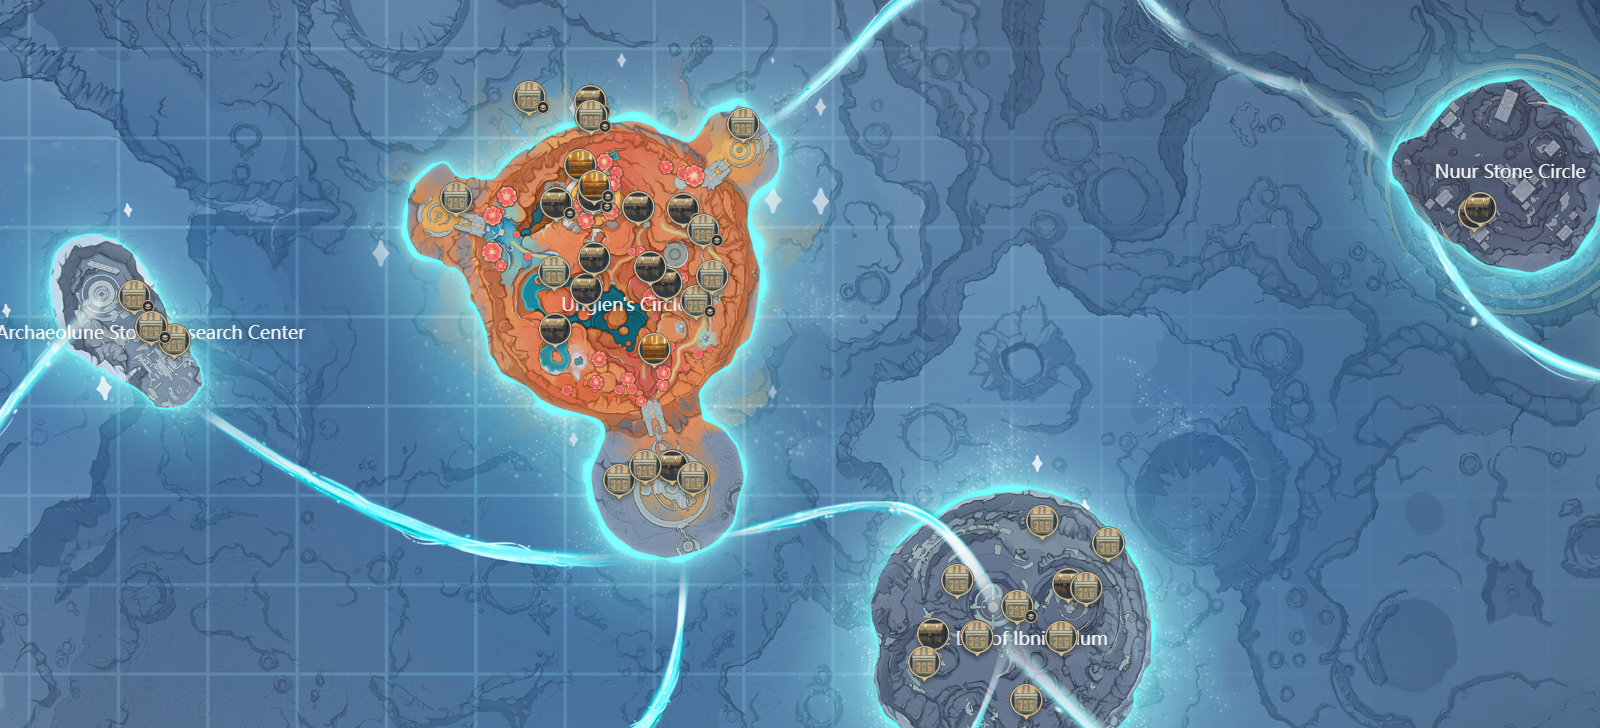
Ungien’s Circle Chest Locations
Ungien’s Circle has a completely different feel from the more open Lunar Highlands. It is more enclosed. When I clear places like this, I usually slow down and look for anything that feels like a dead end, sealed path, enemy guard point, or suspiciously deliberate little clearing. Those are the exact places where chests usually are.
|
# |
Chest Type |
How to Get |
|---|---|---|
|
1 |
Common Chest |
Check the marked chest location around Ungien’s Circle and clear the nearby objective. |
|
2 |
Exquisite Chest |
Complete the local puzzle or combat marker connected to the chest. |
|
3 |
Precious Chest |
Clear the stronger chest objective or sealed marker in the area. |
|
4 |
Luxurious Chest |
Check whether the marker is tied to quest progress, seals, or a larger puzzle route. |
Once you finish the chest table, keep this area in mind for Frost Moon Seal cleanup. Hidden Troves in this area are worth clearing too, so you’d probably want to come back and get them.
Moontide Sea Chest Locations
Moontide Sea is the big one. It has the most diverse chest lineup - you get grouped rewards, Kuuhenki steps, a Shrine of Depth, a three-part puzzle chain, and some chests locked behind the story progression. It also has that wide coastal layout where everything looks open, but somehow the route still keeps sending you into side areas with loot.
|
# |
Chest Type |
How to Get |
|
1 |
Exquisite Chest |
Start the Moontide Sea route after completing the Frost Moon quest and clear the first chest marker near the opening path. |
|
2 |
Common Chest |
Found shortly after the first Lunoculus and viewpoint route. Check the nearby side path. |
|
3 |
Exquisite Chest |
First chest in a two-Exquisite group. Clear the local marker or objective. |
|
4 |
Exquisite Chest |
Second chest in the same two-Exquisite group. |
|
5 |
Precious Chest |
Found in a grouped reward section. Clear the main objective to unlock it. |
|
6 |
Exquisite Chest |
Continue along the main route after the Precious Chest section. |
|
7 |
Common Chest |
Save Kuuhenki 1/3 objective. Help the Kuuhenki to unlock the chest. |
|
8 |
Common Chest |
Found after the first Kuuhenki rescue step. |
|
9 |
Common Chest |
Found after the Beneath the Lunar Sea quest route begins. |
|
10 |
Common Chest |
Continue the same Moontide Sea route and clear the next Common Chest marker. |
|
11 |
Common Chest |
Found near a Lunoculus section. Check the nearby side route. |
|
12 |
Exquisite Chest |
Found after the next Lunoculus route. Clear the local puzzle or enemy marker. |
|
13 |
Common Chest |
Found later in the route before the second Kuuhenki rescue step. |
|
14 |
Exquisite Chest |
Save Kuuhenki 3/3 objective. Complete the third Kuuhenki rescue step. |
|
15 |
Exquisite Chest |
First chest in a three-Exquisite group. |
|
16 |
Exquisite Chest |
Second chest in the same three-Exquisite group. |
|
17 |
Exquisite Chest |
Third chest in the same three-Exquisite group. |
|
18 |
Precious Chest |
Found after the three-Exquisite group. |
|
19 |
Luxurious Chest |
Story-related chest. Progress the required story route before claiming it. |
|
20 |
Exquisite Chest |
Found after the story-related Luxurious Chest route. |
|
21 |
Exquisite Chest |
Found together with a Common Chest in the next grouped section. |
|
22 |
Common Chest |
Found in the same grouped section as the Exquisite Chest. |
|
23 |
Exquisite Chest |
Push the little guy out to unlock the chest. |
|
24 |
Exquisite Chest |
Follow the route after the “little guy” objective. |
|
25 |
Common Chest |
Found after the previous Exquisite Chest. |
|
26 |
Luxurious Chest |
Open the Shrine of Depth in Moontide Sea. |
|
27 |
Exquisite Chest |
Complete Puzzle 1/3. |
|
28 |
Exquisite Chest |
Complete Puzzle 2/3. |
|
29 |
Exquisite Chest |
Complete Puzzle 3/3. |
|
30 |
Common Chest |
Found after the three-part puzzle route. |
|
31 |
Exquisite Chest |
Backtrack to help the robot, then complete the robot puzzle. |
|
32 |
Luxurious Chest |
Found in the grouped reward section after the robot puzzle route. |
|
33 |
Precious Chest |
Found in the same grouped reward section as the Luxurious Chest. |
|
34 |
Precious Chest |
Found in the final grouped reward section. |
|
35 |
Common Chest |
Found in the same final grouped reward section as the Precious Chest. |
|
36 |
Common Chest |
Second Common Chest in the final grouped reward section. |
Backtracking is almost unavoidable in this area - Moontide Sea has too many hidden chests that are easy to miss on the first clear. Just clear everything you see and move from chest to chest at first - the worst thing you can do here is stop midway and get sidetracked by some complicated chest locked behind a hard puzzle
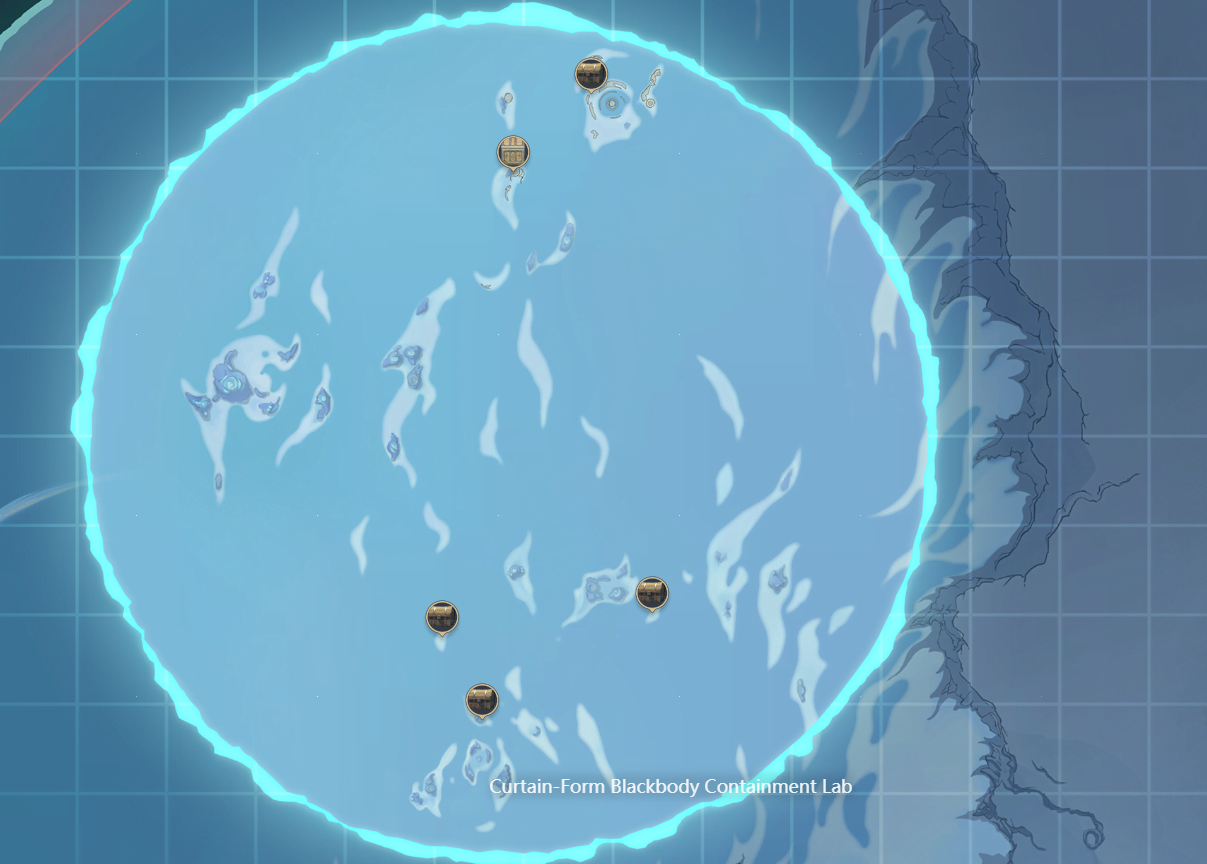
Curtain-Form Blackbody Containment Lab Chest Locations
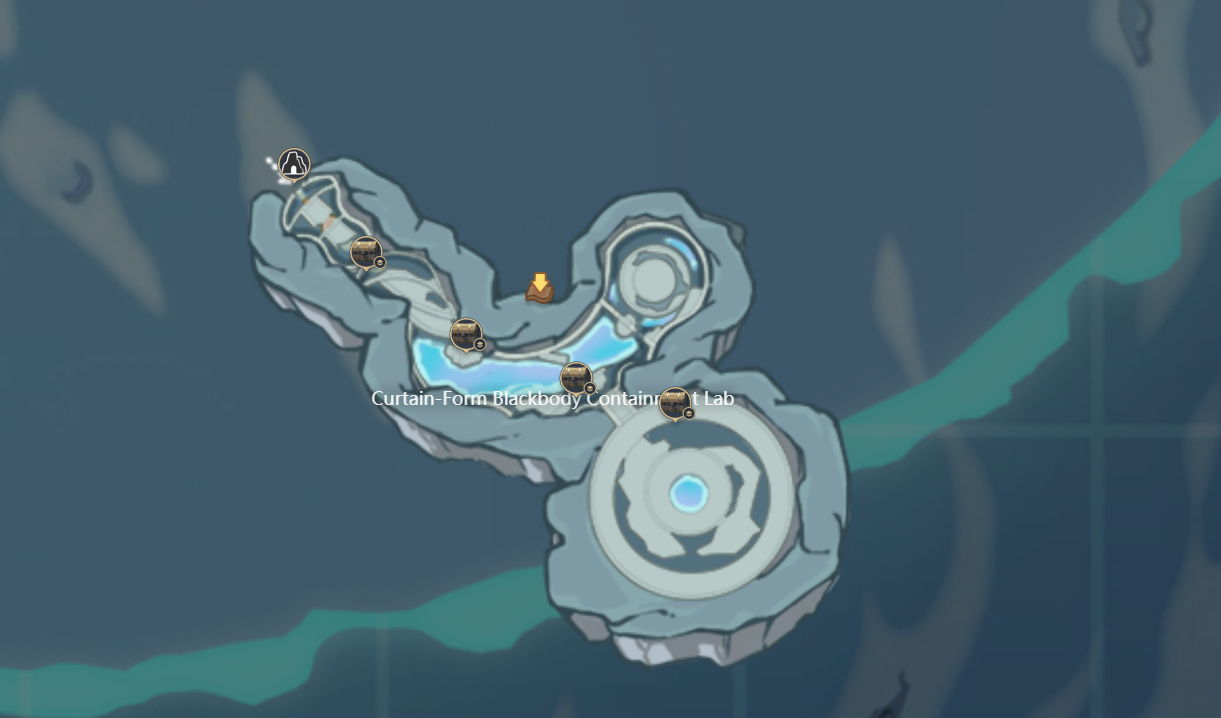
Curtain-Form Blackbody Containment Lab is the part of Moontide Sea that feels least like usual open-world exploration. The area is tight, more mechanical-themed, and easier to misread than the open shoreline we’ve covered before.
|
# |
Chest Type |
How to Get |
|---|---|---|
|
1 |
Common Chest |
Check the marked lab-side chest pin and clear the nearby enemy or open-world objective. |
|
2 |
Common Chest |
Follow the southern lab route and check the next Common Chest marker. |
|
3 |
Common Chest |
Search the lower or side path around the containment lab marker. |
|
4 |
Common Chest |
Clear the next non-puzzle chest marker in the lab area. |
|
5 |
Common Chest |
Check around structures, platforms, or side corridors near the lab route. |
|
6 |
Common Chest |
Follow the map marker and clear the local unlock condition if the chest is sealed. |
|
7 |
Common Chest |
Check the nearby route edge before moving deeper into the lab side. |
|
8 |
Common Chest |
Clear the marked chest location outside or around the lab structure. |
|
9 |
Common Chest |
Check the side route near the southern Moontide Sea lab area. |
|
10 |
Common Chest |
Final Common Chest in the lab’s non-puzzle route. |
|
11 |
Exquisite Chest |
Clear the marked Exquisite Chest objective near the containment lab. |
|
12 |
Exquisite Chest |
Complete the local combat or mechanism condition attached to the marker. |
|
13 |
Exquisite Chest |
Follow the marker route and clear the final Exquisite Chest in the subarea. |
|
14 |
Precious Chest |
Clear the stronger non-puzzle objective in the lab route. |
|
15 |
Luxurious Chest |
Major lab-side reward. |
It is not a huge section of the map, but it is exactly the kind of place where one missing Common Chest becomes deeply irritating and ruins your exploration completion.
Dark Side of the Moon Chest Locations
Dark Side of the Moon does not have “I’ll just quickly clear this” energy. The route is more layered than it first appears, and several rewards are tied to story moments or grouped chest pickups. I would not come here before finishing the Moon quest unless you enjoy staring at things you cannot unlock yet.
|
# |
Chest Type |
How to Get |
|---|---|---|
|
1 |
Precious Chest |
Found in the opening grouped reward section after the first viewpoint. Clear the nearby objective or encounter. |
|
2 |
Common Chest |
Found in the same grouped reward section as the opening Precious Chest. |
|
3 |
Exquisite Chest |
Found in the same grouped reward section as the opening Precious and Common Chests. |
|
4 |
Common Chest |
First Common Chest in a two-Common group after the early route section. |
|
5 |
Common Chest |
Second Common Chest in the same two-Common group. |
|
6 |
Exquisite Chest |
Found near a Lunoculus section. Clear the nearby marker before moving on. |
|
7 |
Precious Chest |
Story-related grouped reward. Progress the required story route first. |
|
8 |
Exquisite Chest |
Story-related grouped reward found with the Precious Chest. |
|
9 |
Common Chest |
Story-related grouped reward found with the Precious and Exquisite Chests. |
|
10 |
Common Chest |
Found after the next viewpoint and Lunoculus section. |
|
11 |
Common Chest |
Interact with the story box to spawn or unlock this chest. |
|
12 |
Common Chest |
Found in the following grouped route section. |
|
13 |
Common Chest |
Continue the route and clear the next Common Chest marker. |
|
14 |
Exquisite Chest |
Found after the mid-route Common Chest section. |
|
15 |
Common Chest |
Found near a Lunoculus section. |
|
16 |
Common Chest |
Found near the next Lunoculus route. Check the nearby side path. |
|
17 |
Common Chest |
Final Common Chest before the Luxurious Chest route. |
|
18 |
Luxurious Chest |
Final major Dark Side of the Moon chest in this route. Complete the preceding route steps first. |
After the final Luxurious Chest, I’d still run one extra check around the nearby pathing. Dark Side of the Moon is not the longest Frost Moon section, but it is one of the easiest places to miss a chest because the route keeps stacking rewards near story beats, Lunoculus, and small interaction points.
Kuuhenki Hidden Troves and Frost Moon Seals
Kuuhenki Hidden Troves are not normal chest-route entries, but they are part of the Frost Moon cleanup loop. The simple explanation of the system is this: collect Frost Moon Seals naturally while clearing areas, then come back to the Hidden Troves once you have enough matching seals - we had those before.
|
Objective |
How to Get |
|---|---|
|
Frost Moon Seals |
Found through Frost Moon exploration and quests |
|
Ungien’s Circle Hidden Trove |
Check the trove marker near the southern Ungien’s Circle route. |
|
Moontide Sea Hidden Trove |
Check southwest Moontide Sea near the Curtain-Form Blackbody Containment Lab side. |
|
Trove Requirement |
Use 3 matching Frost Moon Seals to open the matching trove. |
I’d this system is better handled as cleanup after the chests, especially around Ungien’s Circle and the Moontide Sea lab side.
The Frost Moon Chest Rewards
The Frost Moon chests give the usual Genshin chest exploration rewards, and the full cleanup, counting both chests and achievements, yields you about 20 pulls. Besides that, you’re getting secondary stuff like Mora and artifacts, although they’re probably near useless to you at this stage of the game.
Check out other useful Genshin articles:
