Stella Montis Map Guide TL;DR
-
Stella Montis is a high-risk, high-reward indoor map.
-
The map has two levels, with the upper level holding most high-value loot POIs.
-
Cultural Archive and Medical Research are the strongest loot locations overall.
-
The lower level works mainly as a traversal and escape pathway, featuring Sandbox, Seed Vault, and Loading Bay access.
-
Loot density is higher here than on any other map, increasing blueprint drop chances.
-
Shredder is the unique enemy on this map and requires careful positioning to defeat.
Target-farming weapon Blueprints could take you upwards of hundreds of hours. To save lots of time, you can always buy ARC Raiders Blueprints on Playhub. Quick delivery and lots of offers to choose from.
Stella Montis Map Overview
Before we start covering individual POIs, let’s do a general Stella Montis Map overview first. To better understand the map’s layout, it’s important to understand the underlying theme design. Stella Montis is built to become humanity's last outpost, and the map’s locations reflect it fully. Here, you’ll find the facilities you’d expect to see in a bunkered research facility. The map has two levels, with the upper level containing these noteworthy POIs:
-
Assembly
-
Lobby
-
Cultural Archive
-
Loading Bay
-
Medical Research
Think of it as the main level, where most of the valuable loot is located. The lower level mostly serves as a logistics hub, containing only three notable areas:
-
Loading Bay
-
Sandbox
-
Seed Vault
The loot in these could be decent, and Loading Bay contains a Bastion spawn that serves as a sort of boss fight, but the upper level is the main course. The lower level is essentially an underlying traversal path and an escape route for your raid. There are three regular extract points and two Raider’s Hatches, making it easy for you to escape from this level specifically.
As a whole, the map is designed to be a high-risk, high-level map for experienced raiders, and its rewards are tuned accordingly. Your chances of finding high-tier loot and Blueprints are higher there, at least because the loot density is higher than on any other map. ARC threat is also high, since you’re trapped with them in enclosed spaces. Other raiders could become a problem, too, so bring a trusty weapon with you. You can choose your next favourite gun in our weapon tier list.
Best Places to Loot in Stella Montis
While there are a lot of places you can potentially find loot on Stella Montis due to high container density and blueprint spawn chances, some spots are built differently. Here are detailed breakdowns of the best places to loot in Stella Montis:
#1. Cultural Archive
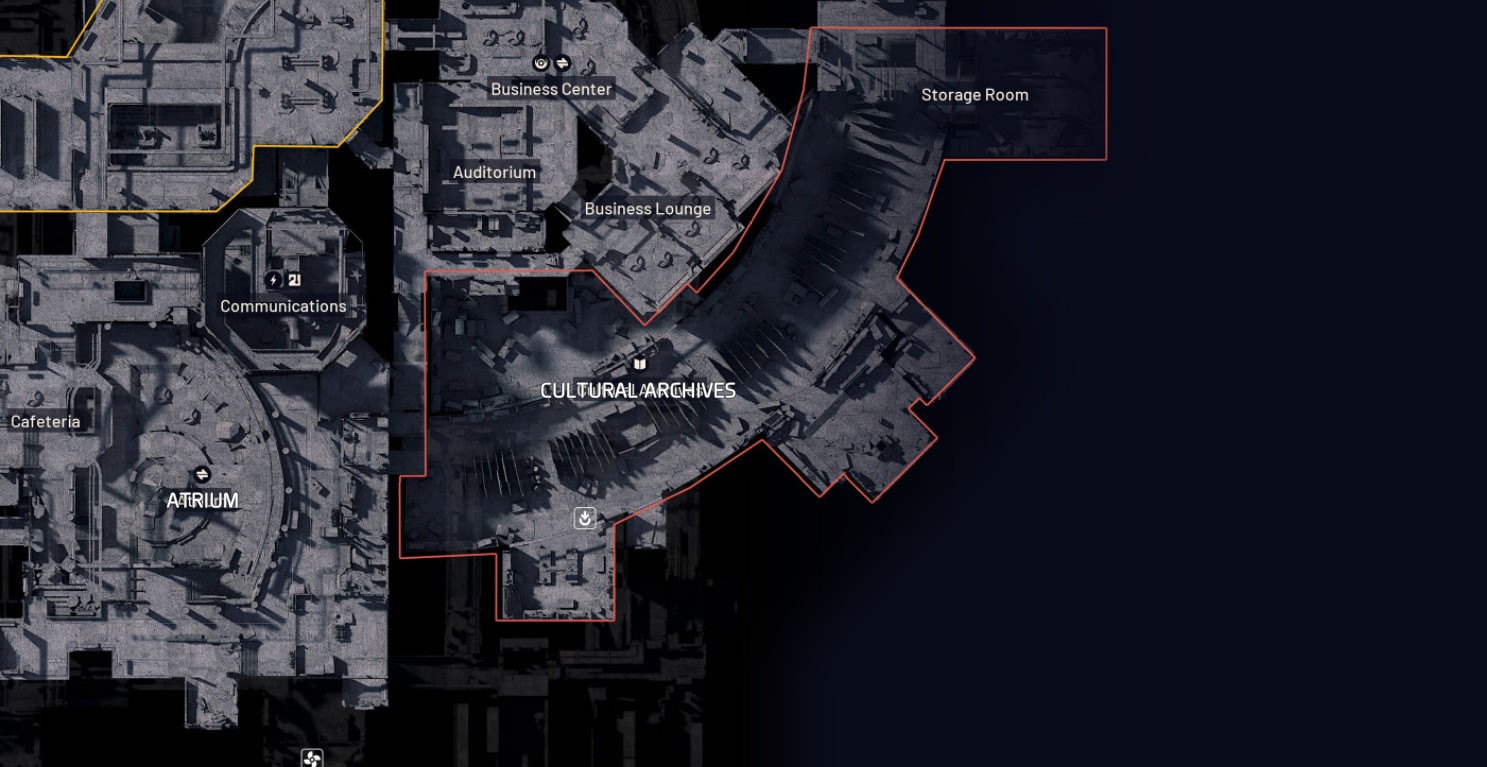
The Archive is my favorite lotting spot, with dozens of wooden crates and mechanical containers spawned all around the location. Blueprints drop odds feel high here, sometimes, I haul out 3 Blueprints in one run from looting this place alone. You’ll find lots of trinkets, basic crafting loot like metal and cloth, and face mild ARC resistance - usually it’s one Shredder and a couple of Ticks and Fireballs.
From this location, you can proceed to loot either the Business lounge or the Seed vault, both pretty lucrative loot spots in my experience. That rotation as a whole creates one of Stella Montis best loot paths; the only problem with it is actually getting spawned here. There’s a raider hatch in Archives and an airshaft extraction point near the Seed Vault, allowing for easy extraction.
#2. Medical Research
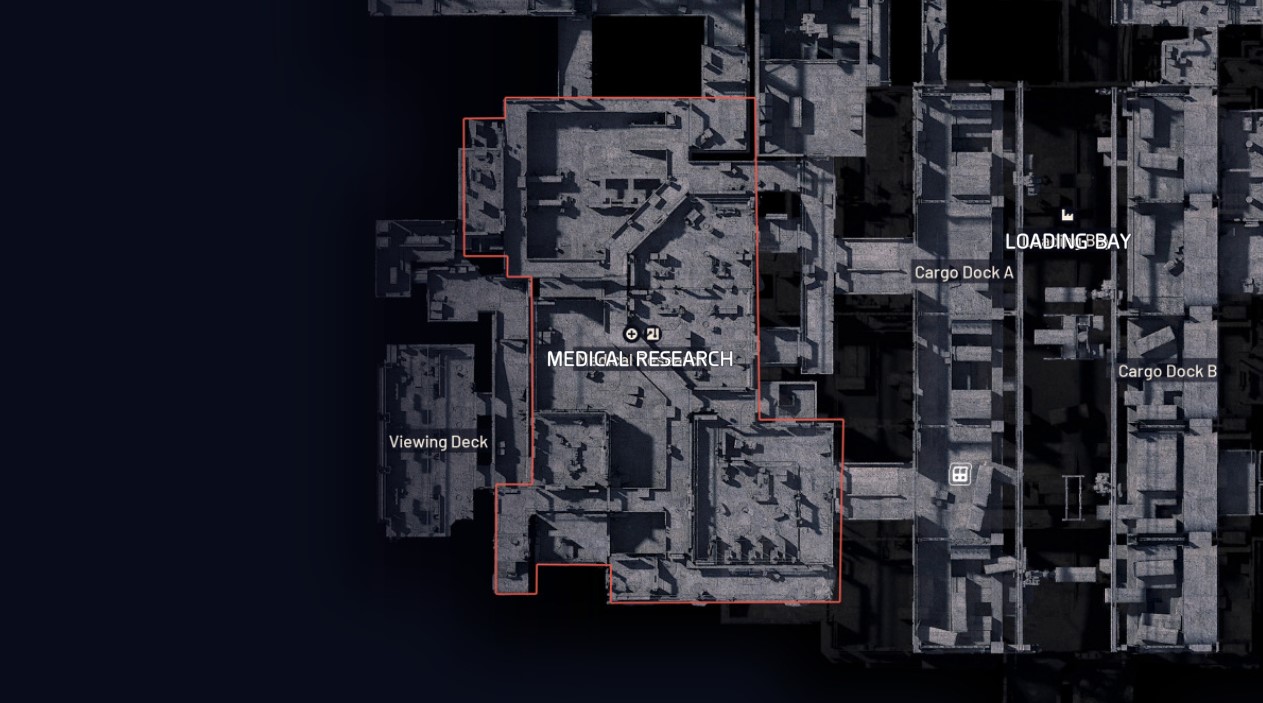
This facility serves as a highly contested PvP point. There are tons of medical and mechanical containers in there, as well as a locked door on the lower level, opened with Medical Vault Key. You can meet Shredders, Pops, and Fireballs here, so beware. From there, you can proceed to the Loading Bay and Assembly, doors to which can be in need of powering with the power cells you can find near locked doors.
#3. Loading Bay
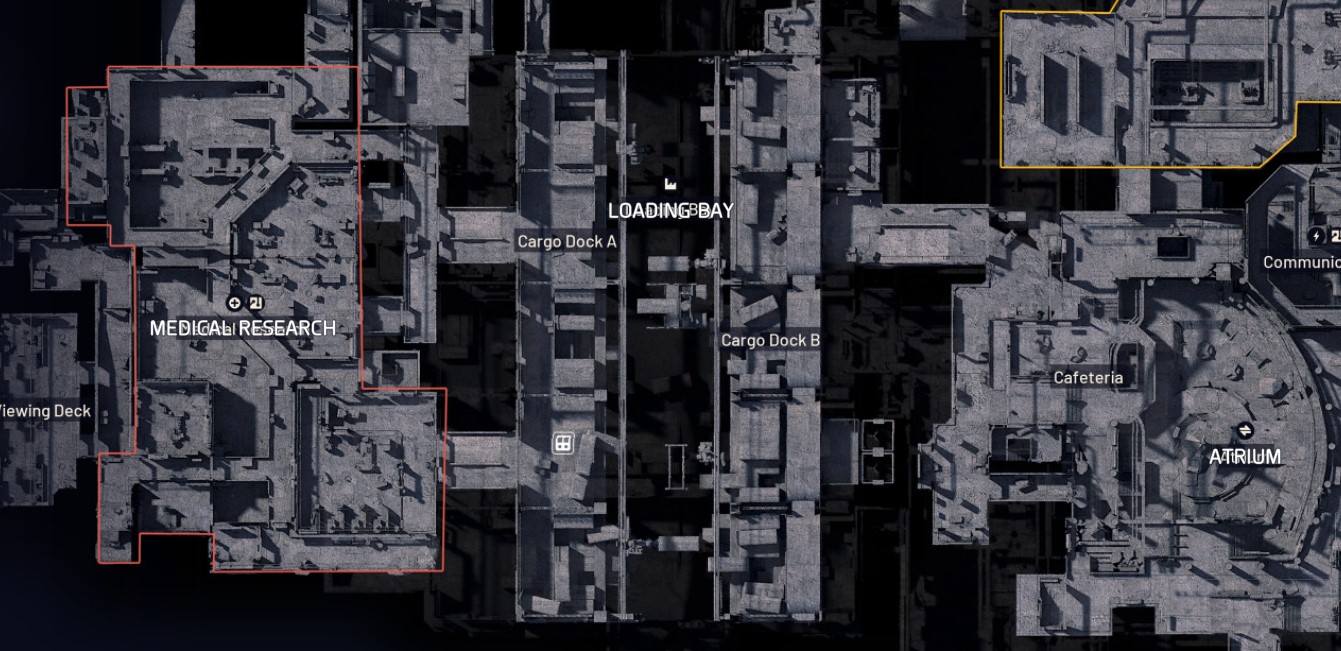
Loading Bay is right next to the Medical Research, and it serves as a central traversal point, connecting 3 popular locations. It also connects the upper and lower Stella Montis levels, and serves as a bossfight area for Bastion. As for the loot, you can find dozens of cargo containers here, each having a chance to spawn multiple lootable drawers, making the area one of the best for looting. For the best loot spots on other maps, refer to our loot locations guide.
#4. Lobby
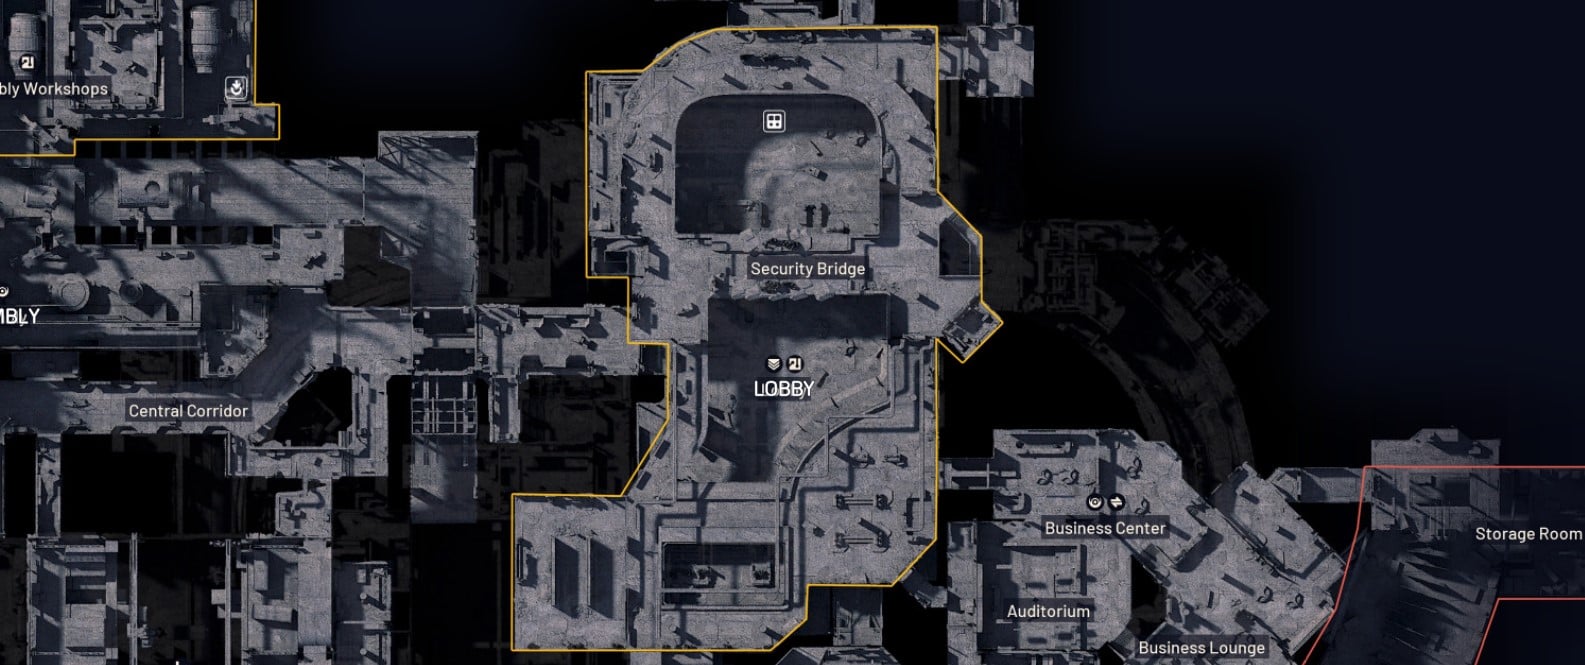
Lobby’s got lots of container spawns, the most notable being black weapon crates, which can possibly contain rare weapon blueprints spawning in security checkpoints. The area is multi-level and hard to navigate with abundant Fireballs, Pops, and Shredders spawns. Players are a constant threat, too, as you can be shot at from any level and at times from awkward angles. The metro extraction point is on the lower level, directly under the Lobby.
#5. Assembly
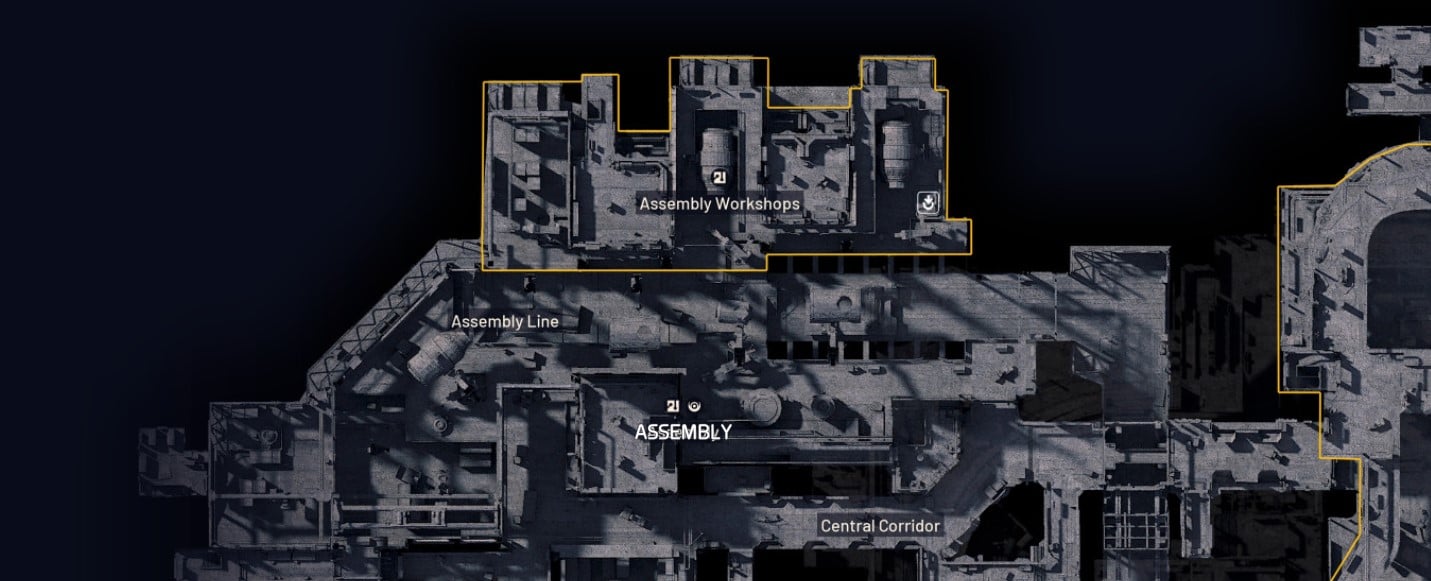
Assembly is a weird one - there’s whooping 4 player spawns here, and loot is not as abundant as in some of the other areas covered in our Stella Montis raid guide, with the most contested point being an Assembly Workshop. In here, you’ll find a lootable engineer bureau of sorts. The number of containers is not enough for all 4 players to find something unlooted, so I prefer to move from this location the moment I spawn here and see any looted containers or hear other players lurking. ARC Presence is mild here, with Pops and Fireballs being the only threats.
Stella Montis Enemies
Most adversaries you’ll encounter in this map should already be familiar to you, all aside from one. Here are all of Stella Montis enemies:
-
Wasp
-
Hornet
-
Pop
-
Fireball
-
Turret
-
Bombardier
-
Shredder (New!)
Shredder is the one that might confuse and surprise you at first, so let’s break him down literally and figuratively:
-
He shoots shrapnel around himself after a short delay, but he needs to get close to you first.
-
He’s quite durable with heavy plating and a larger HP pool - he takes more shots than Hornet to kill
-
His weakpoints are his thrusters glowing blue, staggering him when shot
-
Like any other ARC, he’s somewhat vulnerable to explosives
Make use of doors and corners, and you’ll be able to take Shredders down relatively easily. If you see other players fight shredders, stay at a respectable range since Shredder’s attack AOE is huge.
Stella Montis Tips
Stella Montis employs an intricate, double-level indoor design that could be hard to navigate for players new to it. Some locations, like the Lobby and Atrium, are especially confusing, but there are certain markers that could help you navigate the facilities more easily. Here are the most useful navigation Stella Montis tips:
-
Make use of the signs on the walls and floors. They often clearly tell you where the path leads and which steps to take to get to where you want.
-
Use the lower map level for circular traversal. You can get to lots of places on the map much easier and safer that way.
-
Bring hatch keys for your first runs. It’s going to make it easier for you to familiarize yourself with some part of the map and safely extract without losing your kit and loot.
Overall, the map's logic is clear and sound. Oftentimes, pathways are situated exactly how you’d imagine them to be.
