The Astra Malorum Main Quest is one of the most ambitious and cinematic Easter eggs in Zombies history, taking you from Earth to the red sands of Mars before throwing you into a brutal four-phase boss fight. This Astra Malorum main quest guide for Black Ops 7 Zombies breaks down every completion step with clear instructions, recommended loadouts, boss mechanics, and optimized strategies for both solo and co-op players. After reading it, you’ll have everything you need to beat Astra Malorum on your first attempt.
By the way, you can get stacked Call of Duty accounts on Playhub. Dark Matter, rarest Warzone camos, you can find everything you’ve always wanted. Best prices and lots of offers to choose from.
Step 1: Turn on Power & Unlock Pack-a-Punch
Your first goal is to reach Observatory Dome and interact with the Harmonic Oculus. This turns the power on and begins the hunt for two missing components needed to complete the mechanism.
Find the Two Harmonic Oculus Parts
-
Machina Astralis – found next to a dead zombie (it looks like a scroll piece).
-
Luminarium – another scroll piece beside a dead zombie.
Return both parts to the Observatory Dome and install them. A short wave-defense event will begin while Pack-a-Punch slowly teleports into the room. Hold your ground until the sequence ends. Once complete, Pack-a-Punch is available, and you can proceed to the next Astra Malorum main quest step.
Step 2: Build the LGM-1 Wonder Weapon

The Wonder Weapon requires you to collect three parts to be built, and they all become obtainable once the power is active.
Part 1: Damaged Drone
-
Find the OSCAR robot wandering the map.
-
Aim at the small shielding UFO flying behind him and shoot it.
-
Once destroyed, it drops the Damaged Drone.
Keep OSCAR alive for now, since you will need him for multiple steps of the quest later.
Part 2: Aberrant Wiring
Somewhere around the outer edge of the map, there are several lampposts - find the one that’s blinking. Shoot it and collect the Aberrant Wiring.
Part 3: Car Battery
Pack-a-Punch any weapon. In the Crash Site spawn room, shoot the front hood of Ol’ Tessie. The bonnet pops open and reveals the Car Battery. You now have all three parts, and the next Astra Malorum easter egg task is eliminating Oscar in three separate ways using three unique traps.
Step 3: Kill OSCAR with Three Traps
Oscar must be destroyed in three different trap sequences. These can be done in any order, but each one requires careful setup.
Trap 1: Sunbeam Trap (Pack-a-Punch Room)
In Pack-a-Punch, locate the five steaming boxes. Shoot all five in rapid succession before they reset - their location changes every match, so pay attention and look for the steaming ones. When successful, your character will yap something out loud, and the Harmonic Oculus telescope will become interactable. There are two bodies in the telescope view: Mars and the Sun; you’ll need the Sun. Once you highlight it, the Sunbeam laser trap activates. Lure Oscar into the beam, and he will vaporize. He drops a shiny trinket (not needed, but used as confirmation). Wait a round or two for Oscar to respawn.
Trap 2: Electro-Volt Projector (Luminarium)
At the Luminarium trap, insert the UFO disc just to the right of the switch. Activate the trap and stay inside the room. Small UFOs will spawn periodically around Oscar-destroy them quickly. Keep Oscar inside the trap zone at all times until the progress bar fills. If done right, there will be a white flash, and Oscar drops another trinket.
Trap 3: Absolute Zero Crystal Freeze (Museum Infinitum Rocket)
Buy Cryo-Freeze ammo from an Arsenal and find the purple Aether crystals around the map. Shoot them with Cryo-Freeze to obtain Absolute Zero fragments -you’ll need three total. Once collected, wait for Oscar to spawn and lead him to Museum Infinitum.
-
Destroy Oscar’s UFO drones.
-
Interact with the rocket.
-
Stand near the three crystal shards behind it.
-
Lure Oscar into the crystals until the countdown ends.
Oscar explodes and drops the LGM-1 Wonder Weapon.
Step 4: Oscar’s Playback & Planet Code
This part of our Bo7 Zombies Astra Malorum guide might be a bit confusing, but stick with us. Progress a few rounds until Oscar spawns - you can turn on subtitles to catch his dialogue more easily.
-
Follow him as he begins a monologue replaying past eliminations.
-
You must listen until he reaches Elimination 20 about Dr. Fen.
-
He will then name three planets in order.
These planets correspond to numbers using the game's planet-to-number graphic. The order of the numbers is based on the planet’s proximity to the sun, for example: Neptune - Mars - Jupiter translates to 845. Enter your three-digit code at the Observatory Dome machine - if correct, the elevator shaft near Pack-a-Punch drops down. Mantle up and grab the Cryo Chamber Key from the corpse.
Step 5: Retrieve Dr. Fen’s Brain
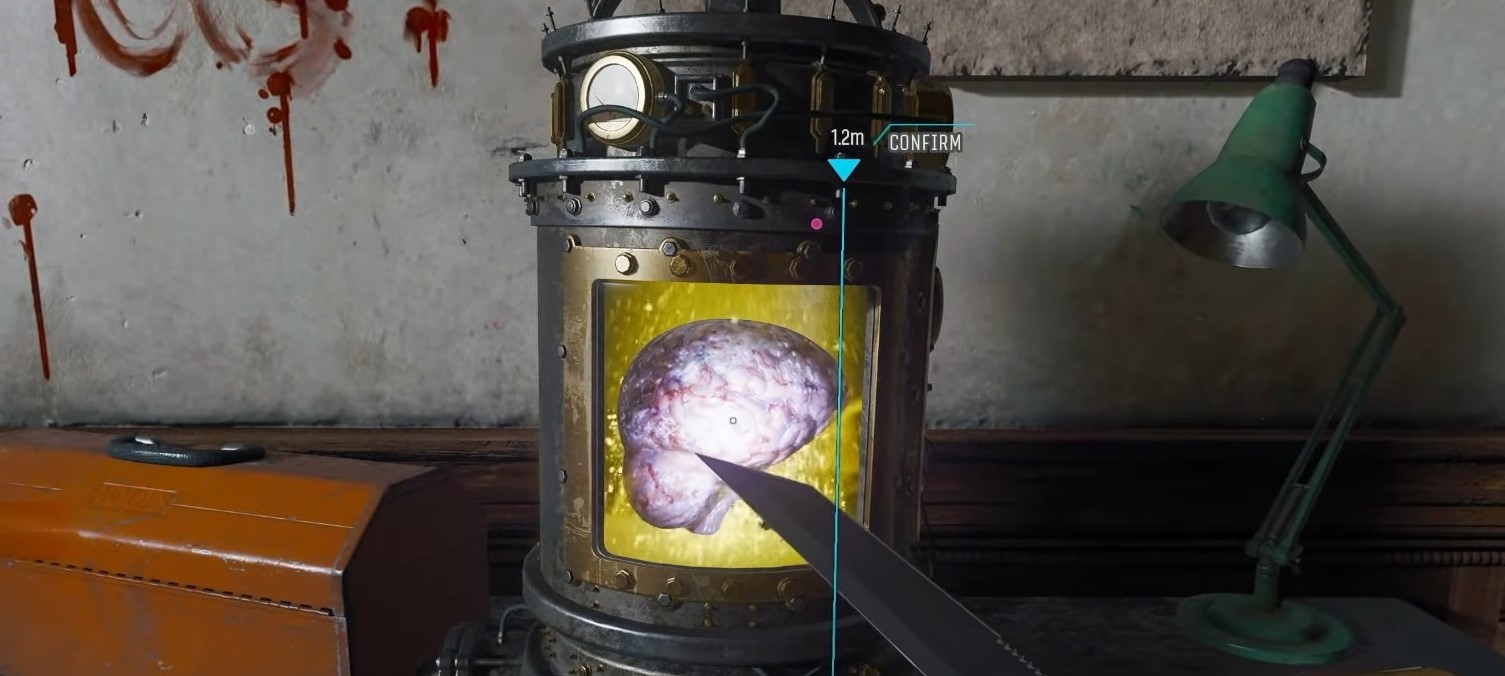
Go to Museum Infinitum and knife the glass case with the Rock Saw - pick it up. Proceed to Machina Astralis and use the key to open the chamber. Hold interact to cut open the skull and collect Dr. Fen’s brain. Bring the brain to the Luminarium and place it in the jar.
Start the one-minute lockdown and protect the jar from zombies and Oscar. When finished, pick up the Brain Jar, take it to Machina Astralis again, and connect it to the perfusion machine.
Step 6: Telescope Code – Finding Mars Coordinates
Return to the Observatory telescope. This time, you must locate Mars, not the sun. Once found, a four-digit code appears in the bottom left of the display. Enter your code in the keypad upstairs in Machina Astralis. If correct, you’ll hear a “coordinates accepted” line.
Step 7: Book & Statue Puzzle in the Archive of Orbit

Your task is to:
-
Find the books’ locations on specific shelves.
-
Determine which statue corresponds to each shelf.
-
Rotate each statue once for each book on its corresponding shelf.
Book positions never change between matches; only the list changes. Keep in mind that you must perform all rotations within the first 15 seconds of a round. If you fail, simply wait for the next round. Once you do it correctly, a hatch opens above the ladder. Climb up and collect the Neptune Planet and place it in the ceiling bracket upstairs.
Step 8: Planet Alignment Puzzle
You now need the correct compass directions for three planets:
-
Saturn
-
Mars
-
Neptune
These are found on pages in:
-
Machina Astralis
-
Archive of Orbit
-
Luminarium
Return to Machina Astralis and look at the ceiling planets. Shoot each one until they align perfectly with their direction marker on the floor. Once all three are aligned, interact with the brain machine again. A teleporter ring floats upward, and a one-minute lockdown begins. Survive the room. Oscar will eventually explode, and everyone is transported to the Mars section of our BO7 Zombies easter egg guide.
Step 9: Mars – Brain Machine & Pylon Sequence
On Mars, head downstairs to pick up the Brain Jar again and place it upstairs in the perfusion device. You’ll get a message that a component is missing. Interact with the brain to charge the machine. You now have a limited time to reach the lower left window and shoot five pylons in order:
-
Back right
-
Back left
-
Front right
-
Front left
-
Pylon above the machine behind you
If done correctly, a bird appears outside - use Mars’ low gravity to jump and grab it mid-air. This gives you the Ascendant Eye Path; place it in the pyramid on Mars.
Step 10: Artifact Symbol Puzzle
Return to Observatory Dome and interact with the organ. Five symbol slots appear:
-
Four symbols are visible.
-
One slot shows interference.
Take a screenshot or write these down; you will need them in exact order. Next up, go back to Mars and shoot the tops of the pillars using the LGM-1 - each pillar lights up with its unique symbol. Activate them in the same order they appeared on the organ. For the interference slot, activate the symbol that did NOT appear.
If you make a mistake, the pillar turns red, and you’ll have to try the next round. Do the puzzle correctly, and your screen flashes white. The boss fight is now available to start.
Step 11: Astra Malorum Boss Fight
Before starting the Astra Malorum boss fight, make sure you have:
-
Pack-a-Punch Tier II or III weapons
-
Ray Gun or Ray Gun Mach
-
Mule Kick for backup weapons
-
Full perks and permanent TED Trial perks
-
Self-revives
-
Ammo reserves (no max ammo drops here)
-
GobbleGums like Raindrops or Power Keg
When ready, vote to begin by interacting with the Brain Jar.
Step 12: Final Boss Fight – Caltheris

The Astra Malorum boss fight has four full phases. Each one is unique and progressively more aggressive.
Phase 1: Soul Pylons and Laser Attacks
You face Caltheris in his first form. Your goal is to:
-
Kill zombies anywhere in the arena
-
Souls feed into the pylons on each side
-
Dodge the rotating laser beams
Once the pylon fills, interact with the brain device to blast the boss. Repeat this for the second pylon, then a double-pylon sequence. After three blasts, Caltheris explodes and reforms on the ground.
Phase 2: Ground Monster Caltheris
The boss is now a physical brute with massive health. He’s got several attacks he repeats over and over again:
-
Throws giant rocks at targeted players
-
Charges and punches
-
Exposes blue armor plates
-
Eventually reveals yellow critical weak spots
Keep moving and maintain distance, aim for crit spots whenever they appear. Drain his health to zero to move on.
Phase 3: Caltheris Ascendant
In this phase, he gets bigger, meaner, and more violent. New mechanics are:
-
Ground slam that breaks all armor if it hits
-
Same rock throws
-
More aggressive movement
Watch for his backward lean-this telegraphs the slam. Jump to avoid it. Refill armor at the wall - buy it between attacks. Continue focusing on crits until he staggers.
Phase 4: Caltheris the Needle
That’s his Final form. The Brain Jar gives:
-
Max ammo
-
Full Field Upgrade
-
Temporary extreme damage boost
Caltheris now adds:
-
Electrified rocks
-
Purple electric pools that are killing you almost instantly
Stay far from impact zones. The best co-op Strategy:
-
Use the Group Ether Shroud in the center
-
Stay completely hidden while burning the crit as a team
Use Raindrops, Power Keg, and other consumables here. Melt the crit spot long enough, and Caltheris finally falls. Congratulations, now you know how to complete Astra Malorum.
Astra Malorum Recommended Loadout
For Astra Malorum, you can succeed with a variety of weapons, but some stand out due to ammo efficiency, boss-phase reliability, and add-clear strength.
|
Category |
Options / Notes |
|---|---|
|
Best Guns to Bring |
DS20 Mirage (Assault Rifle) Novaline Marksman Rifle Akita Shotgun |
|
Field Upgrade |
Solo: Ether Shroud Co-op: Group Shroud for boss fight phases |
|
Augments |
Equivalent Exchange on Quick Revive for more revives during late phases |
|
GobbleGums |
|
Anything that helps keep perks, restore ammo, or revive teammates is worth running.
Conclusion
Just like Ashes of the Damned, Astra Malorum walkthrough takes you on a long quest with multi-stage objectives spread across Observatory Dome, Machina Astralis, Luminarium, Archive of Orbit, Museum Infinitum, and finally Mars itself. Take your time, keep control of rounds when possible, and follow each step in order.
Astra Malorum stands out as one of Black Ops 7 Zombies’ strongest main quests. The multi-layered puzzles, the dynamic Oscar sequences, the planet manipulations, and the epic Mars transition all lead into one of the most demanding boss fights Treyarch has released in years. Once you know each mechanic and step, the flow becomes smooth-and deeply rewarding.
