Warzone Black Ops Royale Guide TL;DR
Black Ops Royale is a no‑Gulag, no‑loadout battle royale on Avalon where your strength comes entirely from on‑map loot, weapon upgrade kits, and Activities like Strongboxes, Relay Antennae, and Cradle Breaches. You scale by chaining these Activities to farm better vests, Trauma, Exotics, and redeploy tools, then only taking fights when you clearly win on position, info, and gear. To place consistently high, treat redeploys as limited extra lives, take Cradle Breaches only when already stable, and rotate early into power positions instead of ego‑pushing every red dot on the map.
Basic CoD knowledge doesn’t always lead to enjoying the game to the full extent. Browse Call of Duty accounts on Playhub with desired ranks, prestige rewards, and camos.
Core Rules, Gear and Loot
Black Ops Royale is Warzone on a hard reset. There are no loadouts, no cash, and no Gulag. 100 players just land in Avalon with a pistol only. Yeah, you have to gear up from scratch and junk. If you enjoyed early Verdansk or Blackout, this mode offers that same feeling: every gun and chest really matter now.
Core Rules and Survivability
The big switch is here: there are no custom loadouts and no buy stations. This means you can't buy the best gun or wait for a free loadout crate. Additionally, there is no Gulag and no money. Early deaths now affect your team's loot rate instead of just sending you to the 1v1 and the shopping spree afterwards.
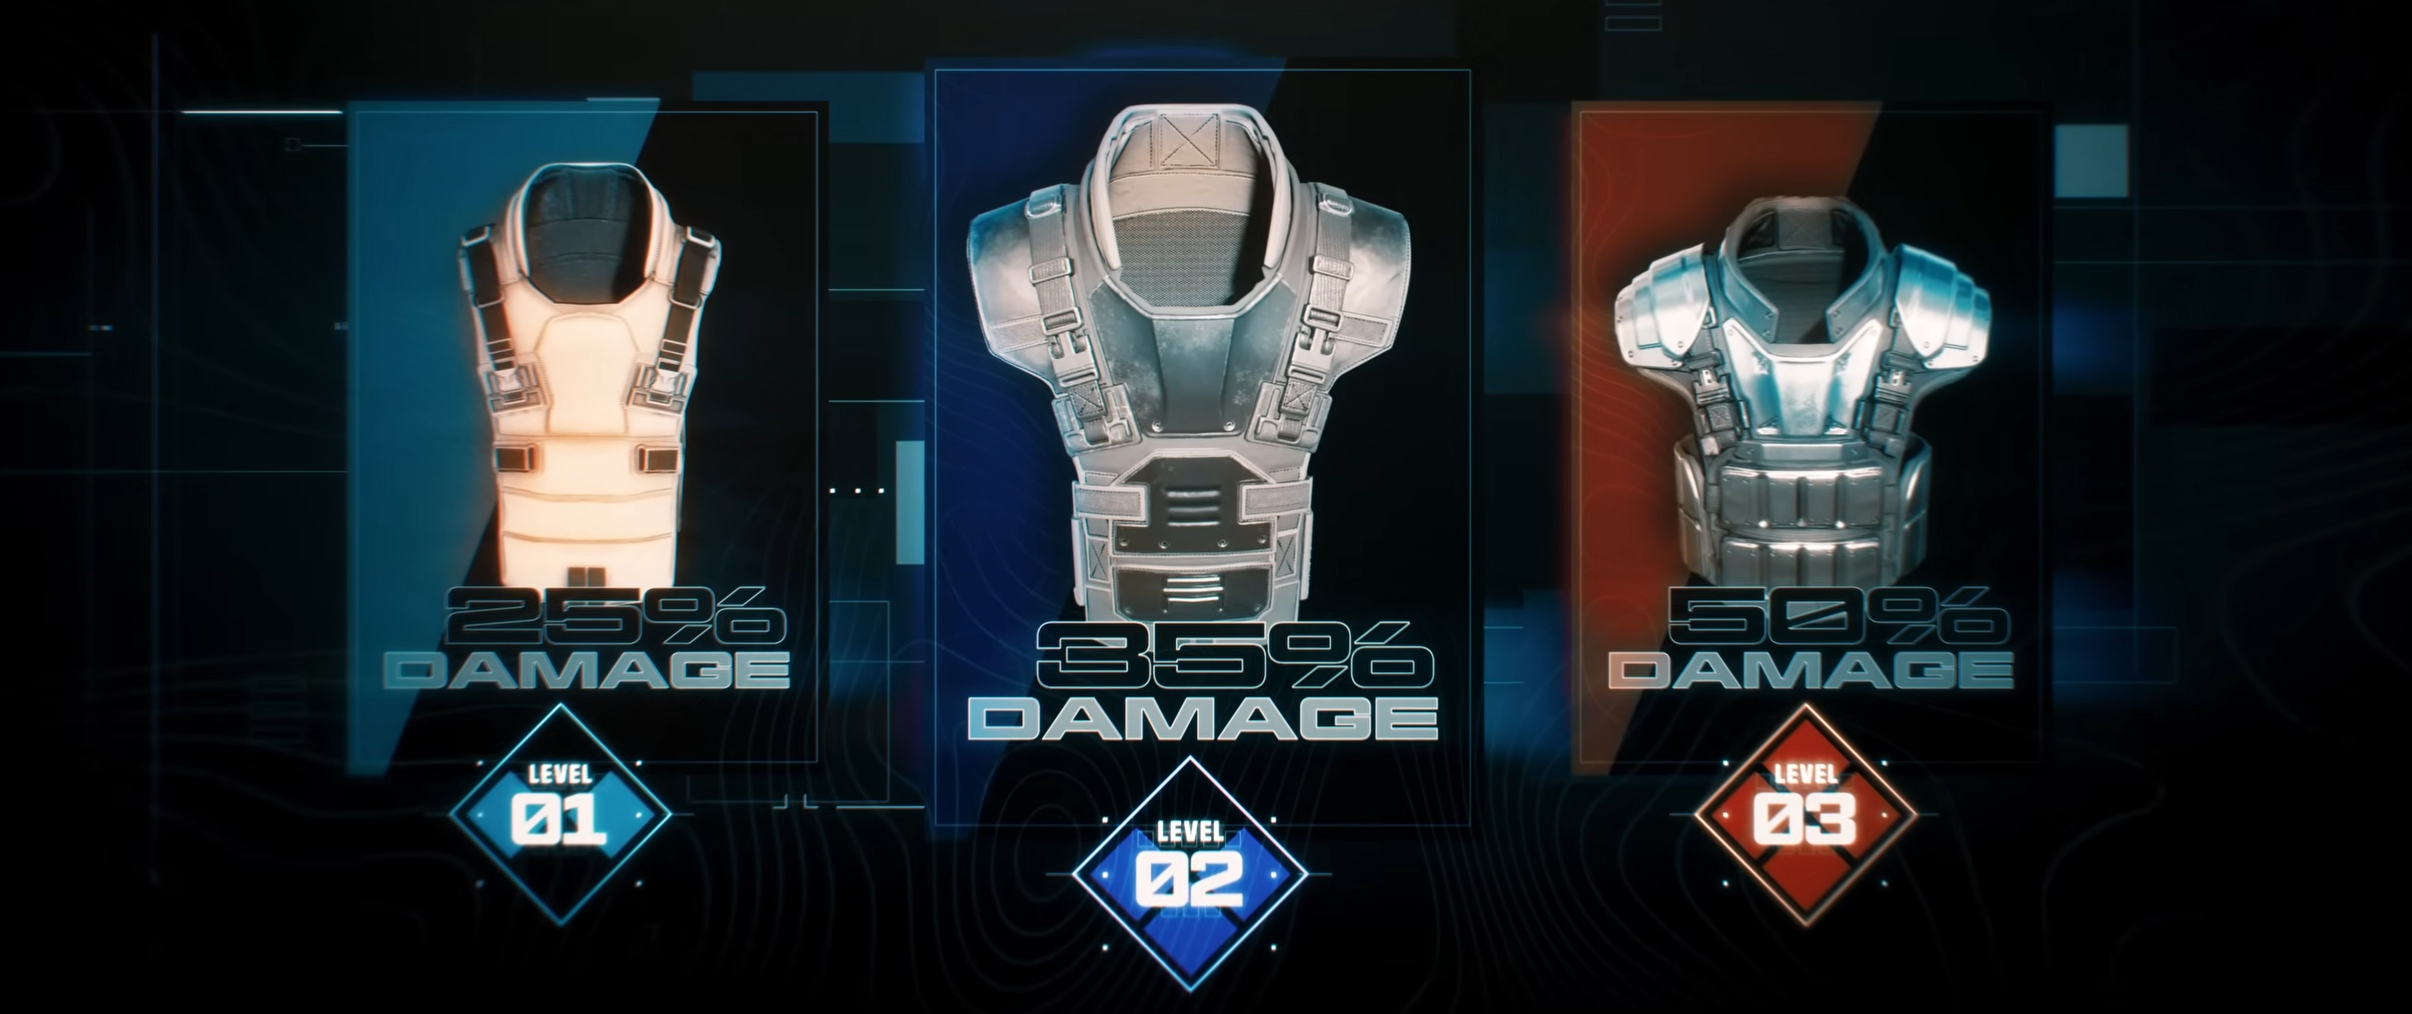
The health model remains the same but is now more complex. You start with 150 base HP and plates, but survivability relies heavily on tiered armor vests and consumables, like the Trauma Kit. T5 vests absorb more plate damage, and upgrading your vest enhances overall durability. Trauma Kits are a high-risk, high-reward play. Using one will give you a short use time before immediately healing and giving you the extra HP to survive, up to 250 HP. This isn’t something you’ll get back, so save the trauma for the fights that matter – the anchors, the breach, the end-game holds. Don’t use trauma on every single plate damage because, let’s be real, it’s just not worth the trauma.
Weapons, Rarities, and Kits
Since no loadout is present in this gamemode, it’s all about weapon rarities and upgrade paths. Every gun will have a rarity level, ranging from gray to orange. As you progress through the rarities, more attachments will be included. There is no option to change attachments manually; instead, each weapon type will have its own set of attachments. You either like it or try another gun.
The main mechanic is attachment/upgrade kits. When you collect a kit for your gun type, it will boost its rarity by one tier and grant the next attachment in its set. This means that if you mess with a basic white AR, it can end up as a purple-beam gun if you collect enough kits. I like it way more than “rush loadout or lose.”
There are also Exotic guns that come completely tuned with up to eight attachments. These guns are often hidden behind high-risk stuff like cradle breaches and special chests. You cannot get Exotic guns by upgrading your guns with kits. They're extremely powerful for that life, but rare enough to consider them a bonus.
Utility, Backpack, and On‑Map Tools
Loot in Black Ops Royale has you making little decisions throughout the entire match, rather than just one wide "grab loadout and AFK" choice. The chests and containers have plates, tacticals, lethals, consumable perks, field upgrades, and kill streak toys like RC XD and Death Machine, which means you’re always making decisions about which things are worth using instead of just auto-piloting the same loadout into every match.
Your backpack is there to help facilitate this, and there’s one major rule to keep in mind: you can’t have duplicate lethals, which means you’re building up a little collection rather than just carrying five of the same grenade around. Over the course of a normal match, you’re probably going to end up using different tools as you go along – maybe using a Sensor Dart to clear out buildings, and then using a Grapple Hook as the circles get smaller. The changing collection of tools on the map is probably more akin to "non-fighting" in Royale than it is to modern Blackout or traditional Warzone.
Battle Royale Avalon Map: Layout and Activities
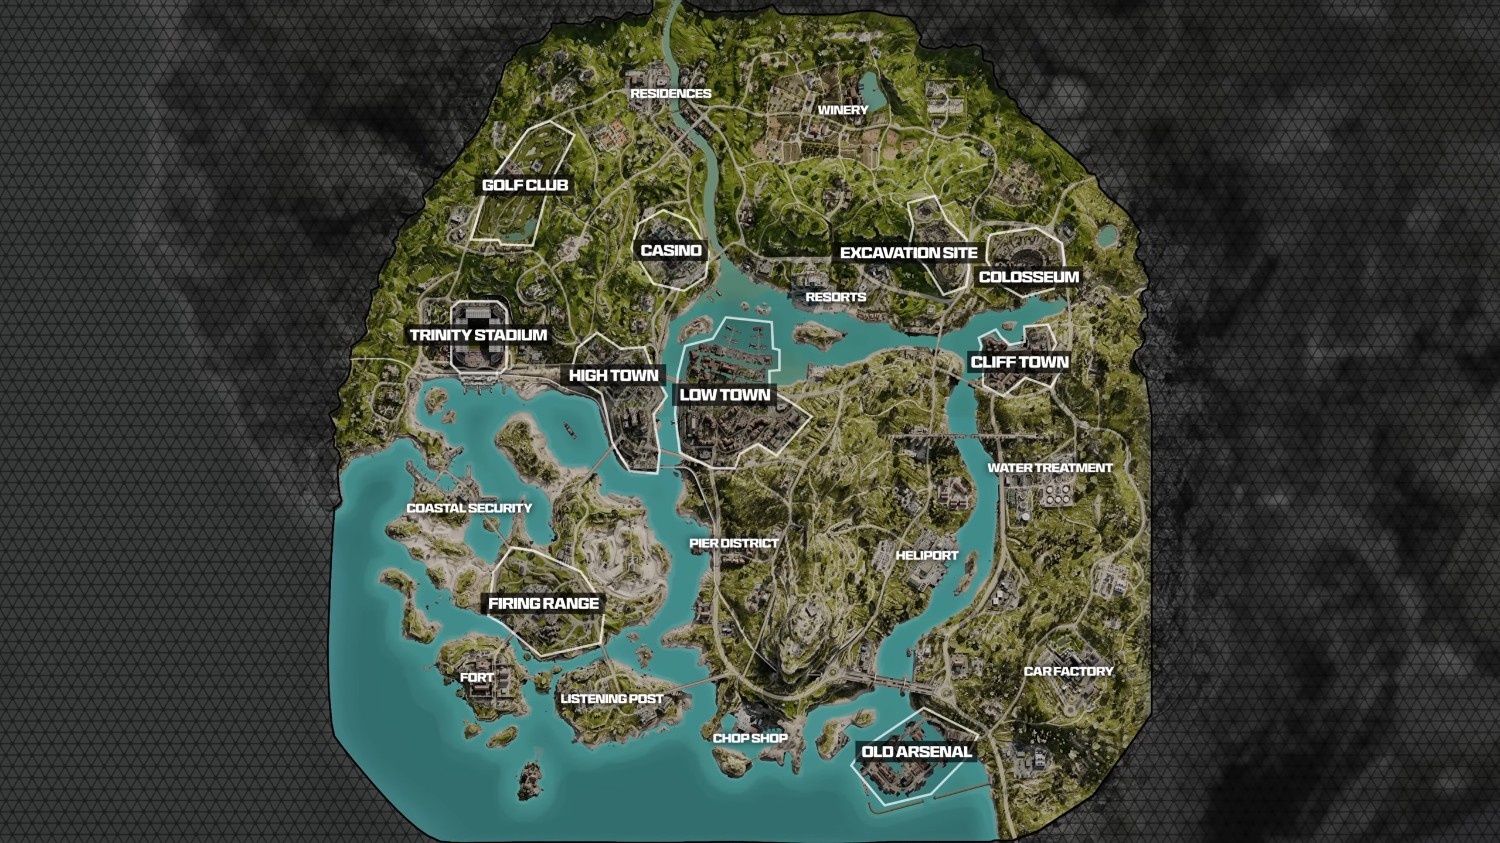
Avalon is a modified version of the Endgame campaign map, but it’s been specifically modified to work well with Black Ops Royale, with improved sightlines, reduced ‘dead water’ areas, and increased land bridges connecting various islands. The official Tac-Map splits it into five areas that are filled with POIs such as Trinity Stadium, Marine Villages, Fort d’Avalon, Low Town, Winery, Casino, and many more, so you’ve got a constant selection of edge fights and sweaty center fights.
What’s nice is that every area is suited to a different kind of gameplay. Trinity Stadium and Low Town offer vertical fights and quick rotations via ascenders, ziplines, and wingsuiting, whereas areas like Marine Villages or Fort d’Avalon are slower-paced, with excellent edge positions and long-range sightlines for teams that wish to camp before they start griefing in the lobby. Once you’ve learned where you wish to land in each of those areas, Avalon is not a difficult map to navigate and begins to feel like a kind of ‘route’ that you can pass through on autopilot.
Avalon Activities
Avalon is not just a collection of POIs strung together; it’s actually heavily connected with Activities that determine whether you leave with loot or not. Each activity costs a bit of time and risk in exchange for a particular type of reward (intel, armor, redeployments, or loot), and figuring out what each activity actually does is basically like learning how to print gear as you run around. Here’s a quick reference for all of the Activities in Black Ops Royale Avalon:
|
Activity |
Description |
Reward |
|---|---|---|
|
Target Uplink Station |
A mission terminal that lets your team ping and hunt a specific enemy squad for intel and loot. |
Dropped gear once you eliminate your target. |
|
Surprise Shipment |
Capture a Guild supply crate that’s defended by combat drones patrolling the area. |
Typically grants an armor satchel plus a bundle of additional gear. |
|
Surveillance Drone |
Track down a roaming Guild surveillance drone, break its escort defenses, and ransack the cache it drops. |
Awards loot and pings extra nearby Activities on your tac‑map for more objectives. |
|
Strongbox Crack |
Pick up a hacking tool, breach a locked Strongbox, and claim a stack of higher‑tier rewards. |
Can roll upgraded armor (level 2) plus other valuable items. |
|
Relay Antenna |
Power up a Relay tower to pulse a short UAV sweep and send out a Redeploy Drone for your squad. |
Grants brief enemy radar coverage, plus a drone that brings teammates back into the match. |
|
Redeploy Tower |
Capture the Redeploy Tower so fallen teammates are flown back into Avalon. |
Returns eliminated squad members to the battlefield. |
|
Supply Drops |
Air‑dropped supply crates that land around Avalon, holding powerful, pre‑rolled loot sets if you secure them first. |
Delivers a mix of randomly rolled but high‑tier weapons, armor, and equipment. |
|
Cradle Breach |
An optional red‑gas Cradle zone full of hallucinated enemies and chaos, but stacked with end‑game‑level rewards if you make it out. |
Triggers a random Cradle event (like zombie waves, a boss, or Mystery Boxes) with unpredictable but top‑tier loot outcomes. |
Second Chances, Contracts, and Cradle Breaches
All these activities show where Black Ops Royale stops being “just another BR” and starts feeling like its own ecosystem. This is the part of the mode that quietly decides who’s still fighting for the win in circle 4 and who’s stuck spectating.
Redeploys: Playing Around Your Extra Lives
There’s no Gulag, but you’re not completely dead on first death – there are the Redeploy Tokens and Redeploy Towers to handle second chances. Everyone starts off with one token; additional tokens can be looted, but only one can be carried at any given time. With a short delay after death, you auto-redeploy if you had a token equipped when you died. This freebie lets you play a bit looser, but as it's gone, suddenly every death costs an awful lot.
Redeploy Towers are the team version of this mechanic, but instead of redeploying yourself, it redeploys the entire team if you can take control of one by standing in its radius for long enough. The problem is, the tower is loud, highlighted, and spawns in locations where other teams are almost certainly going to try to take it, just like you. My attitude towards these is rather simple – if we’re ahead on loot and alive, we use them to farm desperate teams; if we’re behind or dead, then it’s our all-in play to stay in the game.
Contracts and Side Activities That Are Actually Worth It
“Activities” in Black Ops Royale are essentially “mini-missions” that give up time and danger in exchange for information or loot, and there are a number of them that are absolutely worth weaving into your route. Target Uplink Stations give you a bounty-style mission that rewards intel, Surprise Shipments give you Guild shipments that are guarded by robots, and Surveillance Drones defend areas that you can clear to earn even more loot.
Then there are Strongbox Crack, Relay Antenna, Supply Drops, and Ammo Caches, which may share so much different loot. I hope that you'll think of these as a “tempo play,” where instead of just standing in a zone and looting the same three buildings for five minutes, you pick up an activity that tells you where to go fight or resupplies you before the next rotation.
Cradle Breaches: The Greediest Play in the Mode
The real high-risk, high-reward play in Black Ops Royale is the Cradle Breaches. During the game, parts of Avalon will be consumed by red fear gas, which creates hallucinated zombie hordes and special breach events. These, if cleared, reward the team with Mystery Boxes or a Mangler-themed boss encounter directly out of the classic Zombies gamemode. Clearing the breach has the potential to reward the team with random high-tier loot, such as Exotics and even the classic Ray Gun Wonder Weapon.
The greedy part, of course, is the fact that these breaches are loud, chaotic, and filled with AI-controlled mobs, making each and every player on the map know someone is trying to hit the breach. However, the only time I recommend taking these breaches is if the team already has good armor, ammo, and utilities, because if not, you’re just asking to be put into a blender with zombies, the boss, and some teams looking to take you down. However, if done correctly, one good Cradle Breach has the potential to transform an average team in the middle of the game into the best-equipped team in the lobby.
Black Ops Royale Fighting Basics
The gameplay in Black Ops Royale is less about sliding into all red areas and more about selecting a fight at the appropriate time. This is because your power level is derived from on-map loot, vest tiers, and limited redeploy tools. This means that losing a fight is much more punishing compared to standard-loadout Warzone.
When To Actually Take Fights - Know Your Powerspike
The entire gameplay is focused on hitting your power spikes. The first is a straightforward affair where you have a primary of a decent rarity (green/blue), a good vest, and at least some plates or a Trauma Kit in your pocket. Once you’re here, you can start taking fights and contracts instead of just survival. The second spike is where your primary is purple/orange, you have a better quality vest, and a few redeploy tools for your squad. This is where it’s actually reasonable to fight cradle breaches and strong positions in endgame, as you’re finally on equal footing with the lobby in terms of TTK and survivability. See, you don’t need a custom class and pre-equipped stuff to rock hard.
Always think about how many extra lives you really have. If your team is low on Redeploy Tokens and the nearest Redeploy Tower sits in a sweaty POI, do not ever ego‑peek stacked teams on rooftops. Battle Royales are all about discipline, honestly. From my Warzone experience, the squads that win most lobbies are the ones that only take “real” fights when they clearly out‑position, out‑armor, or out‑info the enemy.
Playing Around Towers, Breaches, and Hot POIs
Redeploy Towers and Cradle Breaches are fight magnets, so every decision is “we use this, or farm the people who use this.” Towers are loud and obnoxious when you deploy them, making them perfect for a desperate comeback or perfect bait when you are already in a comfortable position and just want to catch teams that are stuck in the capture zone.
Cradle Breaches are areas of Avalon that are converted into fear gas zombie areas where teams fight hordes and bosses to get Mystery Boxes and top-tier loot. You either go in early with good armor and utility and commit to it, or you hang back and farm teams that exit and are under-plated and have no ammo, similar to how you would farm teams that exit a dungeon in any other Battle Royale. Hot POIs on drop are similar to this. I’d rather drop in just off of all the chaos, gear up, and then go in to farm instead of putting everything on the line in the first 30 seconds of the match.
Long‑Range Fighting Style
In Black Ops Royale, the idea of weapon rarities and archetypes makes long-range engagements less about “perfect meta vs perfect meta” and more about whether someone bothered investing in upgrading their gun and armor. A fully kitted sniper archetype is all set to instantly kill someone with just one devastating hit, and so wide peeks with a low-tiered vest or without the Trauma buff are again a very risky idea.
When playing in the early to mid-game, you should treat snipers as a lethal threat and cross long ranges, as in old Verdansk. Do not sprint across the map - it’s a death sentence. Once you’ve gotten a better vest and a good position, long-range damage is actually a setup tool to break enemy armor and get them to back off from a strong position, then rotate to a position while they are busy re-plating, rather than tunnel visioning to get clips and throwing away a potential circle advantage.
Micro Mechanics: Bursting Plates, Trauma Timing, and Utility
The enemy’s plates and vests are your top priority in a fight. Once that’s taken care of, start pushing, as they won’t be able to reset or pop a trauma kit. A very obvious green light is when you start hearing panic plating – flood a doorway, angle, etc.! Just do something - sitting still and letting them fully reset behind cover is the worst option.
Trauma Kits and utility aren't things you can spam whenever you’d like. You save traumas for fights that decide your game - that temporary 250 HP can easily flip a teamfight. Using all of your preferred gadgets (e.g. Sensor Dart, Grapple, Cymbal Monkey) leads to wins, believe me. If you feel like it’s the game-changer in the moment, don’t hesitate and throw ‘em some ‘nades. Every piece of utility is a small play: a ping to take a clean push, a grapple to hit an off‑angle, or a monkey to blow up a cramped room full of players and zombies at once.
Check our other CoD guides:
