Totenreich Main Quest Guide TL;DR
-
Turn on the power and unlock Pack-a-Punch first by following the on-screen objectives.
-
Get the Jotunn Star Wonder Weapon by collecting the chain, baiting the Zercer with chili chunks, solving the constellation puzzle, and following the ghost to the lighthouse.
-
Build the Atomkraft Core by collecting three uranium canisters through the glowing fish Ravager step, the laboratory Necro Spike step, and the Glock Drop zombie step.
-
Complete the Wundersignal step by using the crowbar, flak round, signal amplifier, robot light codes, radio tower, rocket barrage controller, and claw machine puzzle.
-
Finish the Vegvisir step by cooking the meat, collecting the rune, lighting the church beam, and shooting the correct firepit symbols around the map.
You can buy ranked-ready Call of Duty accounts on Playhub and get straight into the fray. You can also get accounts with prestige rewards and rare camos, all delivered safely and quickly.
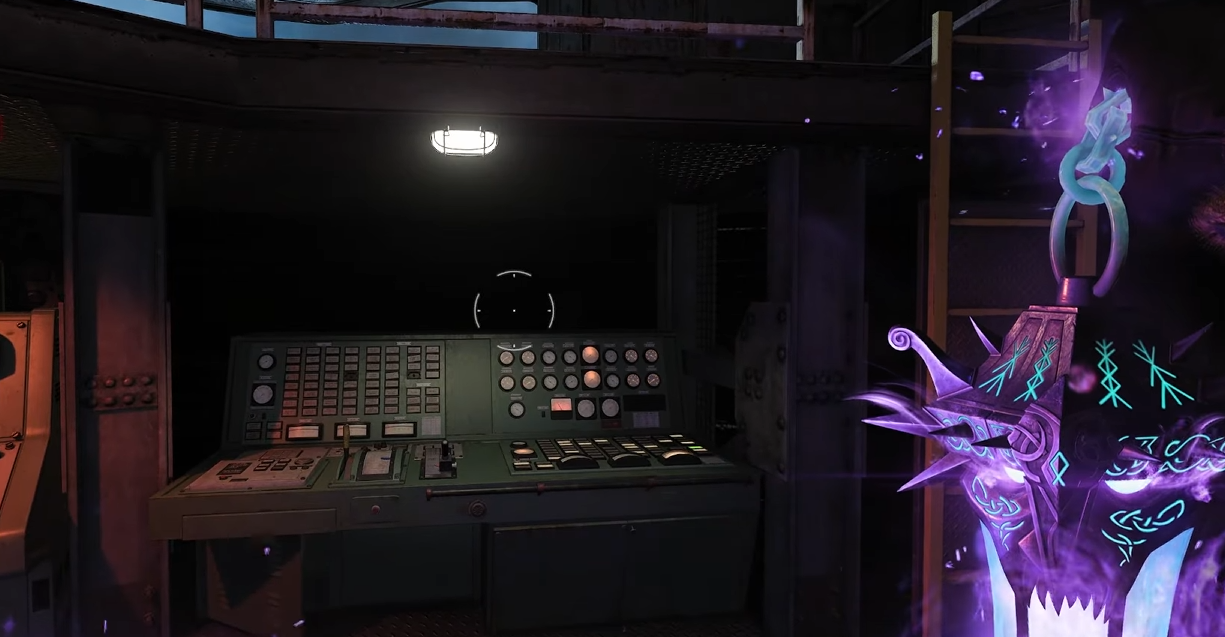
Step 1: Turn On The Power and Unlock Pack-a-Punch
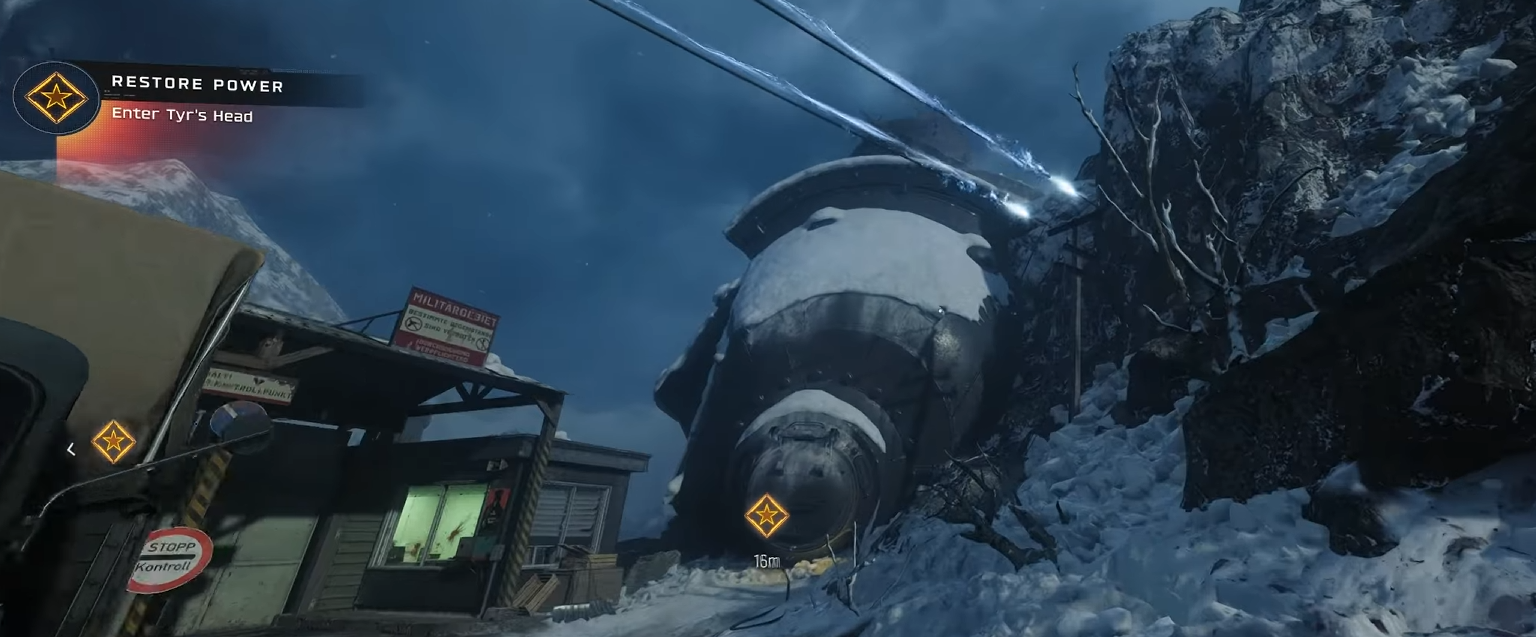
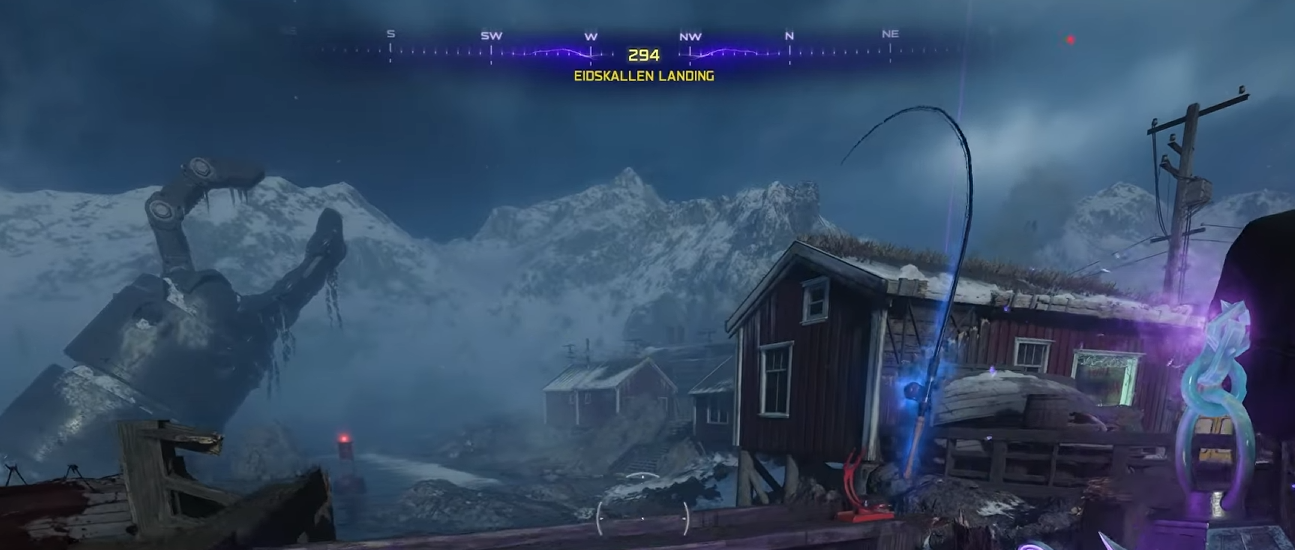
I’ve got good news for you - most of the first step is guided on-screen, and the real Easter egg starts after Power and Pack-a-Punch are already open. Follow the objective markers around the map, turn on the Power, and open Pack-a-Punch before worrying about the real Easter egg steps.
This opening section is longer than usual, but there is no hidden puzzle here. Just keep following the indicators until Power and Pack-a-Punch are both available. Once that is done, you can start collecting parts for the Jotunn Star - a cool flail/morningstar that you’re going to be using throughout the quest.
Step 2: Get the Chain at the Dry Docks
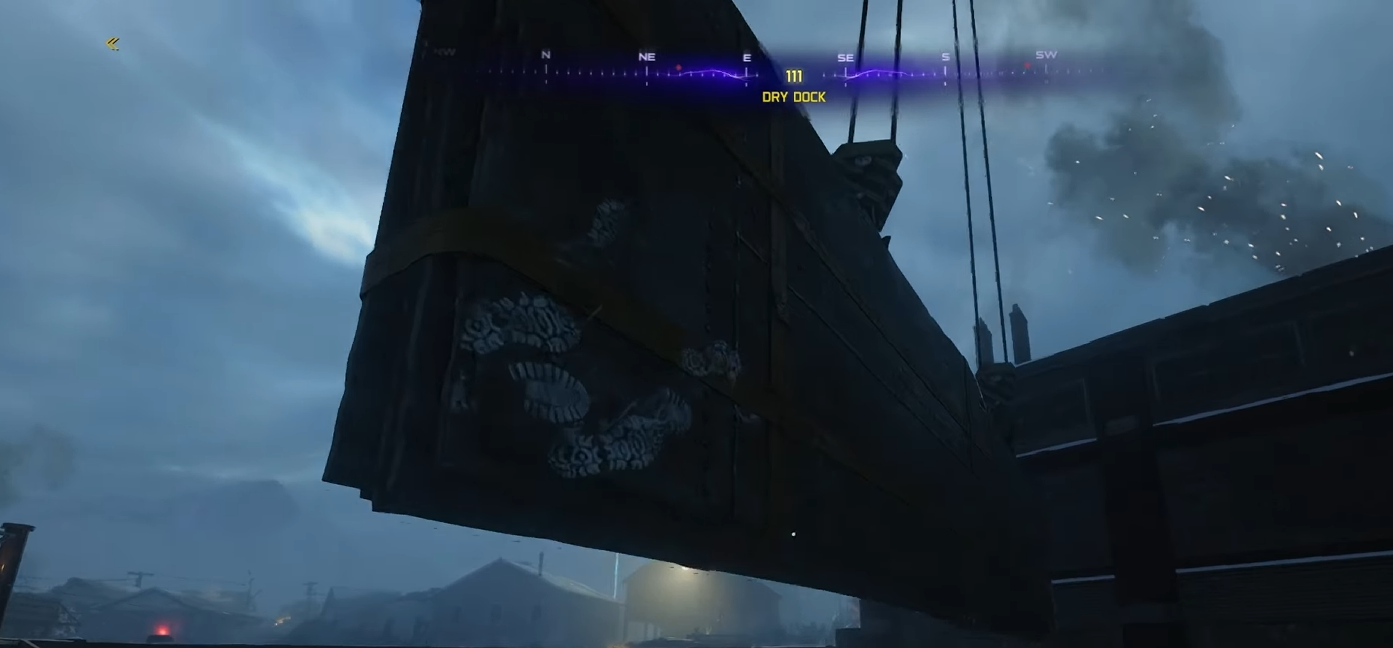
Your first Jotunn Star part is the chain, which you can find at the Dry Docks. Head to the boat area and activate the crane. This lowers the giant wooden slab in front of the boat, which gives you a short parkour route to the chain.
-
You only get around 30 seconds before the crane lifts the wood again, so move fast. Wall run across the lowered wood, jump back toward the front of the boat, and grab the chain.
-
If you miss the jump, it is fine. You can activate the crane infinitely.
Once you have the chain, take it to the giant door in the Burial Grounds. Interact with the door to repair it and open the tomb. This tomb is important for the next Jotunn Star step.
Step 3: Get the Chili Chunks and Lantern
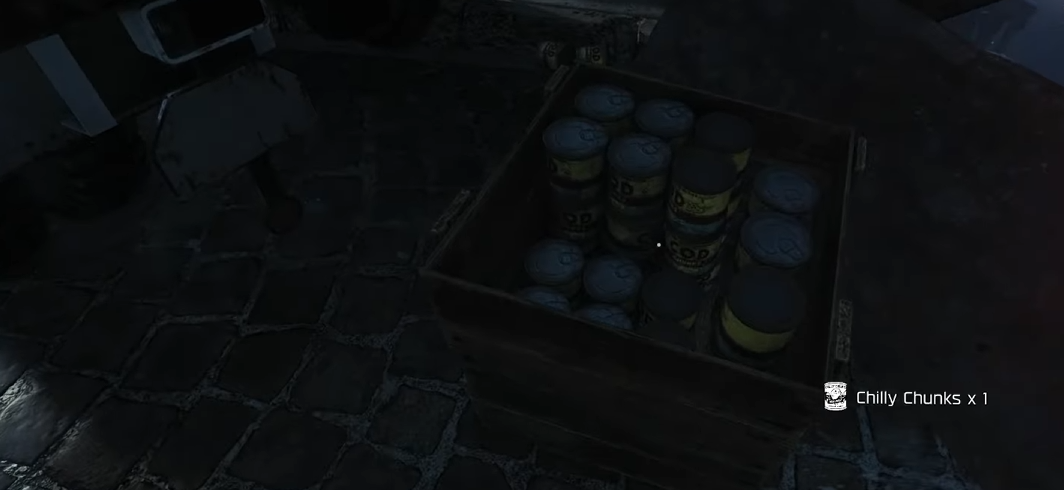
Next, go to Storm Bridge near Deadshot. The chili chunks are sitting in the middle of the bridge near a truck and a pallet. Pick up the can of chili, then take it to Skalin Market.
-
In the market, look for Mule Kick. Face Mule Kick, turn right, and place the chili chunks on the table in the middle of the market.
-
Now wait until the next special round. Kill frozen zombies near the table until a Zercer spawns. The chili chunks are what attract it, so make sure you are standing in the market area when this happens.
Kill the Zercer and pick up the lantern it drops. Take the lantern back to the tomb you opened with the chain and place it at the bottom of the room. Once the lantern is placed, constellations will appear on the walls.
Step 4: Solve the Constellation Puzzle and Get the Jotunn Star
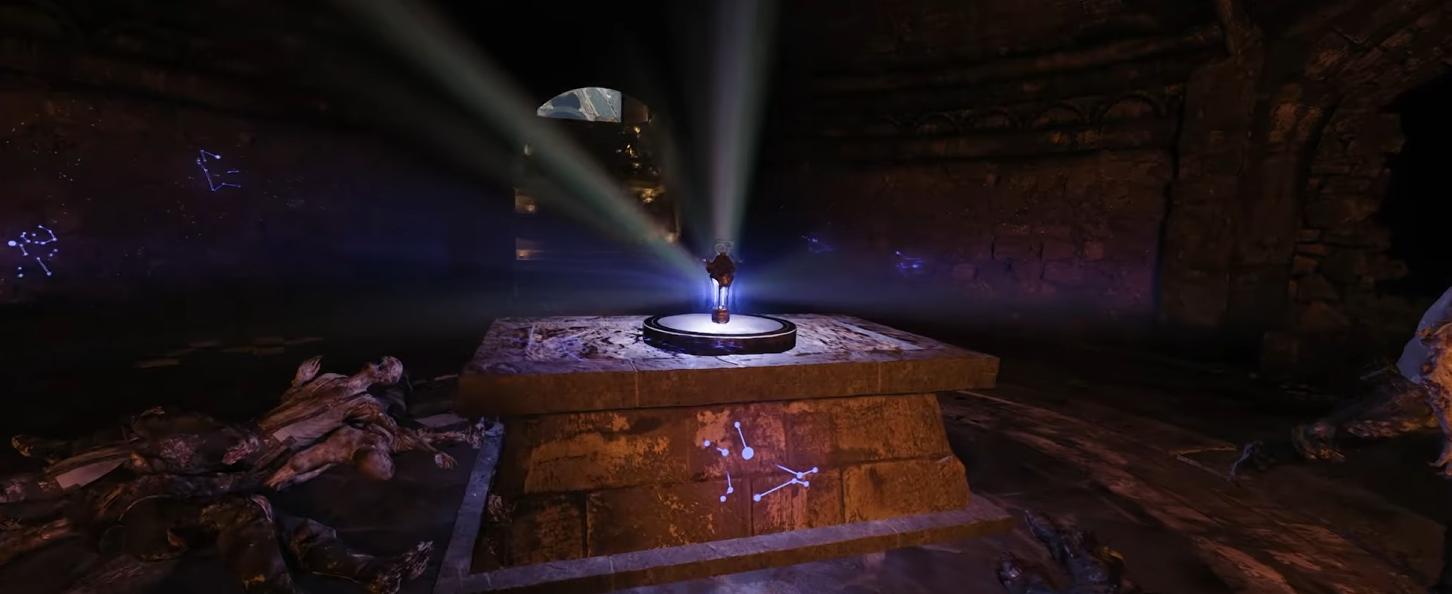
After placing the lantern, look at the podium in the middle of the tomb. Your job is to match the constellations on the podium with the symbols on the walls. The symbols change every game, but the podium order stays the same. If you are facing the podium after coming down the stairs, use this order:
-
Left
-
Right
-
Back
-
Front
Match each side of the podium to the correct wall constellation in that order; you can mess up the order; that’s fine. You get to attempt it again.
Once all four symbols are correct, a ghost will spawn- follow her toward the lighthouse. She will stop a few times along the route, and you’ll need to kill ice zombies near her to charge her up again.
When she reaches the zipline area near the lighthouse, some weird rocks will rise from the water. Parkour across them, then keep climbing the outside of the lighthouse with the next set of rocks. At the top, enter the lighthouse and pick up the Jotunn Star Wonder Weapon.
Step 5: Get the First Uranium Canister With the Glowing Fish
Now you need three uranium canisters for the Atomkraft Core. The first one starts with a fishing rod. Fishing rods can spawn in these areas:
-
Dry Dock
-
Stormbridge
-
Fishery Island
-
Beacon Island
After getting a rod, check fishing spots around the map until you find a glowing green fish jumping out of the water. The fish can appear at several POIs, so you may need to check a lot of spots. There’s a bunch of fish spawns on the map:
-
Two spots in the Landing area
-
Two spots at the Lighthouse
-
One spot at the Dry Dock in front of the boat
-
One spot near the robot’s foot and shoulder
-
Two spots at Fishery Island
-
One spot at the Square
Once you find the glowing green fish, place the rod down and fish it up. This spawns a radiated Ravager into the map.
Flip the round after catching the fish if the next part does not start right away. Listen for a pack of Ravagers moving around the map, then find the one with green smoke around it. Kill that radiated Ravager, and it will drop the first uranium canister.
Step 6: Get the Second Uranium Canister From the Laboratory
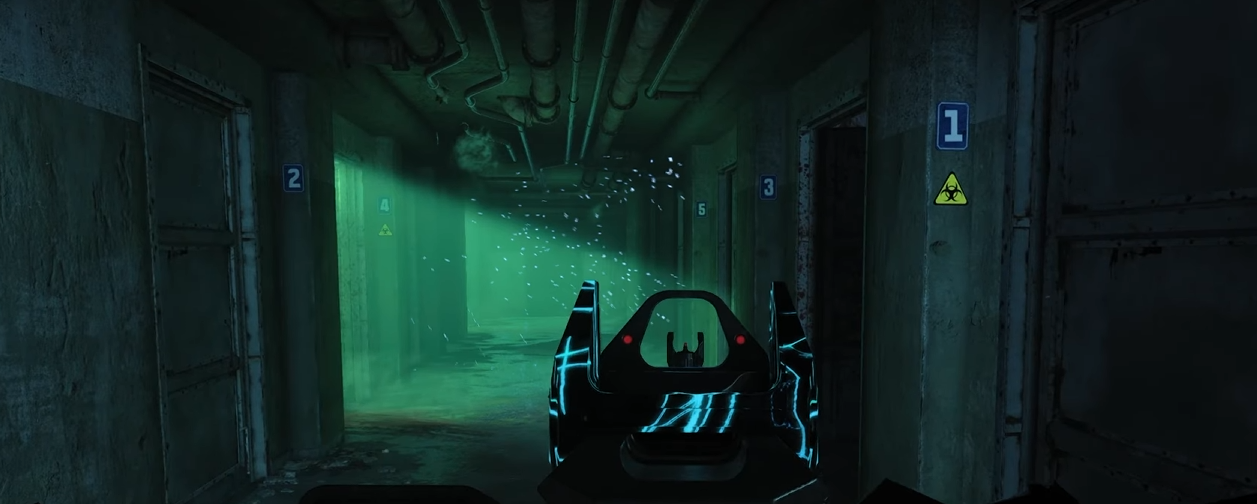
Ughh, I hate these little ARC sections. For the second canister, you need an ARC-XD Card and the Jotunn Star. Take the ARC-XD Card to the Core Foundry. Use the Wonder Weapon to melee the air duct at the top of the stairs, then place the ARC-XD down. Drive it through the secret path, jump over the water, and enter the laboratory.
Those numbers match the jars labeled A through E around the laboratory:
-
1 means A
-
2 means B
-
3 means C
-
4 means D
-
5 means E
So, if the radiation symbols are under 1 and 4, you need jars A and D.
Find the two correct jars and place them on the device next to the jail cell. This gives you a purple serum. Place the serum on the mutated claw on the table, let it melt down, and pick up the Necro Spike.
Take the Necro Spike to the jail cell and start the lockpick puzzle. Move your stick until the spring lights up, then hold it in that exact spot until it releases. Repeat this for the other springs. When the lockpick is finished, the cell opens and reveals the second uranium canister.
Step 7: Get the Third Uranium Canister With the Glock Drop
For the final uranium canister, call in the Glock Drop on a horde of zombies. The Glock Drop will pick zombies up into the air a few at a time. Your job is to kill the floating zombies while they are mid-air. Do this in an open area, because you really need room to execute this part. Keep killing the zombies that get picked up. After enough kills, the final uranium canister will drop - pick it up, and you can move on to the Wundersignal section.
Step 8: Get the Crowbar and Flak Gun Round
After getting the Jotunn Star, head to the second floor of the lighthouse and pick up the crowbar. Once you have it, four wooden boxes around the map can be broken open.
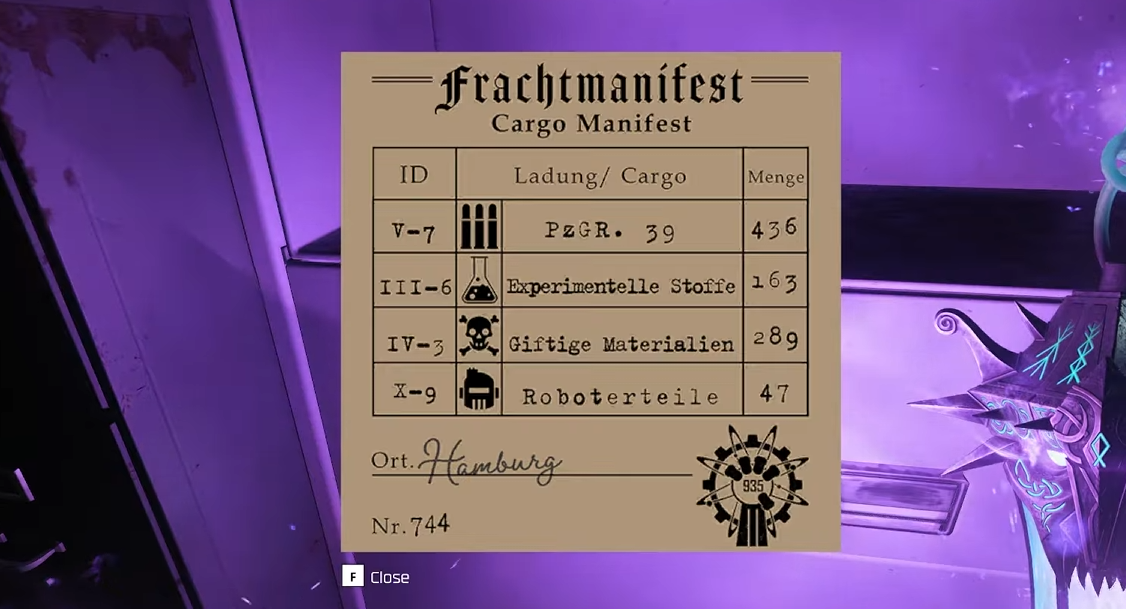
One of these boxes contains a flak gun round. There is a manifest in the War Factory admin room that tells you the correct box, but I think it’d be faster to just open all four and get the Flak randomly. The wooden box locations are:
-
Core Foundry, next to the sniper wall buy
-
Behind the boat at the bottom-right corner of the Dry Dock
-
In the room right before the War Factory admin room
-
At the end of Fjord Road
If you open the wrong box, you can get gassed or electrocuted. If you open the correct one, pick up the flak gun round.
Take the round to the lighthouse and place it in the artillery gun facing spawn. Fire the artillery, and it will shoot into the downed robot head at spawn. Go back to the spawn, search the robot head, and pick up the signal amplifier.
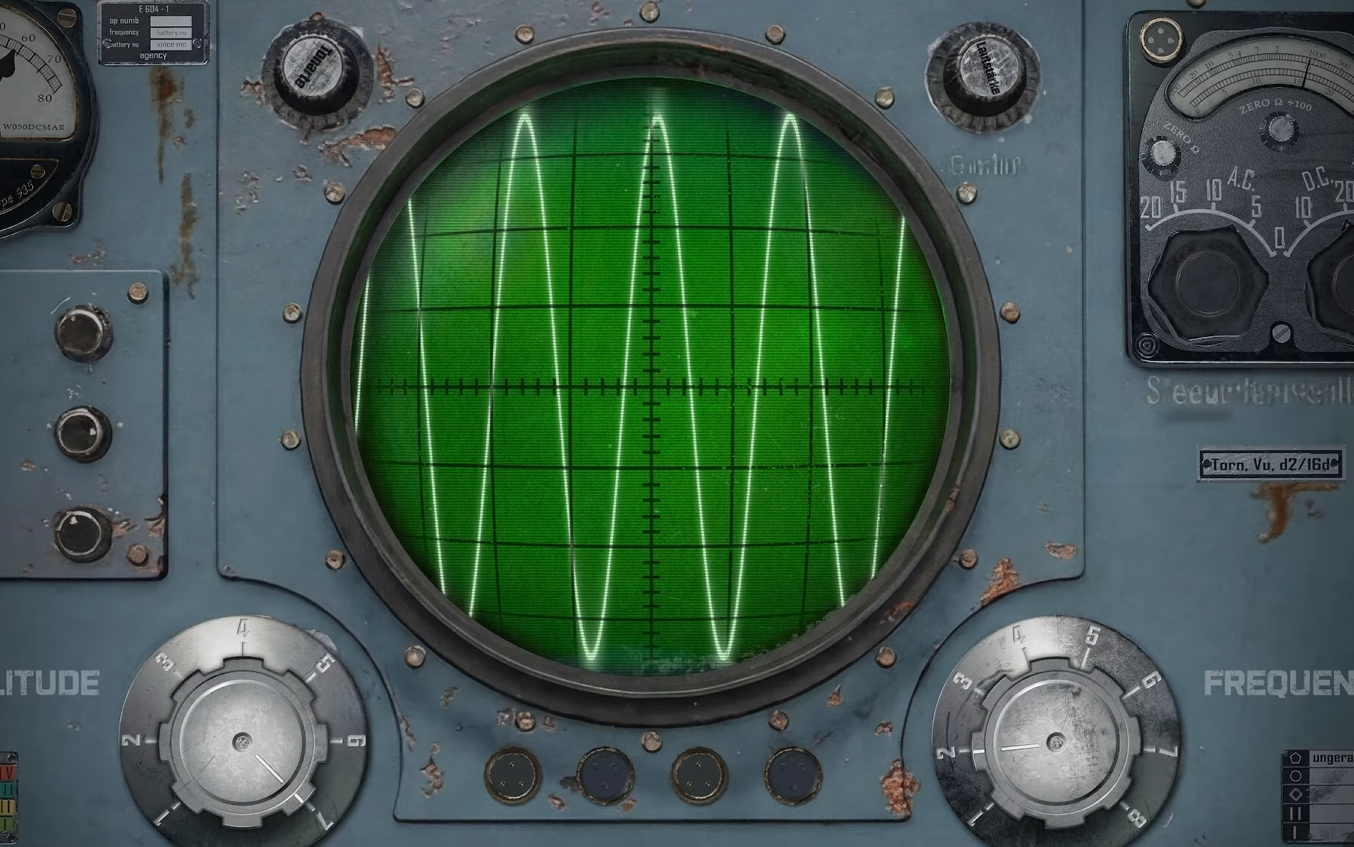
Step 9: Install the Signal Amplifier and Solve the Robot Light Codes
Take the signal amplifier to the robot you used during the Power step. Climb the ladder and install the amplifier into the wall. Now go to the robot’s head and watch the two blinking lights. The left and right lights will flash at the same time, creating two number pairs. Write them down in order. For example:
-
First pattern: left flashes 6 times, right flashes 2 times. That gives you 6 and 2.
-
Second pattern: left flashes 7 times, right flashes 3 times. That gives you 7 and 3.
Your numbers will change each game, so count your own flashes. Once you have the codes, go to the radio tower. Use a Molotov at the top of the zipline to burn the ice, then zip up to the tower. Interact with the control panel and set the dials to the first code.
If the robot shoots G-Strikes into a random area, that means the first code only calibrated it. Enter the second code next. The correct code makes the robot shoot the tower. If the first code makes the robot shoot the tower, you do not need the second code. After the tower is finally hit, pick up the rocket barrage controller in the room directly to the right of the radio antenna.
Step 10: Complete the Claw Machine Puzzle and Charge the Core
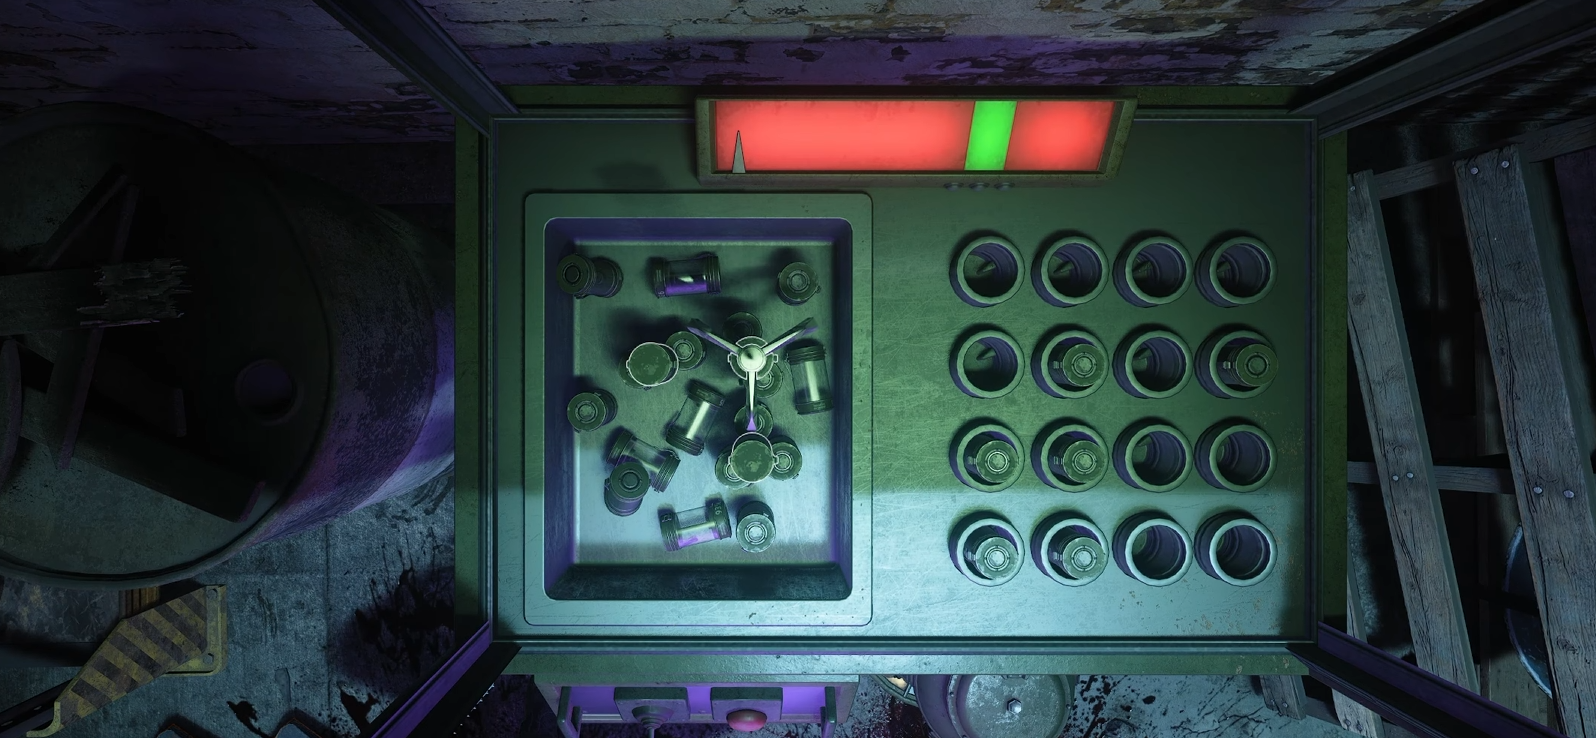
Take the rocket barrage controller to the Dry Dock and call it in on the marked wall. This opens a secret room with a claw machine puzzle. The puzzle asks you to pick up three light bulbs on the left and place them into slots on the right. The goal is to connect the bulbs without overloading the bar past the green area.
You only get one attempt per round. If you fail, flip the round and try again.
-
Once the puzzle is solved, a uranium core drops. Pick it up and carry it to the spawn near Quick Revive. You cannot sprint while holding it, so move carefully.
-
Place the core on the box near Quick Revive, then run into the shack behind it and activate the generator. This starts a defense step where you must protect the core.
-
Whenever the meter stops, run back into the shack and flip the switch again. After around three switch activations, the generator should fully charge.
Pick up the generator and take it to the bridge. Icebergs will appear on the way and try to knock you around. Break them quickly with your melee weapon, then place the generator directly in the middle of the bridge.
Step 11: Get the Meat and Start the Vegvisir Step
After placing the core on the bridge, a short cutscene will play. When it ends, run to the left side of the bridge near the robot and pick up the piece of meat.
-
Take the meat to the fireplace near Vulture Aid. Place it down, then use a charged Jotunn Star shot to start the fire.
-
Once the meat begins glowing, use a Disciple Injection to throw zombies at it and cook it completely.
-
After enough zombies are thrown at the meat, a lockdown starts with an HVT enemy.
-
Kill the HVT, and a rune will spawn in the fireplace. Pick up the rune and take it to the altar in the church.
Step 12: Solve the Vegvisir Symbol Puzzle
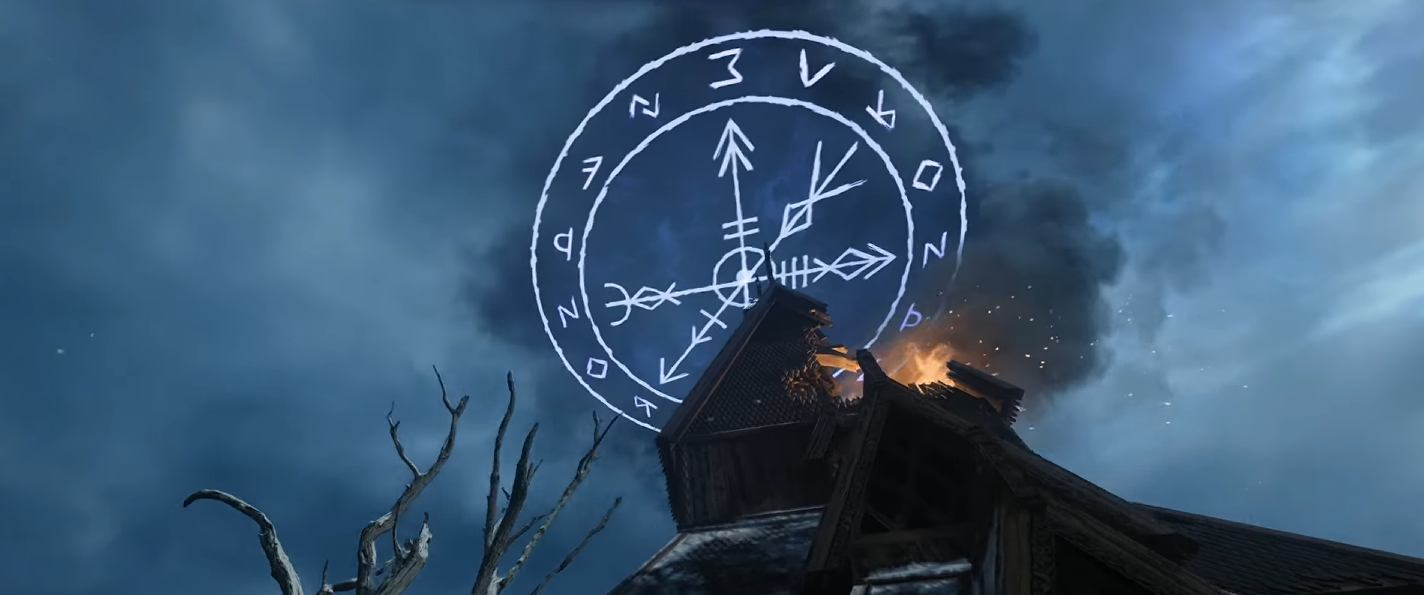
Place the rune on the church altar, then use another charged Jotunn Star shot to light the beam in the sky. A giant symbol will appear above the church. You only care about three arrows on this symbol:
-
The arrow with a single point
-
The arrow with a double point
-
The strange-looking arrow with the more complex shape
The symbols at the ends of those three arrows are your order. The symbols change every game, but the arrow order stays the same.
-
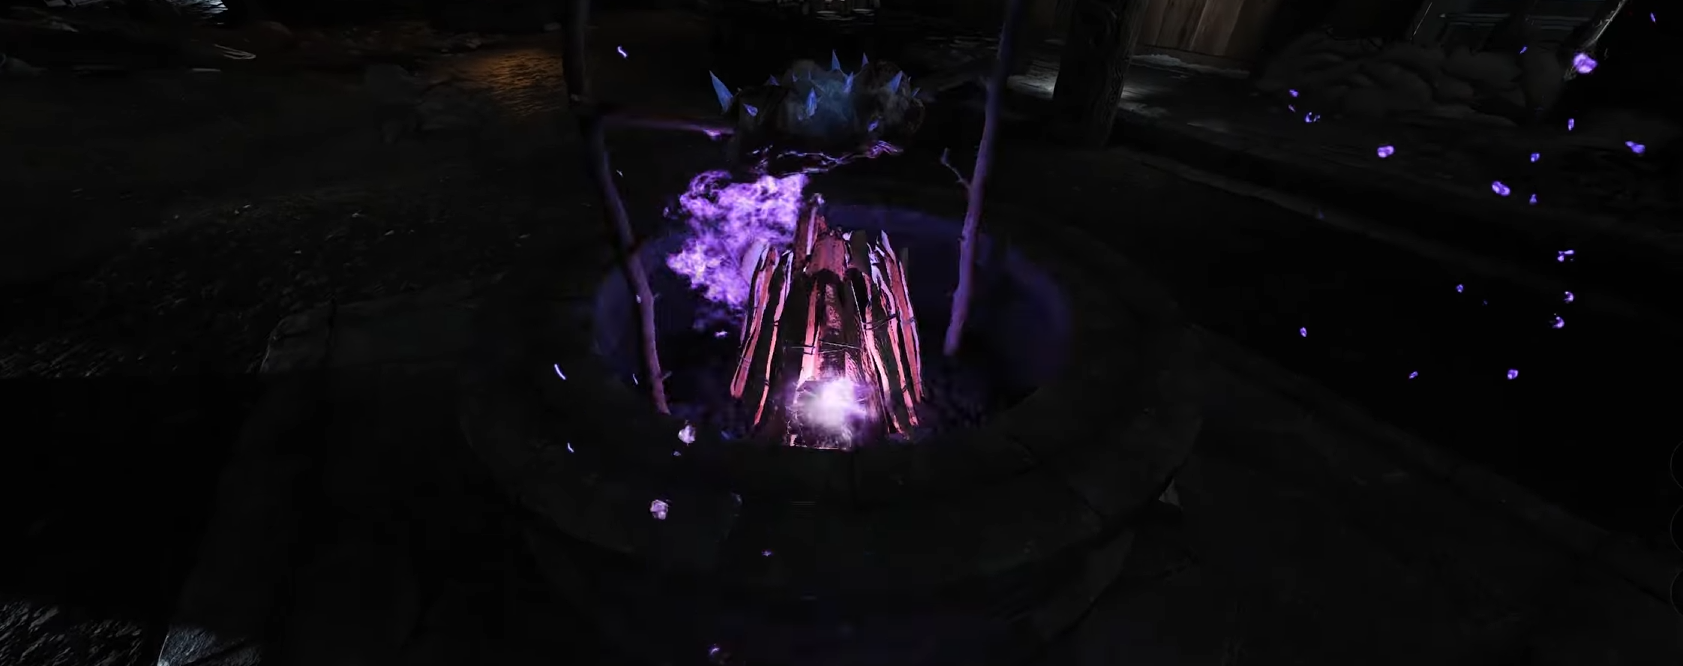
Write down the three symbols in that order. Then search the map for fire pits with those symbols floating above them.
-
When you find each matching symbol, shoot it with a charged Jotunn Star shot in the correct order. Once all three fires are lit, return to the church.
-
If done correctly, the arrow will now point toward the robot. That means you are ready to start the boss fight.
Step 13: Prepare for the Boss Fight
Do not enter the robot until you are fully ready. Once you start the fight, you are committed. Before entering, I’d recommend you bring:
-
Jotunn Star
-
A strong bullet weapon
-
Pack-a-Punch upgrades
-
Stim Shots
-
Extra armor plates
-
GobbleGums that help with armor or survival
-
Full perks if possible
You do not need a perfect setup, but armor matters a lot in this fight. The fight is tough, and the boss has several attacks that can shred plates quickly, so Stim Shots can save a run when the arena starts freezing. When ready, enter the robot and press the button in the middle to launch into the boss fight.
Step 14: Totenreich Boss Fight
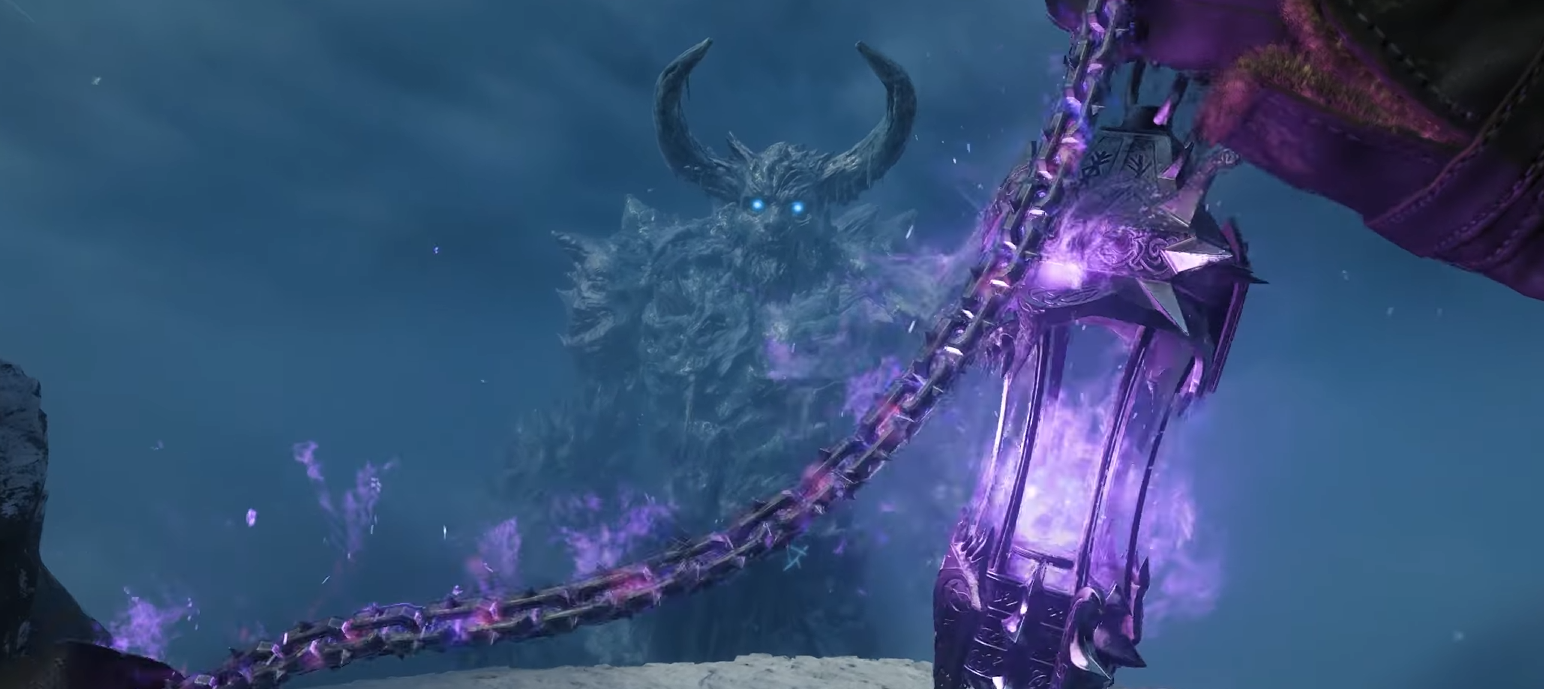
I love this fight in particular and the quest as a whole. The boss fight starts with the giant robot fighting the Jotuhn in the background, like what? During this phase, watch for the red weak spot on the boss:
-
Shoot the weak spot as soon as it appears. If you deal enough damage, the robot knocks the boss down and comes over to help you clear zombies for a short time.
-
If you do not deal enough damage, the boss comes toward you and starts attacking, while you also deal with zombies. It is much safer to focus on the red weak spot as soon as it appears.
-
You will repeat this a few times until the robot eventually gets knocked down. After that, you fight the main boss more directly.
During the immune sections, floating ice giant heads appear around the arena. Get close enough for the heads to aggro onto you, dodge their icicle attacks, then hit them with a charged Jotunn Star shot. This freezes the head and drops it to the ground.
Once a head is frozen on the ground, destroy it with a bullet weapon. These heads can drop armor and ammo, so use them to restock. The main boss has a few attacks to watch for:
-
Freeze attack: He freezes a large part of the arena. Run to the opposite side as soon as you see it.
-
Rune barrage: He launches rocks or runes at you. Hide behind pillars and peek out to shoot weak spots.
-
Icicle head phase: Freeze the floating heads with the Jotunn Star, then destroy them with bullets.
-
Final front-area attack: He locks you near the front and throws runes across the arena.
In the final stage, slide left or right based on where the runes are landing. If the arena is covered, go prone to avoid most of the barrage. Use Stim Shots if your armor breaks and your health starts dropping.
At the very end, the boss becomes undamageable, and the robot finishes the fight. Keep firing and survive the last moments. Once the boss goes down, congratulations, the Totenreich Main Quest is complete.
Totenreich Main Quest Rewards
Finishing the Totenreich Main Quest rewards you with the “Ambition” Richtofen Operator Skin, a Totenreich completion Calling Card, and 10,000 XP. If you complete the quest before Directed Mode arrives for the map, you also get a unique early completion Calling Card variant.
There are a couple of extra Totenreich rewards as well. Completing the Totenreich Mastery Challenge gives another Calling Card and 5,000 XP, while collecting the required Audio Logs, Documents, and Artifacts gives a third Calling Card and another 10,000 XP.
