
AION 2 Best Builds TL;DR
-
Skill investment determines which parts of the kit receive the most power.
-
Swapping stigmas creates the biggest difference between PvE, PvP, and support builds.
-
Specialties should improve the skills you already use most often.
-
Macros are essential for automating repeatable attack chains, but they should not be used with emergency abilities.
-
Accuracy comes first in most builds because missed attacks hurt the performance of most classes too much.
Want to start Global with more resources? You can get AION 2 Kinah on Playhub with quick delivery, competitive prices, and full privacy.
Best AION 2 Builds Overview
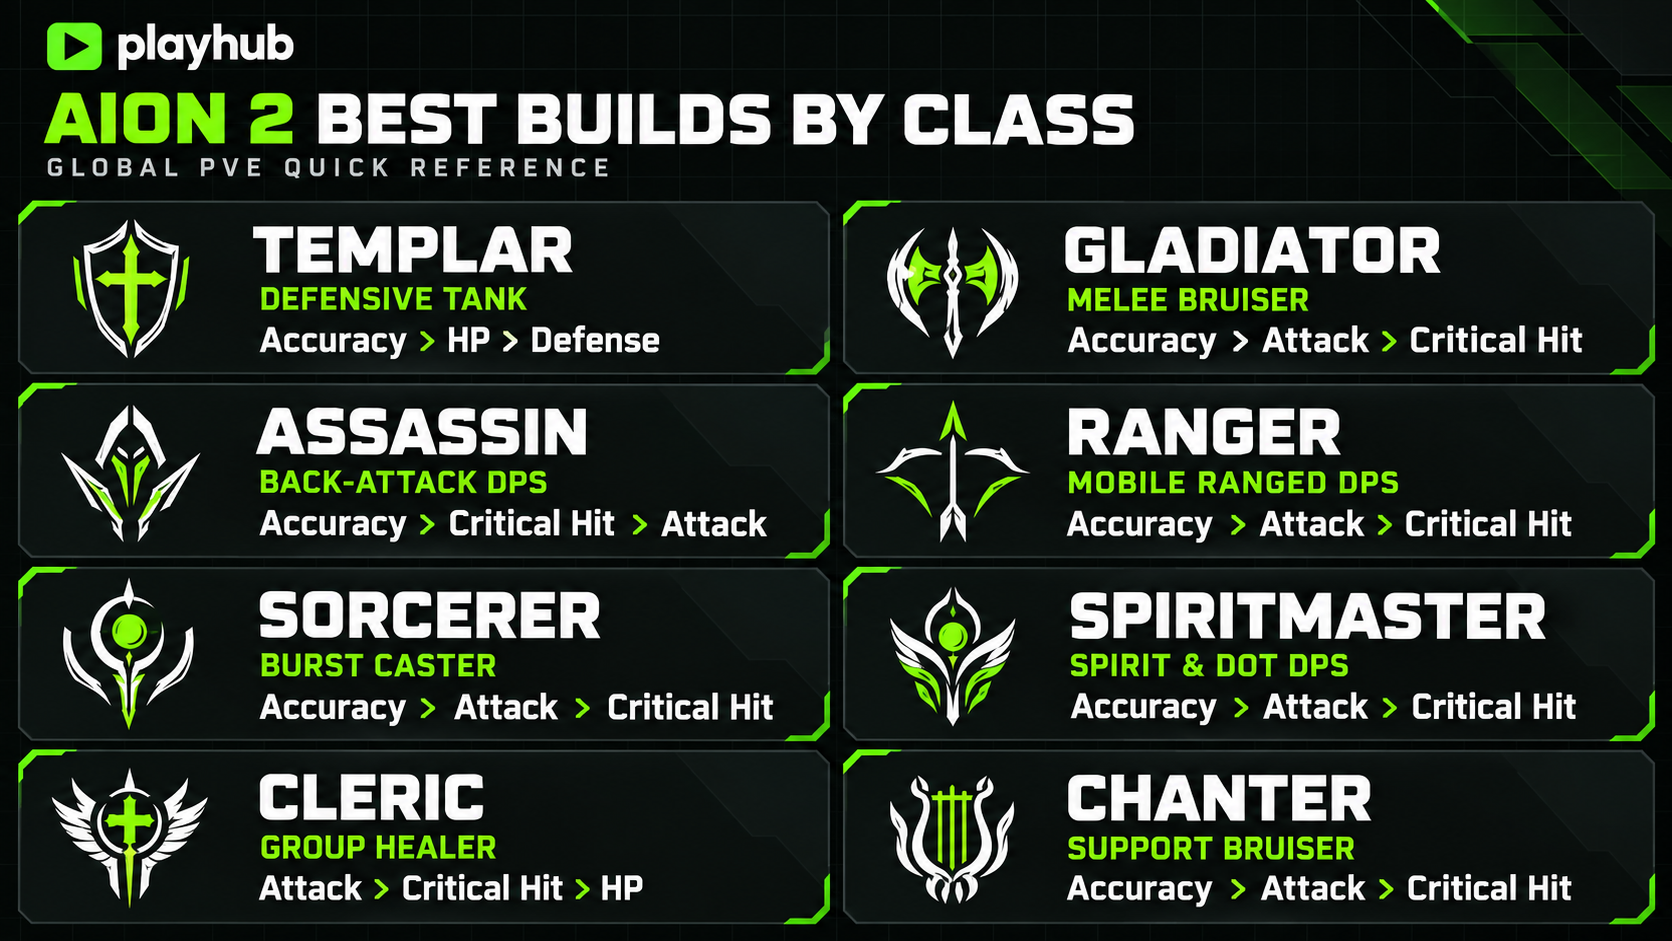
The table below shows the role each build is trying to perform. I have kept the recommendations focused on Global PvE, with the class sections explaining where you can make sensible swaps.
|
Class |
Build Focus |
Defining Stigmas |
Stat Priority |
|---|---|---|---|
|
Templar |
Defensive tank |
Shield of Protection, Taunt, Battlefield Banner, Doom Shield |
Accuracy > HP > Defense |
|
Gladiator |
Melee bruiser |
Lunge Stance, Zikel’s Blessing, Rage Burst, Focused Block |
Accuracy > Attack > Critical Hit |
|
Assassin |
Back-attack DPS |
Illusive Clone, Swift Contract, Triniel’s Dagger, Throw Shadowblade |
Accuracy > Critical Hit > Attack |
|
Ranger |
Mobile ranged DPS |
Vaizel’s Authority, Bow of Blessing, Supporting Fire, Griffon Arrow |
Accuracy > Attack > Critical Hit |
|
Sorcerer |
Burst caster |
Element Enhancement, Delayed Explosion, Fire Wall, Steel Barrier |
Accuracy > Attack > Critical Hit |
|
Spiritmaster |
Summon and damage-over-time DPS |
Summon: Ancient Spirit, Spirit’s Benediction, Flame Blessing, Jointstrike: Corrode |
Accuracy > Attack > Critical Hit |
|
Cleric |
Group healer |
Light of Protection, Noble Aura, Earth Punishment, Prayer of Amplification |
Attack > Critical Hit > HP |
|
Chanter |
Support bruiser |
Undefeated Mantra, Sprint Mantra, Power of the Storm, Marchutan’s Wrath |
Accuracy > Attack > Critical Hit |
Best Builds for Every AION 2 Class
Templar Tank Build
Since the Templar class is not trying to win a DPS race, we’re prioritizing the skills that help us keep the boss pointed in the right direction while turning successful blocks and shield actions into more threat and safer damage windows for the group.
-
Skill Specs: Judgment 12 for the guaranteed Critical Hit, then 16 to remove its cooldown; Pummel 12 for Punishment cooldown reduction; Warding Strike 12 for Damage Tolerance, then 16 for party protection.
-
Stigmas: Empyrean Lord’s Punishment 5, Doom Shield 5, Battlefield Banner 5, and Taunt 1. Raise Taunt later if forced-target uptime becomes a problem.
-
Daevanion: Take the blue nodes at the Nezekan board for Judgment, Punishment, and Pummel first, then work toward Fury and Ironclad Defense nodes.
-
Pantheon: Justice > Life > Space - full on defenses.
-
Gear baseline: Enraged Kromede extended sword, Nakk plate, and White Dragon Lord accessories. Until then, favor gear with Accuracy, HP, and Block over forcing a named set.
-
Macros: Doom Shield → Warding Strike → Shield Smite → Judgment; Pummel → Flash Rampage → Debilitating Smash → Annihilate.
-
Stat priority: Accuracy requirement > HP > Defense or Block.
-
Situational swaps: Use Shield of Protection for harder PvE. Grapple and Comrade in Arms make more sense in PvP.
As with many other builds on this list, accuracy comes first. On Templar, it’s especially crucial because a missed opener becomes a threat generation problem. Once attacks consistently land against the content you are farming, build HP and whichever defensive stat your current gear complements best. Chasing damage increases before that point is basically pointless - there are lots of DPSes in your groups as is.
Gladiator Greatsword Build
Gladiator is the comfortable melee all-rounder, and we’re going to double down on it in this build. Korean players have pushed offensive glass cannon versions hard, but the balanced build makes more sense for a fresh Global account because it loses comparatively little damage while gaining lots of survivability.
Gladiator works best when Rage Burst can generate enough resources for repeated Overhead Slams without draining the character dry. That makes Overhead Slam and Rending Blow the first two level-up targets; basically, Ruinous Blow and Sword Aura Rampage can wait until the main loop is already working.
-
Skill Specialties: Overhead Slam 12 for a guaranteed Critical Hit, then 16 to remove its cooldown; Rending Blow 12 for boss damage, then 16 for MP recovery on Critical Hits; Ruinous Blow 12 for the additional hit, then 16 to ignore Block/Evasion and land as a Multi-Hit; Sword Aura Rampage 16 for cooldown reduction during stagger windows.
-
Stigmas: Rage Burst 5 and Focused Block 5 first, then Lunge Stance 20. Keep Zikel’s Blessing equipped but delay its upgrades until Lunge Stance is finished.
-
Daevanion: On Nezekan, take the blue Overhead Slam and Rending Blow nodes first. Next, take Ruinous Blow, then pick up the green Attack Preparation and Experienced Counter Strike nodes.
-
Pantheon: Destruction > Death > Freedom. Destruction improves Attack, Death adds Critical Hit, and Freedom helps cover Accuracy.
-
Gear baseline: Enraged Kromede greatsword, full Nakk plate, and White Dragon Lord accessories. Overhead Slam and Rending Blow skill lines matter most on the rings.
-
Macro: Rage Burst → Overhead Slam → Rending Blow. Keep Rush Strike, Focused Block, and Zikel’s Blessing manual.
-
Stat priority: Accuracy > Attack > Critical Hit.
-
Situational swap: Replace Focused Block with Lifestealing Blade when solo sustain matters more than mitigation.
Gladiator really does not need a long macro, so we keep it simple. I think that automating Rush Strike is especially risky; the button that saves uptime can also get you into a horrible position both in PvE and PvP.
Assassin Back-Attack Build
Assassin has one of the highest single-target damage ceilings in AION 2, but you need backstab uptime and proper Insignia management to bring the most out of it. Korean boss footage makes the burst look effortless because the good attempts are built around stable positioning. In a rough pick-up group, the same character can lose a large chunk of its value while chasing a rotating target.
Heart Gore deserves the biggest investment first because its level-16 reset can create another burst window for your rotation. Quick Slice and Insignia Explosion only need their useful middle breakpoints before you return to upgrading Heart Gore.
-
Skill Specialties: Heart Gore 12 for Multi-Hit, then 16 for cooldown resets on Critical Hits; Quick Slice 12 to shorten Insignia Explosion’s cooldown; Insignia Explosion 12 for the longer Stun, then 16 for another 3-second cooldown cut.
-
Stigmas: Illusive Clone 20 first; Swift Contract 15, then 20; Triniel’s Dagger 10; Savage Fang 15.
-
Daevanion: Take blue nodes for Heart Gore and Insignia Explosion first, followed by Quick Slice. Exploit Weakness and Rear Smite are the best green-node follow-ups for the back-attack build.
-
Pantheon: Death > Destruction > Time. Critical Hit comes first because the build’s resets depend on crits, followed by Attack and Combat Speed.
-
Gear baseline: Enraged Kromede daggers, Nakk leather, and Dragon Lord accessories are BIS. Try to get Heart Gore and Insignia Explosion skill lines on accessories.
-
Macro: Insignia Explosion → Heart Gore → Savage Roar. Keep Quick Slice separate and keep Ambush, stealth, Evasion Stance, and disengages on manual control.
-
Stat priority: Accuracy requirement > Critical Hit > Attack > Back Attack Damage.
-
Situational swaps: Use Throw Shadowblade when the boss denies melee access. Use Evasion Stance when staying alive produces more damage than the fourth offensive Stigma.
After meeting the Accuracy requirements, Critical Hit tends to pay off the most - several parts of the kit scale with crits. Attack and Back Attack Damage follow in the priority order.
Ranger Bow Build
Ranger may not be the absolute peak-DPS answer in every Korean parse, but it’s chill to play and get rewarded across all content. That consistency is why, for me, Ranger remains such an easy recommendation for a newcomer’s first Global character.
Ranger has several good endgame passive targets, but trying to finish all of them at once spreads the build too thin. Deadshot and Gale Arrow should get to LvL 20 first. Snipe, Drill Dart, and Tempest Shot work well enough at 16:
-
Skill Specialties: Deadshot 20 for all three equipped Specialty slots; Gale Arrow 12 for the better Gale buff, then 20; Snipe 12 for Deadshot cooldown reduction, then 16 for the Tempest Arrow chain; Drill Dart 12 for Multi-Hit, then 16 for another activation; Tempest Shot 16.
-
Stigmas: Bring Vaizel’s Authority, Bow of Blessing, Supporting Fire, and Griffon Arrow to 5. Finish Vaizel’s Authority at 20 first, then work through the other three.
-
Daevanion: Take Deadshot and Drill Dart blue nodes, followed by Gale Arrow. Concentrated Fire and Focused Eye are the best passive-node follow-ups.
-
Pantheon: Destruction > Death > Time. Attack and Critical Hit improve every rotation, while Combat Speed keeps the bow chain flowing.
-
Gear baseline: Enraged Kromede or crafted longbow with Nakk chain armor. Look for Deadshot, Drill Dart, and Gale Arrow skill lines on accessories.
-
Macros: Gale Arrow → Drill Dart → Tempest Shot for bosses; Vaizel’s Authority → Explosive Arrow for farming. Keep Snipe separate.
-
Stat priority: Accuracy requirement > Attack > Critical Hit.
-
Situational swap: Use Explosive Arrow when clearing packs. Keep traps, movement, and defensive skills manual.
Sorcerer Fire and Ice Build
Sorcerer competes with Assassin for the highest burst, but it pays for that damage with stationary cast playstyle. A good build therefore should improve both your damage and the chance of actually getting the casts off. Sorcerer gets the most value from completing a compact Fire rotation, so we’re improving that direction the most:
-
Skill Specs: Flame Arrow 12 for the Fire Damage Boost, then 16 to reset Blaze; Firestorm 12 for Hellfire cooldown reduction, then 16 for stacking fireball damage; Blaze 12 for Multi-Hit; Wish of Concentration 12 for Combat Speed, then 16 for the 10-second cooldown cut; Winter’s Shackles 8.
-
Stigmas: Element Enhancement 15 first. Bring Delayed Explosion, Fire Wall, and Steel Barrier to 5 before spending more shards elsewhere.
-
Daevanion: Take blue nodes for Hellfire, Firestorm, and Blaze first. After those breakpoints are covered, invest in Grace of Enhancement and Robe of Flame nodes.
-
Pantheon: Destruction > Illusion > Death.
-
Gear baseline: Splendid Genesis Dragon spellbook and cloth set with Enraged Kromede accessories are your target gear. Hellfire, Firestorm, and Blaze skill lines are the priority.
-
Macro: Winter’s Shackles → Bittercold Wind → Blaze → Firestorm. Keep Flame Arrow, Hellfire, Wish of Concentration, movement, and Steel Barrier manual.
-
Stat priority: Accuracy requirement > Attack > Critical Hit > enough MP to keep Grace of Enhancement active.
-
Situational swap: Replace Steel Barrier with Cold Storm only when the group already covers protection.
The four-skill row is a convenience, but you have to read the room - if the boss is about to move, stop the macro and use the shorter cast that will actually land.
Spiritmaster Spirit and DoT Build
Spiritmaster wants its spirit attacking and its DoTs ticking. The spirits do their job well enough at lvl 8, so you’d be better off leveling spells like Cold Shock and Combustion first:
-
Skill Specs: Cold Shock 12 for the stacking Attack effect, then 16 for buff removal; Combustion 12 for Skill Speed, then 16 for Ashy Call; Jointstrike: Curse 12 for the shorter cooldown, then 16 to ignore Block/Evasion and land critically; Elemental Fusion 12 for the charged hit; Dimensional Control 12; normal spirits 8, with Earth Spirit 16 later.
-
Stigmas: Summon: Ancient Spirit 15 first, then 20. Bring Enhance: Spirit’s Benediction, Flame Blessing, and Jointstrike: Corrode to 5 while working toward it.
-
Daevanion: Take the blue Elemental Fusion, Cold Shock, and Combustion nodes. Spirit Strike and Mental Focus are the best green-node options.
-
Pantheon: Destruction > Destiny > Death. Attack leads, extra MP helps the full spirit cycle, and Critical Hit finishes the damage package.
-
Gear baseline: Use the best crafted orbs available with Nakk cloth and Enraged Kromede accessories. Prioritize Elemental Fusion, Combustion, and Cold Shock skill lines.
-
Macros: Water Spirit → Corrode → Earth Spirit → Fire Spirit; Jointstrike: Curse → Elemental Fusion → Dimensional Control → Combustion. Keep Cold Shock separate.
-
Stat priority: Accuracy requirement > Attack > Critical Hit > HP.
-
Situational swap: Use Siphon during long solo sessions. Keep pet repositioning, spirit survival tools, and crowd control manual.
Make sure to watch the summons - on bosses that move between platforms or change targets a lot, a manual correction is worth lots of DPS.
Cleric Group-Healing Build
Cleric class needs enough healing power to cover just enough of the encounter damage, then wants to get as much personal damage as possible. Cleric splits its bonus levels between healing and damage, and priority depends on the content.
-
Passive skills: Judgment Thunder 16 to make Divine Punishment activate twice; Radiant Recovery 12 for Incoming Heal, then 16 for harder group content; Condemnation 12 for the Critical Hit reset, then 16 for Multi-Hit; Earth’s Retribution 12 for Bolt cooldown reduction; Healing Light 16 for the shorter cooldown, then 20 for its third equipped Specialty.
-
Stigmas: Bring Light of Protection, Noble Aura, Earth Punishment, and Prayer of Amplification to 5, then finish Light of Protection at 20 first.
-
Daevanion: Condemnation is the basic choice for most PVE encounters. Add Healing Light and Radiant Recovery nodes when you need more healing, or Bolt when you can make use of more damage.
-
Pantheon: Destruction > Wisdom > Illusion.
-
Gear baseline: Aim for a crafted mace and shield, Nakk chain, and Enraged Kromede accessories. Condemnation, Chain of Torment, and healing skill lines provide the most value.
-
Damage macro: Chain of Torment → Debilitating Mark → Condemnation → Judgment Thunder. Keep Earth’s Retribution separate and every defensive button on manual.
-
Stat priority: Attack > Critical Hit > HP > enough MP for the content.
-
Situational swaps: Use Benevolence for sustained healing or Absolution when cleansing decides the encounter.
Unmacroed heals are essential - you just can’t spend any time waiting for the right cast to go off, so manual is super necessary.
Chanter Support-Bruiser Build
Chanter is easy to misunderstand because its personal damage can look good enough to tempt players into building a weaker Sorcerer. But really, the class becomes way more valuable when it keeps a portion of that personal output and improving everyone else’s damage through its buffs.
-
Skill Specs: Dark Crush 12 for Piercing Strike, then 16 to remove its cooldown; Recuperation 12 for the larger heal; Spinning Strike 12 for Seal, then 16 to ignore Block/Evasion and land critically; Onslaught 12 to reduce enemy Accuracy through Bursting Blow, then 16 to ignore Block/Evasion and land as a Multi-Hit.
-
Stigmas: Undefeated Mantra 20 first. Bring Power of the Storm and Sprint Mantra to 5, leave Marchutan’s Wrath at 1 initially, then make Power of the Storm the second level-20 target.
-
Daevanion: Take blue nodes for Dark Crush and Spinning Strike first, followed by Onslaught. Attack Preparation and Wind Promise are very good, too.
-
Pantheon: Destruction > Life > Death.
-
Gear baseline: Crafted staff, Nakk cloth, and Enraged Kromede accessories. Dark Crush, Spinning Strike, and Undefeated Mantra skill lines take priority.
-
Macros: Spinning Strike on its own; Dark Crush → Marchutan’s Wrath → Impactful Crush → Incandescent Blow. Keep Onslaught separate and support tools manual.
-
Stat priority: Accuracy requirement > Attack > Critical Hit > HP.
-
Situational swap: Replace Marchutan’s Wrath with Healing Touch when extra recovery prevents deaths or lets the Cleric keep attacking.
Accuracy stat once again comes first for the damage side because missed attacks break more than the number floating over the target. Attack and Critical Hit follow, with HP gaining value as mechanics become less forgiving. The goal is not to top one meter at the cost of the class’s actual reason for being invited.
Check out other helpful Aion 2 articles: