All Weapon Case Locations in ARC Raiders
-
Weapon cases can spawn weapons, ammo, and blueprints, but they are not guaranteed to appear each run
-
Spawn points stay fixed, so learning locations is important in the long run
-
Cases can appear in multiple spots within the same room, so always check the whole area
-
High-value POIs like Control Tower, Santa Maria, and Arrival get contested early
Target-farming weapon Blueprints could take you upwards of hundreds of hours. To save lots of time, you can always buy ARC Raiders Blueprints on Playhub. Secure and fast delivery from verified sellers only.
How Weapon Cases Work in ARC Raiders
Out of all crate types, weapon cases are special in ARC Raiders - they spawn weapons, weapon blueprints, and ammo. After the much-requested weapon cases buffs in a recent patch, they’ve become not only an excellent way for beginners to acquire their first Anvils and Ospreys, but a stable source of Bobcats, Tempests, and other epic guns.
There are several set case spawn points on the map, but they’re not guaranteed to appear every game. Moreover, they’re usually contested by other players, since everyone values them highly, so knowing where exactly to search for them is crucial. Sometimes they get replaced by ammo boxes, grenade tubes, and medical tubes, too, so try to remember the spawn points whenever you see them - next time, it could be a weapon case spawned at the exact same place.
As always, Night Raid = better loot, and weapon cases are not an exception. Running cold snap or any other special condition increases your chances of findgint better loot.
Dam Battlegrounds Weapon Case Locations
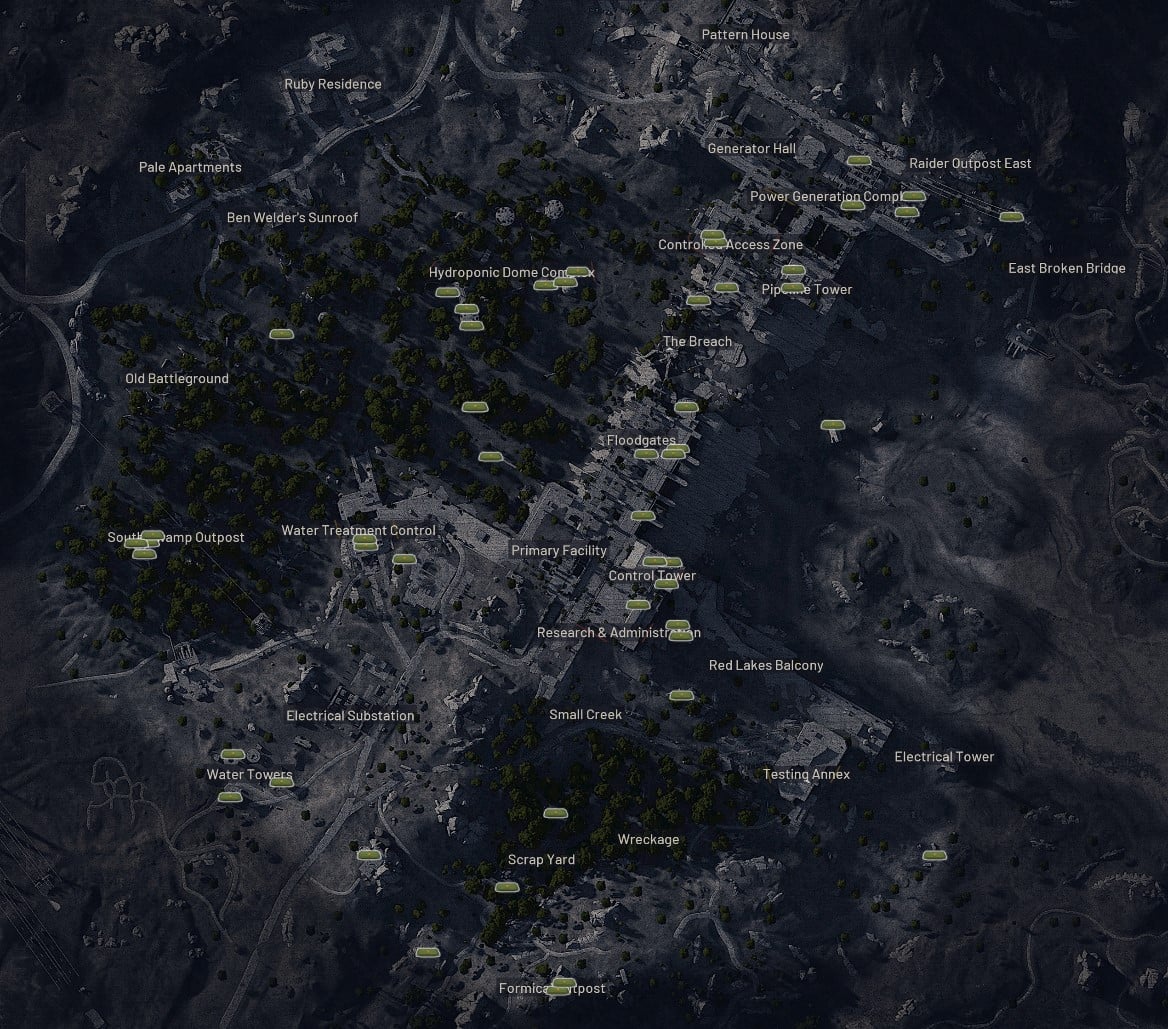
Dam is the map where cases are useful as ever. Even if you lowroll and get a green weapon, it’s a great tool whenever you’re only starting out. The crates are spread across rooftops, towers, locked rooms, broken bridges, abandoned shacks, and even simply hidden between rocks somewhere in the open. There are lots of places you’ll want to check out, and these are the ones I visit in my games whenever I’m nearby:
|
Location |
Weapon Case Spots |
|---|---|
|
Power Generation Complex |
On the raised section with the electrical machinery, look beside the two upright pallets standing next to each other. |
|
Broken bridge east of the power area |
At the end of the bridge, drop down into the hole in the structure. The case sits in the hidden pocket below. |
|
Red Lakes bridge wreck |
Inside the broken bridge piece sticking up from the ground, check the interior near the hornet husks. |
|
Testing Annex area |
Truck southeast of Testing Annex: look in the back of the truck near the small camp. Tower between Testing Annex and Research & Administration: climb the tower, then jump onto the vent-like platform below. The case might spawn there. |
|
Pipe junction near the leaper area |
In the southmost corner, where the big pipe meets the lower section, I always check the floor whenever I pass there. |
|
Control Tower |
Lower fight area: at the bottom, look below the large cabinets. Locked room: this one has several possible placements. Check the table, under the computer banks, on the right side by the other computers, and on the window side. Locked rooms all share the same theme - weapon crates are often a part of the loot I’d expect you to get there, unless it’s a medical room or something. |
|
Formicai Outpost |
Desk: one case can sit right on top of the desk inside. Upper jump: the second one is higher up on a cabinet after the awkward jump puzzle through the interior climb. Generator northwest of Formicai Outpost: check by the generator. This spawn can compete with a medical bag. |
|
South Swamp Outpost |
The spawn is right on the couch inside. |
|
Hydroponics |
Hydroponic southwest dome: one case can sit in the west corner of the dome. Another can appear by the water pools. Hydroponic eastern dome: check the back shelves. The case can be found on either shelf side. Crashed car south of Hydroponics: climb the crashed vehicle that leans into the tower and check the platform at the top. There’s also a rock formation south-southeast of that crash site: look under the small rock overhang; there could be a case hidden here. |
|
Water Treatment |
Main room: just check on top of the table. Locked room: if you have the key, inspect the desk and the floor inside. Pipe lift: ride up and check the end of the pipe above the courtyard. I’ve opened this crate dozens of times, and they were always unlooted for some reason. Try this spot whenever you’re near. |
|
Water Towers |
Both tower tops can spawn a case. These are much easier to access using a Snap Hook or a Zipline. |
|
Research & Administration |
Second floor: go up one floor, turn left, and check behind the couch. |
|
Breach / Pipeline Tower area |
Bridge by the Breach and Pipeline Tower: at the far end of the bridge overlooking the matriarch area, inspect the floor. Under the broken bridge by the Breach: on the opposite side, check directly beneath the broken section. Interior room behind that bridge: go through the nearby door, head down, turn left, and inspect the floor space inside. |
|
Floodgates |
Breach room: after dropping the drawbridge and breaching in, check the loot room carefully. |
With how large the Dam is, don’t try too hard to chase the cases specifically. Use this list whenever you visit the location and try to find cases hidden there; you’ll gradually memorize the placements this way.
Buried City Weapon Case Locations
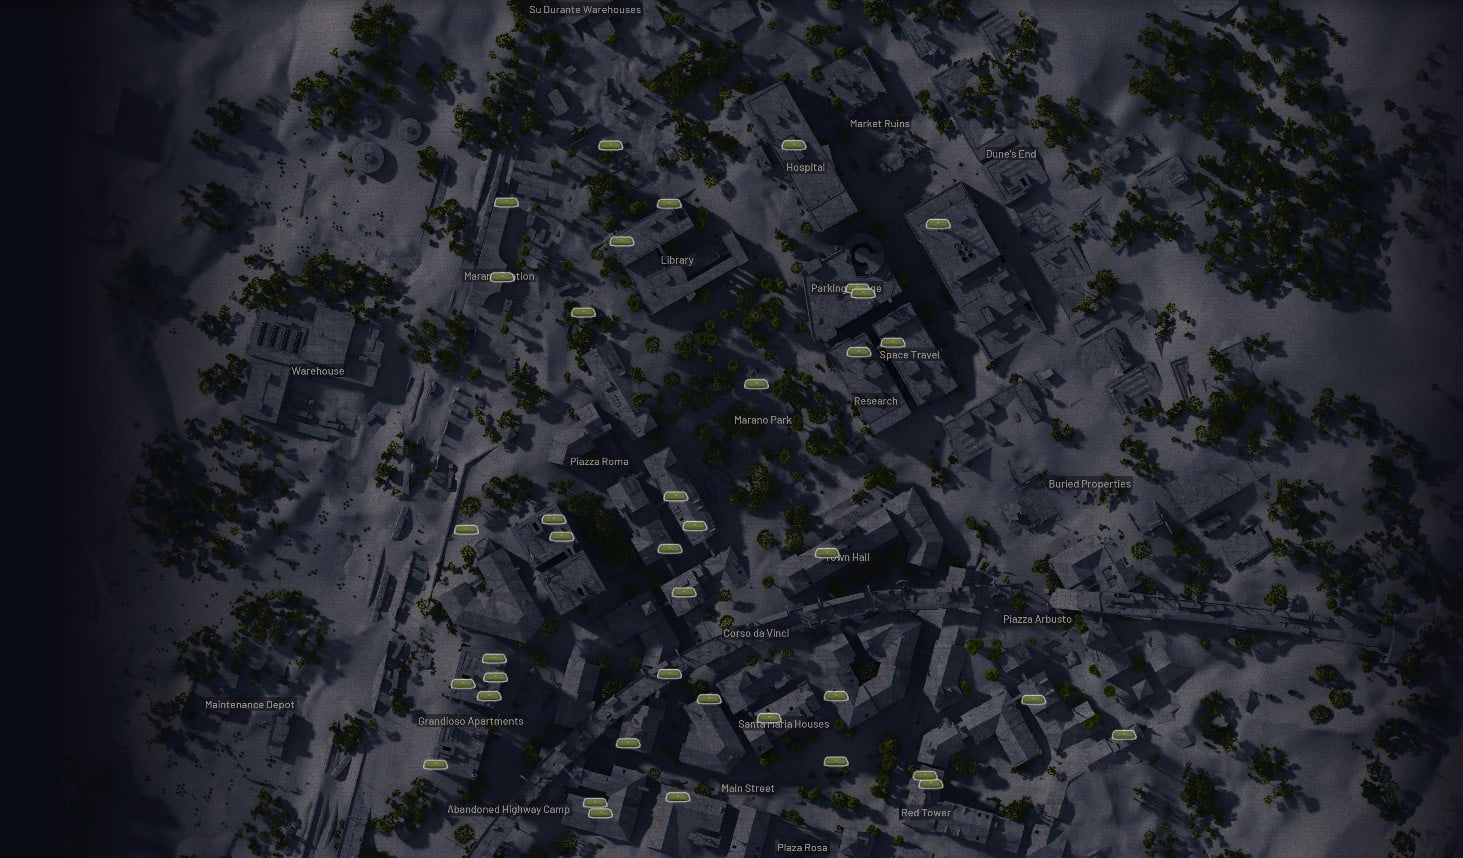
Buried City has lots of case spawns, but they’re often contested due to how players tend to spread on this map. Rooftops, keyed rooms, and famous landmark crates get checked fast, so knowing the exact corner matters if you want to loot up something good.
|
Location |
Weapon Case Spots |
|---|---|
|
Library area |
Library rooftop: check the northern corner of the roof. That’s the one I was oblivious about for the longest, even though I frequented the place all the time. Bus just northwest of the Library: inspect the inside of the broken bus. |
|
Galleria |
Galleria sign: climb or zipline onto the sign itself and check the top. |
|
Parking Garage |
Lower level: this area has several possible placements. Check the blue tarp, the car, and the truck in the corner. This one’s thematically fitting for the case, since it’s a raider outpost. |
|
Space Travel |
Fourth-floor locked room: if you have the JKV keycard, the case is inside the room. |
|
Marano Park apartments |
Apartment southwest of Marano Park: go to the attic and inspect the corner. Apartment just south of that: in the kitchen area, check the top of the shelf. |
|
Piazza Roma / Piazza Arbusto area |
Apartment building A2 by Piazza Roma: take the zipline into the room and check behind the whiteboard first. The second possible spot is the back-left side of the room. Piazza Arbusto apartment: go to the second floor near the train exit and check inside. Tower apartment near Piazza Arbusto: climb to the top and inspect the rooftop platform. |
|
Marano Station |
Breach room: after breaching in, check near the other loot containers. Roof: climb up from the trains and inspect the area beside the sign. |
|
Red Tower |
Exterior: one case can sit on the left metal platform. Interior: in the room with lockers and the breach, check the back above the stairs. |
|
Santa Maria area |
Open circle between Red Tower and Santa Maria: inspect the exposed ground spawn in the middle. This is a very risky one. Santa Maria Houses: this POI has multiple placements. Check the whole courtyard and interior, because the case can sit in different parts of the compound. White room northwest of Santa Maria: jump in, take a quick right, and check the small white room. Bridge semi-truck north of that house: there could be a case, too. |
|
Abandoned Highway Camp |
Building under Abandoned Highway Camp: jump in through the window from the north side, go inside, and check under the table on the right. |
|
Grandioso Apartments |
Rooftop: inspect the hut roof area and the generator side. Locked room: the case is inside once opened. |
|
Hospital |
Rooftop room: zipline or hook up, then check inside the structure on the rooftop. |
|
Town Hall |
Locked room: this area has multiple placements, so check it thoroughly. |
The biggest drawback of trying to chase down the cases on Buried CIty is how contested they get. I’d suggest you not even bother rechecking the spawn point after you hear other players stalking around it.
Spaceport Weapon Case Locations
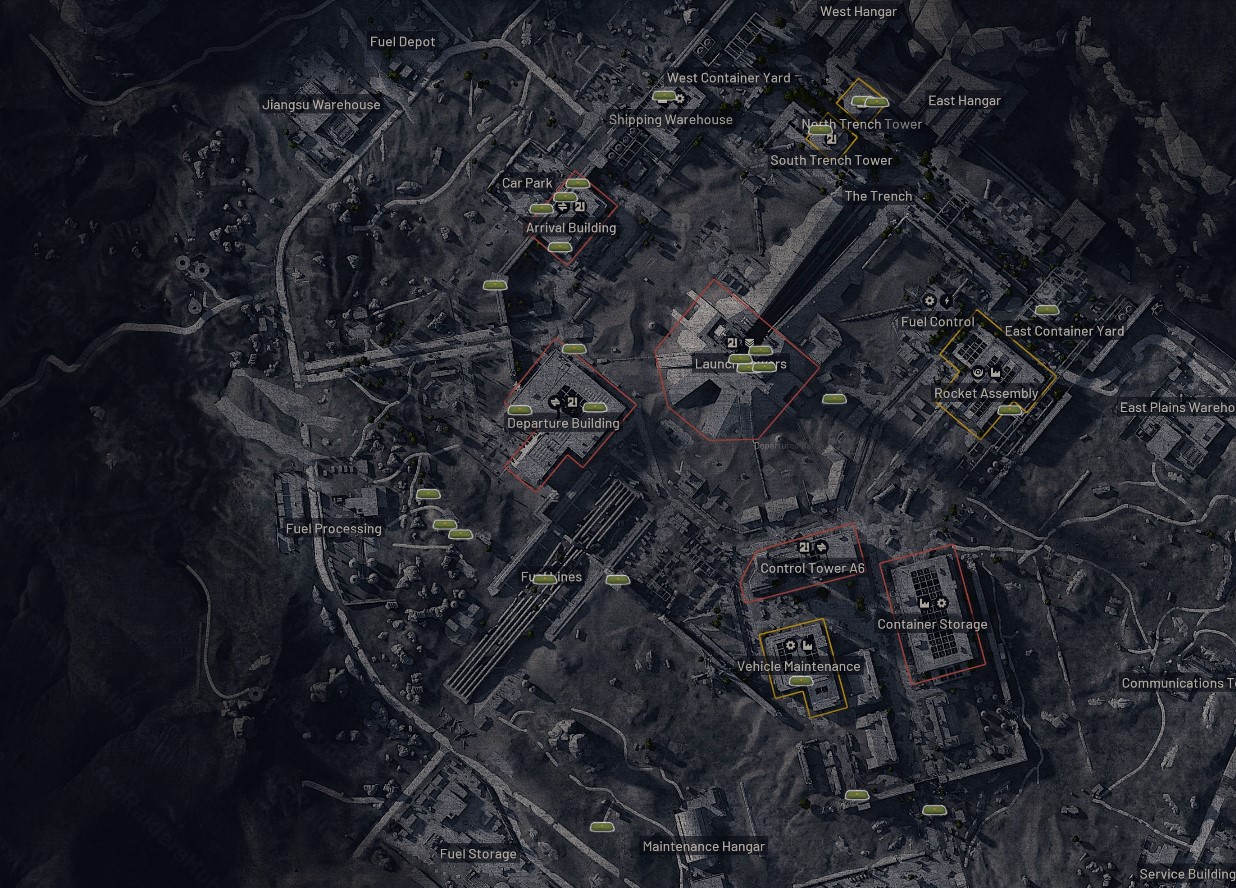
Spaceport is still the best map for case farming because spawn point clusters are scattered across the map, as evident from the arcraidershub’s map. That means you’ll most likely find a completely unlooted spawn in every game. Players also reported increased drop rates of epic weapons on this map, so choosing this map solely to do weapon case runs could be a go. There are many spawn points there:
|
Location |
Weapon Case Spots |
|---|---|
|
Trench Towers |
North Trench Tower: on top of the desk inside. South Trench Tower: inside the tower, if you open it. North Trench vent top: climb up and inspect the top of the vent-like structure. |
|
Arrival Building |
Roof: check the rooftop platform. South breachable room: inspect the desks inside - the case might be on top of them. Elevator shaft: go to the bottom and check the back. West breachable room: the case can sit on the northern side of that room. |
|
Southwest of Arrival |
Watchtower southwest of Arrival: go to the top and inspect inside. I’ve found a Bobcat there once. |
|
Maintenance / Fuel Storage area |
Red sphere between Maintenance and Fuel Storage: check behind it. Watchtower east of that sphere: go to the top floor. |
|
West entrance area |
Security office near the west entrance: inspect the grassy ground spot. |
|
Rocket Assembly area |
Corner near Rocket Assembly blue area: drop down and check the corner near the edge. Pipes south of Rocket Assembly: climb the exterior pipes and inspect the top. |
|
Container Storage |
Locked room: the case is inside the room, per usual. |
|
Fuel Lines |
Tower by Fuel Lines: go up and inspect the top room. |
|
Departure Building |
Ground breach room: go to the shower area and check all the way in the back. Upper floor: on the east side near the top, inspect the desk. |
|
Tunnel under Departure |
One case can appear on top of the computers. Tunnel bend farther east: check the turn in the tunnel where other utility loot can also appear. |
|
Launch Tower |
Lower level: inspect the sand-side area at the bottom on the south end. Southeast top: check the upper platform. Northwest tower interior: inspect the inside. |
|
Control Tower A6 |
Locked room: once inside, check around the control panels and the edges of the room because the exact placement can shift. |
Spawn points layout creates a potential for running loot paths in your games. Trench Towers → Arrival Building → Departure Building → Tunnel under Departure → Launch Tower is an example route. Change the locations order depending on where you spawn and where you plan to extract.
Blue Gate Weapon Case Locations
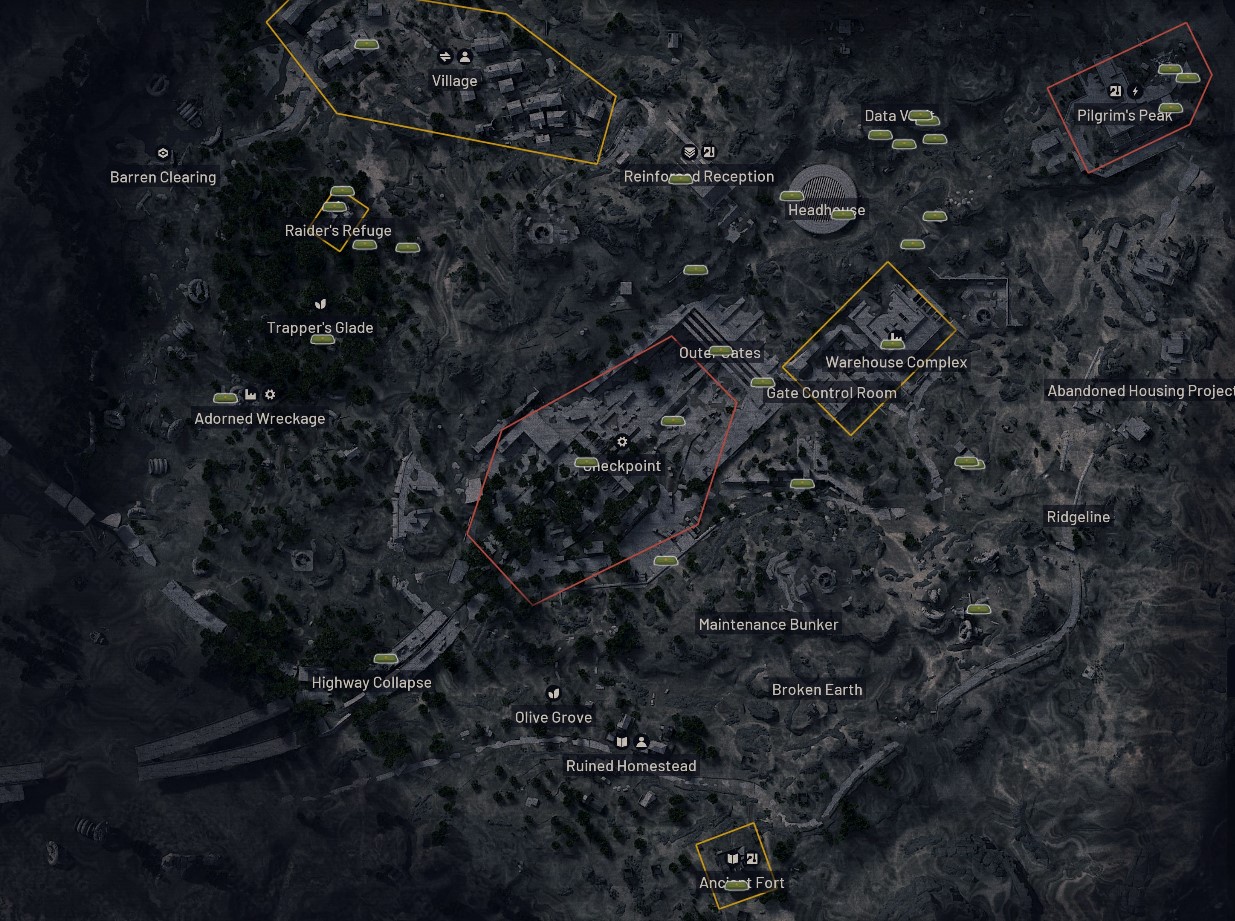
Blue Gate’s weapon cases are hidden in House basements, ledges, trucks, and rooftops, essentially in places where you’d expect them to be. The spawns might be better hidden and harder to learn than the Spaceports’, but once you know the exact props to inspect, it becomes much easier to get great value from your raids.
|
Location |
Weapon Case Spots |
|---|---|
|
Raider’s Refuge area |
Raider’s Refuge upper church area: check by the bedroll on the top of the building. Raider’s Refuge basement puzzle room: after opening the door via puzzle, inspect the bed inside. House east of Raider’s Refuge: jump into the basement and check the northmost corner. |
|
Village |
Village locked room: inspect the shelf once opened. |
|
Checkpoint / tunnel approach |
Checkpoint bus: go to the back of the bus. Sofa near the zipline on the way to the tunnel: inspect around the sofa platform. |
|
Tunnel area |
Tunnel side room under the staircase: go right after entering and check beneath the stairs. Red puzzle room in the tunnel: complete the room and inspect the interior spawn. Breach room in the heavy PvP tunnel area: inside, check the loot room with the lockers and breaches. Northeast end of the tunnel: go all the way to the back and inspect the dead end. Northwest end of the tunnel: do the same on the opposite side. Locked patrol vehicle in the tunnel area: find the active locked truck for that raid and check inside with the patrol car key. |
|
Reinforced Reception |
Inspect the ribbed wall section where the case tucks into the structure. |
|
Headhouse |
Northwest ledge: check the outer rim ledge. Southeast ledge: inspect the opposite rim as well. |
|
Warehouse Complex / twin zipline entrance |
Warehouse Complex middle rafter: go to the end of the central walkway. Twin zipline entrance tunnel spot: one case can sit on top of the vents. Same entrance area: the second can sit on top of the pipes. |
|
Pilgrim’s Peak |
Locked room: inspect the room interior once opened. |
|
Ancient Fort |
Puzzle room: after solving the fuel-cell puzzle, inspect the opened room. |
|
Adorned Wreckage |
Top: climb the large machinery and check the top platform. |
Blue Gate has some of the most annoying spawns to learn at first, but it also rewards map knowledge more than almost any other location. A lot of players know the big breach room. Fewer players check every basement corner, ledge, vent top, or dead-end tunnel properly.
Stella Montis' Weapon Case Locations
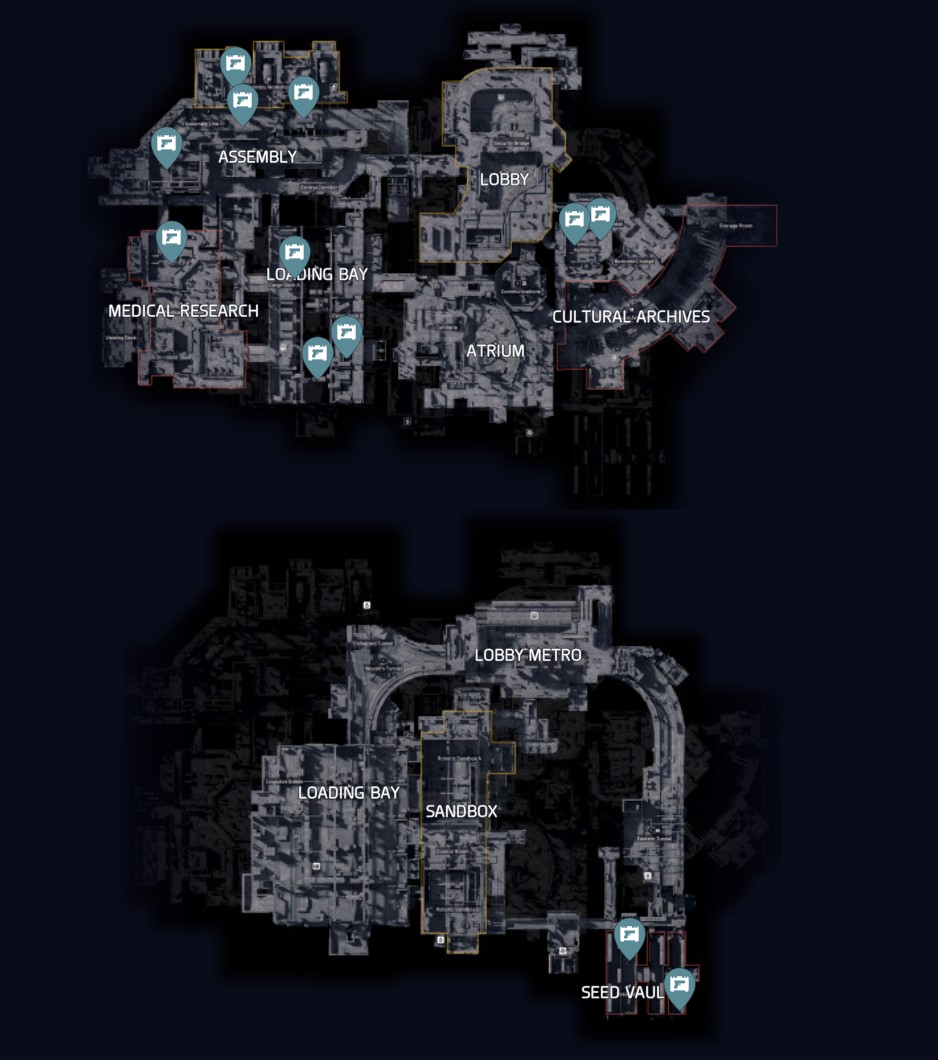
Stella Montis is more compact indoors, but the rooms are layered, and several of the best case spawns can shift inside the same POI.
|
Location |
Weapon Case Spots |
|---|---|
|
Assembly area |
Assembly thruster: jump into the thruster and inspect the insides. This area can even produce two cases at once in rare situations - they were looted in my experience, though. Room north of Assembly: go to the second floor and check by the pillar. |
|
Medical Research |
Servers: inspect the top of the red server stack. I see a case there every game, often unlooted. Locked room: check the corner inside. |
|
Loading Bay / Cargo Dock A |
Loading Bay south side: inspect the top of the container. Cargo Dock A side: check the insides of the white container. |
|
Atrium / Communications |
Atrium cafeteria kitchen: inspect the corner inside the kitchen. Communications: go up one floor in the dark central room and check under the staircases around the pillar. |
|
Auditorium / Security Bridge |
Auditorium: this room has several possible weapon case placements. Check behind the teacher’s desk, in front of it, under the table, and along the walls. On rare occasions, several crates may spawn back-to-back. Security Bridge top: inspect the upper side first. Far side of the bridge: after crossing, check to the right of the chair. Security room, lower level: inspect the bottom of the staircase. |
|
Seed Vault |
This POI has multiple placements. After opening it with a Fuel Cell, check the left side, central lane, right side, and the nearby floor spots instead of treating it as one single spawn. |
|
Sandbox |
Look in the middle of the sand near the shredder. |
|
Control-room lift pipe route |
Ride up and inspect the pipe-side spawn point. It’s tricky to jump into, but the loot if well worth it in my experience. |
|
Storage room |
Locked by key: inspect the room interior. |
|
Metro Station |
Lobby: thoroughly check the lobby floor, it’s pretty easy to miss. |
Find more ARC Raiders guides here:
