
Hall of Thanes Guide TL;DR
-
Hall of Thanes is tuned for levels 13–18, so entering around level 15 makes the later Dark Iron packs much easier. to deal with
-
The dungeon has four bosses: Faldrim Anvilmar, Magmatus, Plunder, and Durgen Dirgehammer.
-
Collect all eight Dwarven Heirlooms before leaving. The final vault room has the highest number of them.
-
Hall of Thanes was built as an early Alliance dungeon, but Horde characters can enter it after making a rough trip through Ironforge.
Starting fresh in WoW Forever? You can get WoW Forever Gold on Playhub, with competitive prices and quick delivery from verified sellers.
What Is Hall of Thanes in WoW Forever?
Hall of Thanes is a new early-game dungeon hidden beneath the High Seat of Ironforge. For decades, Old Ironforge was little more than sealed-off scenery - Forever finally opens its doors and turns the royal burial chambers below the city into a five-player instance.
The story is typical for the region: Dark Iron Dwarves have broken into the tombs looking for relics, disturbing several dead dwarven rulers in the process. The first part of the dungeon is filled with easier ghosts, and the second half shifts towards the group fighting Dark Iron packs, fire elementals, and stone golems. Blizzard officially lists Hall of Thanes as a level 13–18 dungeon, making it the Alliance-side alternative to Ragefire Chasm. It is not actually locked to Alliance characters, though most of its quests are.
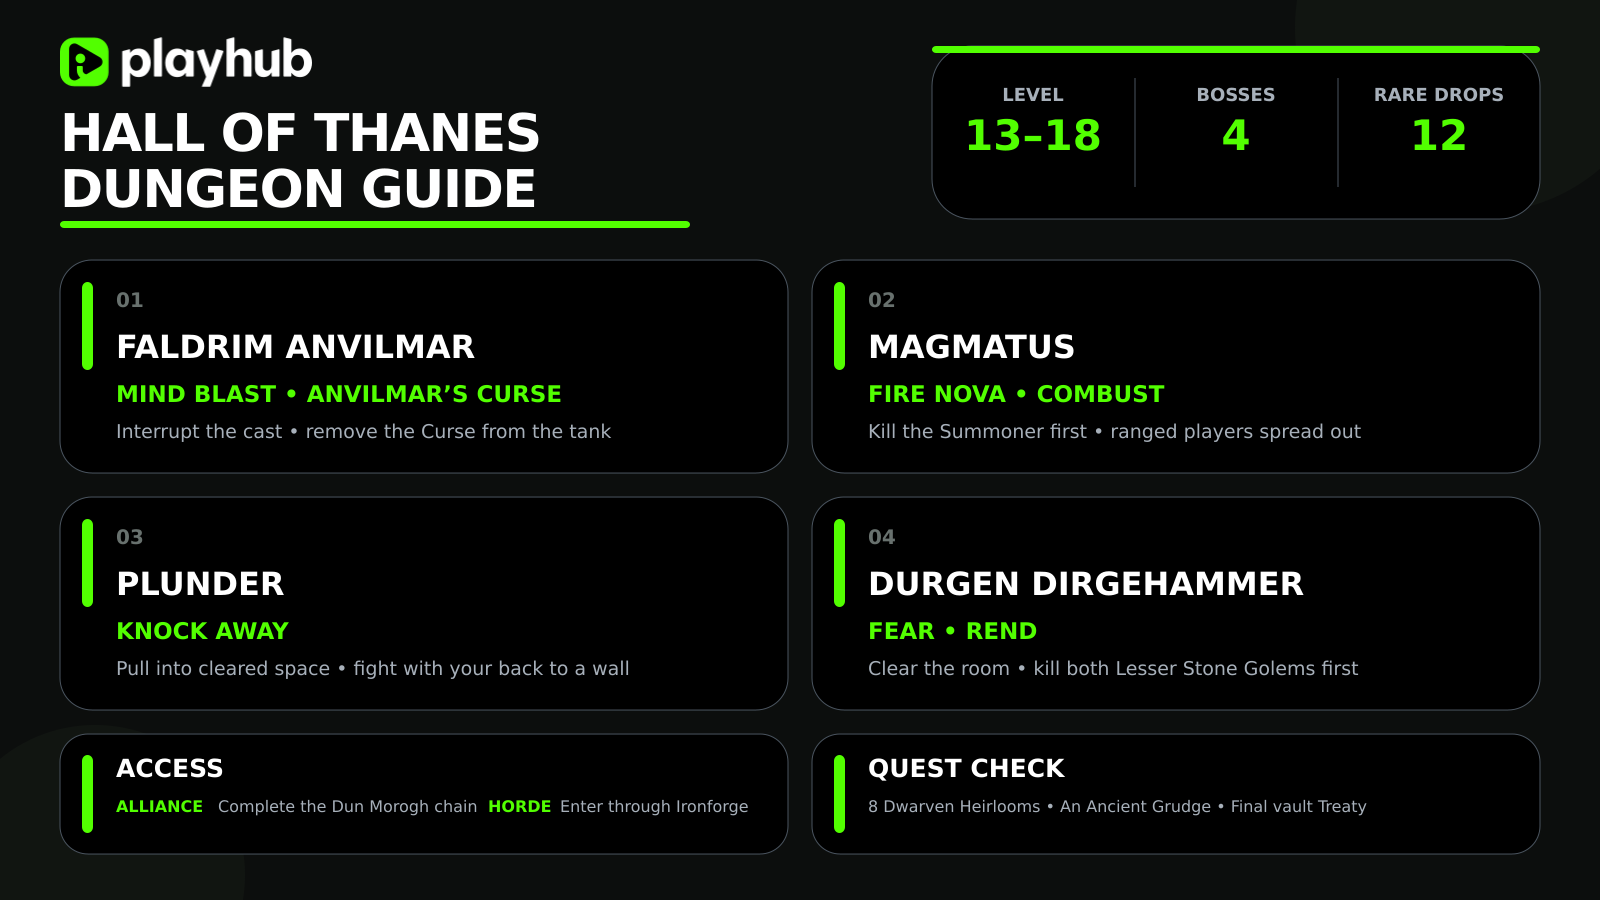
This is not a mechanically complicated dungeon - it’s tuned for newbies, but its later half enemies hit much harder than the entrance encounters suggest. Pulling two Dark Iron packs at once can turn a clean run into a wipe, so your tank and melee should be careful not to aggro trash.
How to Reach Hall of Thanes
Alliance players can reach the dungeon easily:
-
Go to the Great Forge, face the High Seat where King Magni stands, and enter the throne room.
-
Turn left almost immediately into the web-covered passage around 43.5, 52.0.
-
Follow the descending path through Old Ironforge until you reach the instance portal.
You’ll need to complete a quest chain in order to get access to the dungeon. Once you’re done with the quests, watch the ledges on the way down. The route runs beside open lava, and falling in is an annoying way to die and spend time coming back.
Horde players have a much worse trip; this dungeon is mostly designed for alliance-side, after all. The route runs from Hillsbrad through Arathi Highlands, Wetlands, Loch Modan, and Dun Morogh before entering Ironforge. From there, you still need to get through high-level city guards and reach the High Seat. Make sure to remove your gear before the corpse run to avoid durability damage, and bring the entire group together at once to have an easier time infiltrating the dungeon.
Personally, I don’t think the whole journey and trouble is worth it. It’s something you can choose to do for fun, but it's not efficient at all.
Hall of Thanes Quests
There are five quests total tied to the dungeon. Three are Alliance progression dungeon entry prerequisites, but Important Heirlooms and An Ancient Grudge are available to both factions inside the dungeon itself. Alliance players have to do the short Dun Morogh prerequisite for Old Ironforge Incursion before entering, since it rewards you with great weapons at the end.
|
Quest |
Where It Starts |
Objective |
Notable Reward |
|---|---|---|---|
|
Important Heirlooms |
Thom Filch in Old Ironforge |
Collect 8 Dwarven Heirlooms |
Dwarven Tome or Tomb Robber’s Gloves |
|
The Restless Dead |
Afadra Dunwall near the entrance |
Kill 15 Enraged Apparitions, 10 Tormented Souls, and Faldrim Anvilmar |
Dusty Belt or Cryptwalker Bracers |
|
Old Ironforge Incursion |
Earthseer Farsen after the Underground Map prerequisite |
Kill Durgen and loot his head |
Calibrated Blunderbuss, Ironforge Greathammer, or Deepblaze |
|
An Ancient Grudge |
Ghostly Attendant inside Anvilmar’s Rest |
Defeat Faldrim Anvilmar |
Catacomb Cloak |
|
The Treaty of Understanding |
Tablet inside a vault in the final room |
Deliver the treaty to King Magni |
Experience and faction reputation |
To unlock Old Ironforge Incursion, kill Dark Iron Dwarves around Gol’Bolar Quarry in southeastern Dun Morogh until one drops a Dark Iron Map. Turning in the Underground Map quest to Earthseer Farsen opens the dungeon follow-up quests.
The Dwarven Heirlooms are small clickable statuettes placed all around the dungeon. You start seeing them after Faldrim, but the Reliquary of Kings at the end contains enough for the whole party. Before leaving the final room, sweep the vaults and make sure everyone has eight.
Best Route Through Hall of Thanes
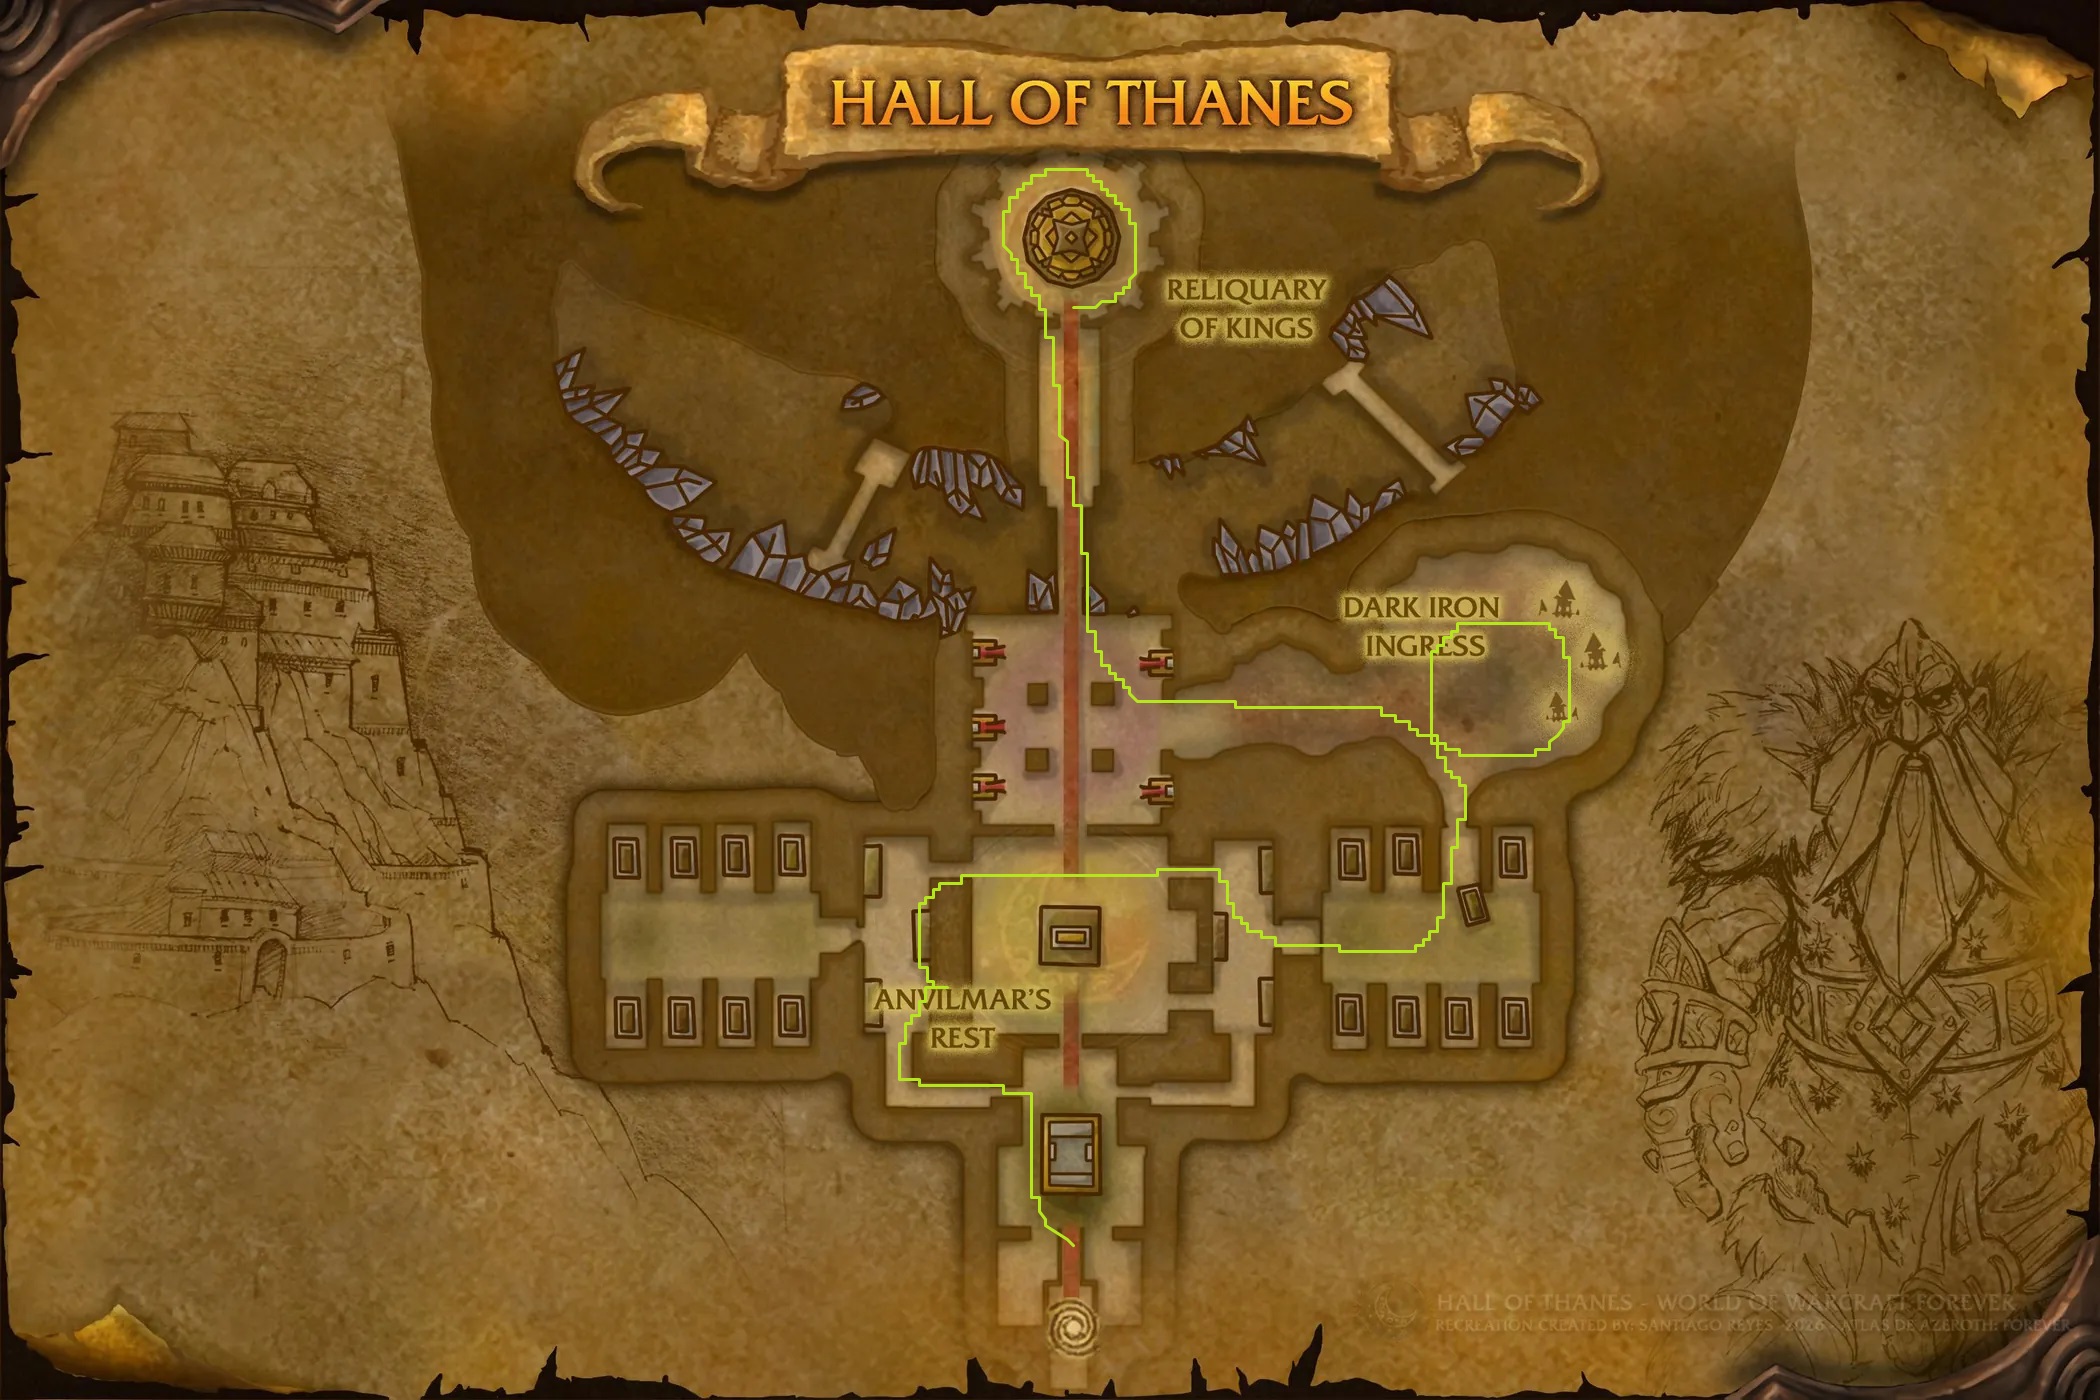
Hall of Thanes is linear, so there is no route puzzle or whatever here. The boss order is:
-
Faldrim Anvilmar
-
Magmatus
-
Plunder
-
Durgen Dirgehammer
Start by clearing the ghosts around Anvilmar’s Rest and taking the An Ancient Grudge quest from the Ghostly Attendant. After Faldrim, follow the southeastern passage into the Dark Iron section. The tunnel leads through Magmatus’s cavern, back into the constructed halls for Plunder, and finally across the bridge into the Reliquary of Kings.
After Durgen’s down, search the vaults for the Treaty of Understanding and any remaining Dwarven Heirlooms. One of the vaults also contains a lever that opens a shortcut back toward the first boss area, so you don’t need to backtrack. A complete community map is also available in the Hall of Thanes route guide.
Hall of Thanes Trash Mobs
The opening ghosts are very tame. When Dark Iron enemies enter the mix, however, you’ll have to be careful to not pull extra packs - these are pretty powerful. Here are all the enemies you can expect to see:
-
Enraged Apparitions and Tormented Souls: Mostly straightforward undead enemies found near the entrance; kill enough of them to finish The Restless Dead during one run.
-
Dark Iron Looters: regular melee attackers, dangerous in number.
-
Bloodhound Runts: Apply Infected Wounds, a five-minute Disease that increases physical damage taken. Dwarves can clear it with Stoneform, and First Aid users can bring Simple Poultices to counteract the debuff.
-
Dark Iron Engineers: Throw dynamite at a location - move out.
-
Dark Iron Summoners: Cast Fireball and summon Fiery Assistants. Interrupt the summon or use a corner to break line of sight and force the caster to run into the group.
-
Lesser Stone Golems: These move quickly and hit hard for this level. Pull them one at a time when possible, then stun and focus them before dealing with weaker enemies.
You will also find Seaforium Blasting Powder kegs beside several Dark Iron packs. Ranged players can shoot the barrels before the pull to soften up nearby enemies, since not only do they deal damage, but also apply a -20% attack and cast speed debuff called Anvilmar’s Curse.
Hall of Thanes Boss Guide
Faldrim Anvilmar
Faldrim patrols around the central tomb in Anvilmar’s Rest. I think it’s best to just clear one side of the room and meet him there to not have any annoying ghosts interrupting your fight. Faldrim uses two named abilities:
-
Mind Blast: A direct spell attack that can be interrupted.
-
Anvilmar’s Curse: A ten-minute Curse that reduces attack and casting speed by 20%, while also making the target immune to Poisons and Bleeds.
Interrupt Mind Blast and remove Anvilmar’s Curse if your group has a decurse. The Curse is not immediately lethal, but leaving it on the tank slows threat generation and can make the dungeon feel harder than it really is.
Magmatus
Magmatus is a fire elemental accompanied by a Dark Iron Summoner. The add matters more than the boss during the opening seconds, so the tank should aggro both enemies while the group kills the Summoner first. If its summon completes(which really shouldn’t), deal with the Fiery Assistant before returning to Magmatus. Magmatus uses:
-
Fire Nova: Periodic Fire damage around the boss.
-
Combust: A burn placed on a random player that deals DOT Fire damage over several seconds.
Ranged players have no reason to stand beside the elemental. Spread outside Fire Nova range to leave the healer fewer targets to heal. Melee characters can’t avoid every pulse, so watch your health and maybe use a potion if Combust lands on you while the group is already low. The boss is not difficult once the Summoner dies, but keeping both enemies alive creates more incoming damage than many level-appropriate healers can comfortably handle.
Plunder
Plunder is a stone golem patrolling the hallway before the final bridge. His ability list is basically non-existent, but the room itself turns it into a real threat:
-
Knock Away: Knocks the target backward and can throw players into untouched packs.
Do not fight Plunder wherever the patrol happens to meet you. Pull him back into cleared space, then have the tank and melee players stand with their backs close to a wall. Ranged players should keep their distance and avoid lining up with remaining enemies. Once the knockback cannot add another pack, Plunder becomes one of the easiest bosses in the dungeon.
Durgen Dirgehammer
Durgen waits in the Reliquary of Kings with two Lesser Stone Golems beside him and Dark Iron Looters scattered around the edge of the chamber. Before the fight starts, clear every Looter you can without pulling the boss. Durgen’s Fear will otherwise send players directly into them, creating a very bad situation that could result in a wipe. His ability list includes:
-
Fear: An area fear that scatters nearby party members for several seconds.
-
Rend: A physical damage-over-time effect placed on the tank.
When the fight begins, focus down one Lesser Stone Golem and then the other. Splitting damage leaves all three enemies alive longer than you’d want and forces your healer to spend mana and track health bars for too long. A Shaman can place a Tremor Totem before the pull to break Fear, but any group can manage the ability if the room has already been cleared.
Keep the tank healthy through Rend casts, use stuns on the golems, and save damage cooldowns for the point in time when both adds are dead. There is also what seems to be a bug in this encounter: if the group wipes after killing one golem, that golem does not return for the next boss attempt. I would definitely rather try to go for a clean kill, but there’s that loophole if your group struggles with the boss.
Hall of Thanes Loot Table
Hall of Thanes currently has 12 rare boss drops. The items require you to be level 13 to be used and sit at item level 18, so several can last well beyond the dungeon’s intended range. Mail users receive the largest share, but casters, leather classes, and physical damage dealers all have at least one worthwhile target.
|
Boss |
Rewards and Item Types |
|---|---|
|
Faldrim Anvilmar |
Aetherwisp Bracers - cloth wrist armor; Spiritwraith Drape - Agility/Spirit cloak; Ephemeral Choker - Stamina/Spirit necklace |
|
Magmatus |
Flamefist Grips - leather hand armor; Kindlegem Girdle - mail waist armor; Fang of Magmatus - spell-power dagger |
|
Plunder |
Golemguard Chest - mail body armor; Treads of the Protector Golem - mail foot armor; Golemheart Stave - spell-power staff |
|
Durgen Dirgehammer |
Robes of the Disgraced Thane - cloth body armor; Direhammer Leggings - leather leg armor; Durgen’s Crescent Axe - one-handed Strength/Agility axe |
I think that the rare weapon drops are a great reason to repeat the dungeon. Fang of Magmatus gives casters a rare early dagger option, and Golemheart Stave fills the more traditional two-handed caster slot. Durgen’s Crescent Axe is the biggest prize for physical classes, and on its own can easily justify another clear if you leave empty-handed the first time.
I also like how the loot matches the dungeon’s level and gets you a bunch of early gear that’ll empower your character a lot. Add the guaranteed weapons from the Old Ironforge Incursion quest, and a single full dungeon+quests run can replace a large part of a fresh character’s gear, letting you breeze through at least a couple of levels worth of questing.
Check out other helpful WoW Forever articles: