
MW4 DMZ Traits TL;DR
-
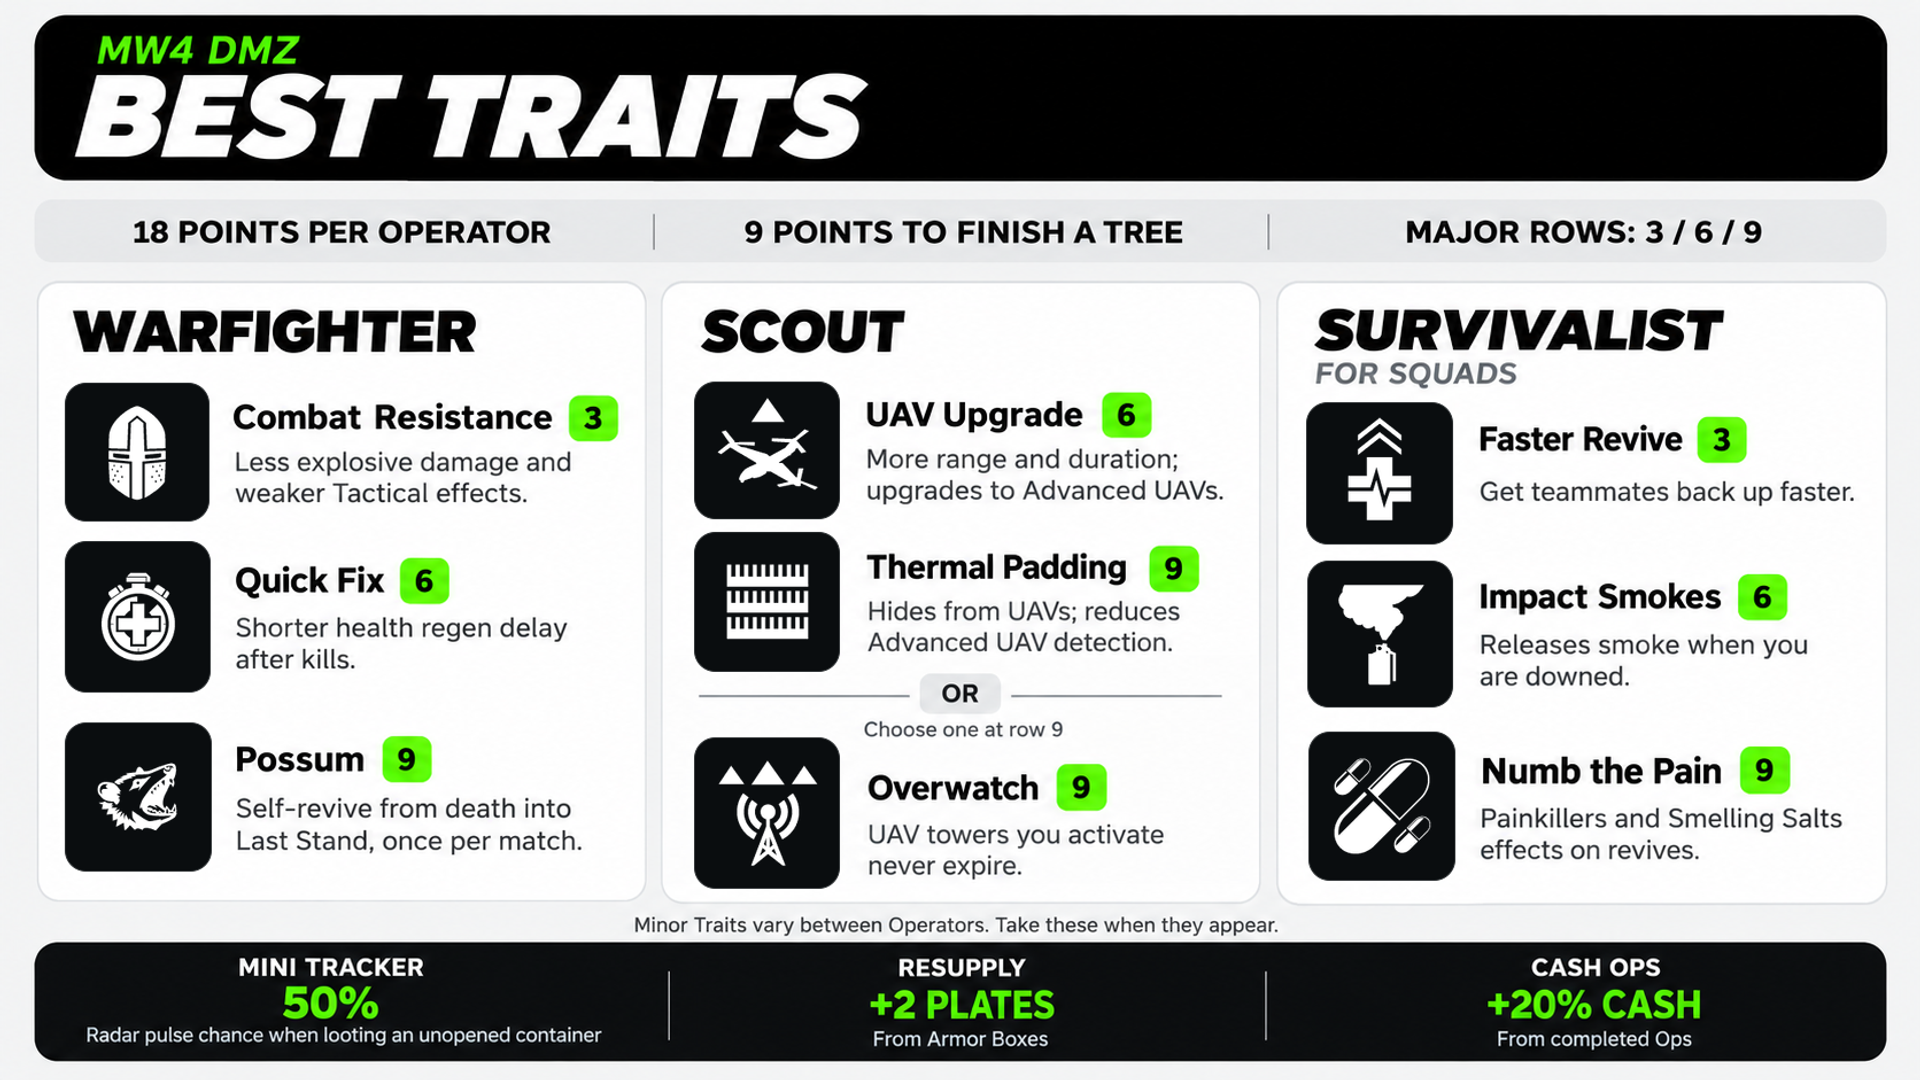
18 Trait Points per Operator let you finish two trees or split points between all three.
-
Major Traits are fixed choices at 3, 6, and 9 points in each tree. Minor Traits vary between Operators.
-
Quick Fix and Possum are my main Warfighter picks; Thermal Padding or Overwatch decides how I finish Scout.
-
For squads, Faster Revive, Impact Smokes, and Numb the Pain make Survivalist worth considering. Solo players get more from its other choices.
Have some skins you weren't able to get? You can buy stacked Call of Duty accounts on Playhub with lots of legacy rewards - all delivered safely and quickly.
How Trait Points Work in MW4 DMZ
Trait Points belong to the Operator you’re leveling. Their Dog Tag progression awards them, separately from your overall DMZ player level, and a fully leveled Operator reaches Onyx III with 18 points. A fresh recruit has to earn their own points, so switching characters also means checking which Traits you’re taking into the raid.
Each tree takes nine points to finish, with one pick per row. The important choices are the Major pairs in rows three, six, and nine. Picking Quick Fix, for example, closes off Viper Sense on that Operator’s current tree. The official FOB guide explains the progression and confirms that you can’t freely substitute a Trait after choosing it.
|
Point split |
What you get |
|---|---|
|
9 / 9 / 0 |
Two completed trees, including two final Major picks |
|
9 / 6 / 3 |
One final Major pick and earlier Majors from all three trees |
|
6 / 6 / 6 |
The first two Major choices in every tree |
Spreading points evenly costs you every final Major pick. For a combat build, losing Possum and Thermal Padding is too much to give up just to reach the middle of all three trees. The 9/6/3 farming build below makes a more deliberate trade: it keeps one final pick and adds earlier survival bonuses.
As you can see, my recommendation definitely would be investing heavily in Warfighter and Scout, with Quick Fix, Possum, Container Looter, and Thermal Padding doing most of the work in your regular combat-oriented build. You get extra recovery between fights, another life after getting killed(which is broken in any Extraction game), and some protection from enemy UAVs detection. If you’re playing in a squad, though, you can get more from Overwatch and Survivalist since info and revivals are important in that sort of gameplay.
Best Warfighter Traits
Warfighter is simply too good to not invest in every time. Quick Fix helps between kills, healing you with player and NPC takedowns, and Possum can save an Operator who would otherwise be finished, but with some caveat as to when to use it since you’ll have to revive yourself still.
|
Points in Warfighter |
Best pick |
Alternative |
|---|---|---|
|
3 |
Combat Resistance |
Equipment Professional for replenishing equipped Lethals and Tacticals |
|
6 |
Quick Fix |
Viper Sense |
|
9 |
Possum |
Adaptive Restock for an extra item from killed AI hostiles |
Quick Fix is useful because AI kills count for it. You’re just being topped off at all times much faster than your enemies are. Possum lets you self-revive from death into Last Stand at maximum health once per match. That is a huge benefit for a solo Operator, and even more useful when the rest of your squad can get the enemy's attention and cover your self-revive. It can be outplayed using mines and by just camping the body, but not a lot of people are doing it right now, and the perk will probably get nerfed later in the game’s lifecycle.
Adaptive Restock suits an Operator used to do PvE and gather supplies. On an expensive kit, I’m definitely taking Possum. Extra item per hostile is tempting, but I care more about surviving the deployment rather than hoarding stuff you’ll lose anyway running bad traits.
Best Scout Traits
Scout has the strongest choices for controlling how much information you and the enemy have. Thermal Padding helps you move without appearing on ordinary UAV scans; Overwatch helps your squad hold an area with a tower running. You have to choose between them, so this is where you decide based on whether you play with squadmates or solo.
|
Points in Scout |
Best pick |
Alternative |
|---|---|---|
|
3 |
Container Looter |
Hostile Looter when the plan involves killing lots of AI for ingredients |
|
6 |
UAV Upgrade |
Field Crafting for a dedicated looting and crafting Operator |
|
9 |
Thermal Padding |
Overwatch when the squad intends to use UAV towers |
Container Looter gets my default vote because searching containers is already a huge part of almost every deployment. Hostile Looter instead gives killed hostiles a chance to drop Printer ingredients. That’s a reasonable swap for Compound clears and other AI-heavy runs, but you’re more likely to avoid heavy PvE fights and just loot containers most of the time.
UAV Upgrade increases UAV range and duration and upgrades them to Advanced UAVs. I’d take it on the player who regularly brings UAVs for the squad. Field Crafting sounds way weaker and situational, so I wouldn’t say it’s worth the points.
Thermal Padding is non-debatable if you’re solo. Its effect hides you from UAVs and reduces an Advanced UAV’s detection to ordinary UAV detection level. Overwatch keeps UAV towers you activate from expiring, which is decent for a squad looting around a specific POI.
Best Survivalist Traits
Survivalist changes the most depending on who you play with. Faster Revive and Numb the Pain are attractive when teammates can pick each other up, while Consumable Duration and Die Hard make more sense for an Operator who often deploys alone. I wouldn’t copy a squad support build onto a solo Operator just because both builds are called “survival.”
|
Points in Survivalist |
Solo recommendation |
Squad recommendation |
|---|---|---|
|
3 |
Consumable Duration |
Faster Revive |
|
6 |
Free Revive |
Impact Smokes |
|
9 |
Die Hard |
Numb the Pain |
Free Revive automatically repairs the first Wound you get. The name makes it sound like a second Possum, but the benefit you’re buying is Wound recovery. Keep medical supplies for later Wounds; this only covers the first one.
Impact Smokes releases smoke when you’re downed. It’s useful when a teammate needs cover to reach you, particularly after a fight spills into a road or courtyard. The smoke doesn’t remove the enemy’s last known position on you, so a teammate should still expect shots or explosives through it.
Numb the Pain applies Painkillers and Smelling Salts effects on revives, which is definitely not something that’s going to be super useful every game. Die Hard instead gives infinite bleed-out time in Last Stand and automatically calls an exfil when you approach one while downed. For a solo run, that can leave an escape attempt open after a fight you couldn’t win, but it’s also extremely niche. Take the first if you’re a squad player and the latter if you’re running solo.
Best Minor Traits to Take
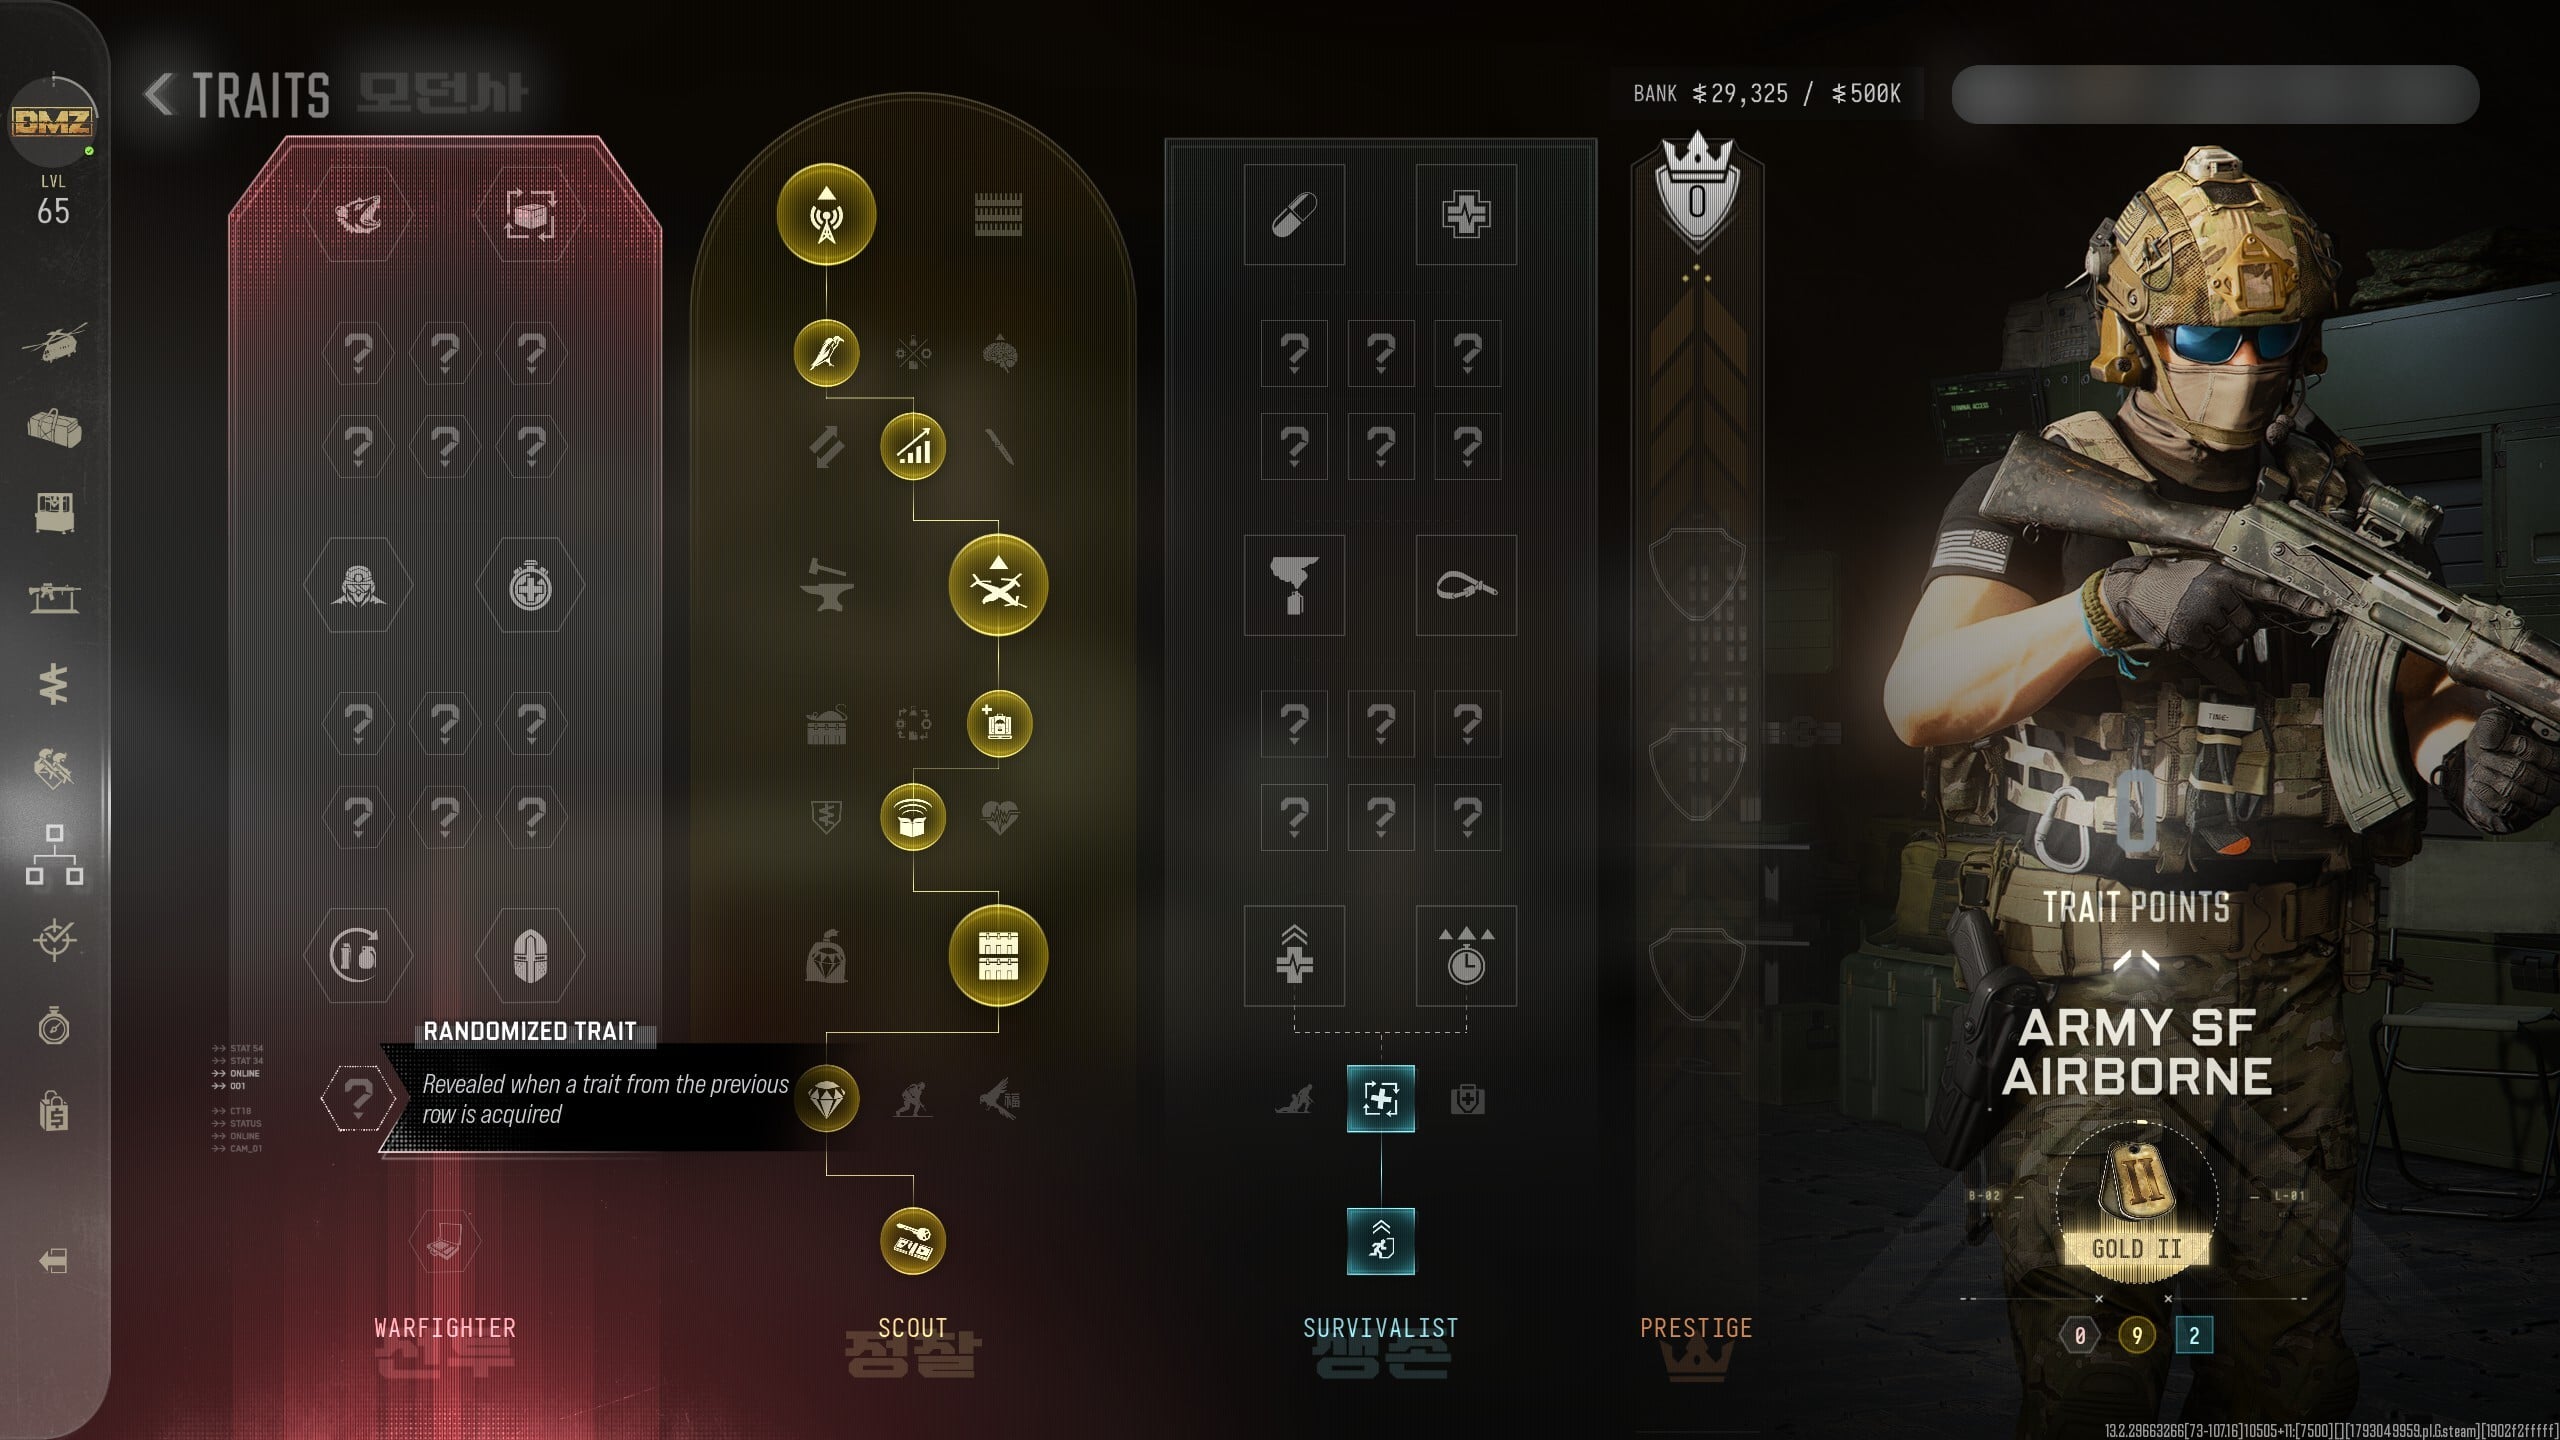
Your Minor rows won’t match somebody else’s screenshot since they’re generated somewhat randomly. Even the starting pick can differ, and some Minors appear in several different trees, so you’ll need to choose between your own rolls along the way. These are the ones I look for in my builds:
|
Minor Trait |
Bonus |
|---|---|
|
Plate Speed |
Faster Armor Plate insertion |
|
Metabolism |
Slowly restores health lost through a Tourniquet |
|
Mini Tracker |
50% chance of a radar pulse when looting an unopened container |
|
Ammo Scavenger |
Double ammunition from ammo packs |
|
Resupply |
Armor Boxes give two extra plates |
|
Cash Ops |
20% more Cash from completed Ops |
Stuff like Plate Speed is the sort of bonus I’d take over a small economic gain on any Operator. Getting a plate in before someone reaches your doorway can decide the fight more times than you’d imagine. On a farming Operator, Cash Ops is more attractive, but only if you’re completing Ops rather than spending the whole deployment searching locked rooms.
Best Trait Builds for Solo, PvP, and Looting
There are my recommended Major combinations. Fill the Minor rows with the best choices your Operator gets.
|
Build |
Warfighter |
Scout |
Survivalist |
|---|---|---|---|
|
PvP |
9: Combat Resistance, Quick Fix, Possum |
9: Container Looter, UAV Upgrade, Thermal Padding |
0 |
|
Solo survival |
9: Equipment Professional, Quick Fix, Possum |
0 |
9: Consumable Duration, Free Revive, Die Hard |
|
Squad support |
0 |
9: Container Looter, UAV Upgrade, Overwatch |
9: Faster Revive, Impact Smokes, Numb the Pain |
|
Looting and Orders |
3: Combat Resistance |
9: Container Looter, Field Crafting, Thermal Padding |
6: Consumable Duration, Free Revive |
The PvP build is best if you want one Operator for all situations. Solo survival gives up Scout’s loot and UAV benefits for more recovery options. That’s a serious trade-off, especially if UAV detection is what keeps getting you killed; in that case, I’d keep Scout and Warfighter instead.
Can You Reset Traits in MW4 DMZ?
There’s no normal respec button for swapping a Trait you’ve already picked. Operator Prestige resets the regular trees and awards a permanent Prestige Trait, so that’s your only choice. Prestige Traits are randomly awarded, with up to three permanent Traits, so it’s worth it to just grind one operator to get an uber operative.
Check out other helpful MW4 articles here:
